What's new
Van's Air Force

Don't miss anything! Register now for full access to the definitive RV support community.

Show us your panel !!!!!

RV_7A

Well Known Member
I working on my panel and am wanting ideas on the layout. I'm using mostly analog instruments such as Altimeter, Vertical Speed, Air Speed, Compass, Turn Coordinator. Typical analong engine mangement gauges and a SL-40 comm and GTX-320A transponder. That about all for now going in my panel.

Everything else is going underneath the panel like switches, trim indicator, ELT control, Audio jacks, heat control.

If you have pics or can take a picture of your panel please post it here or send it to me and I can host and post it for you.
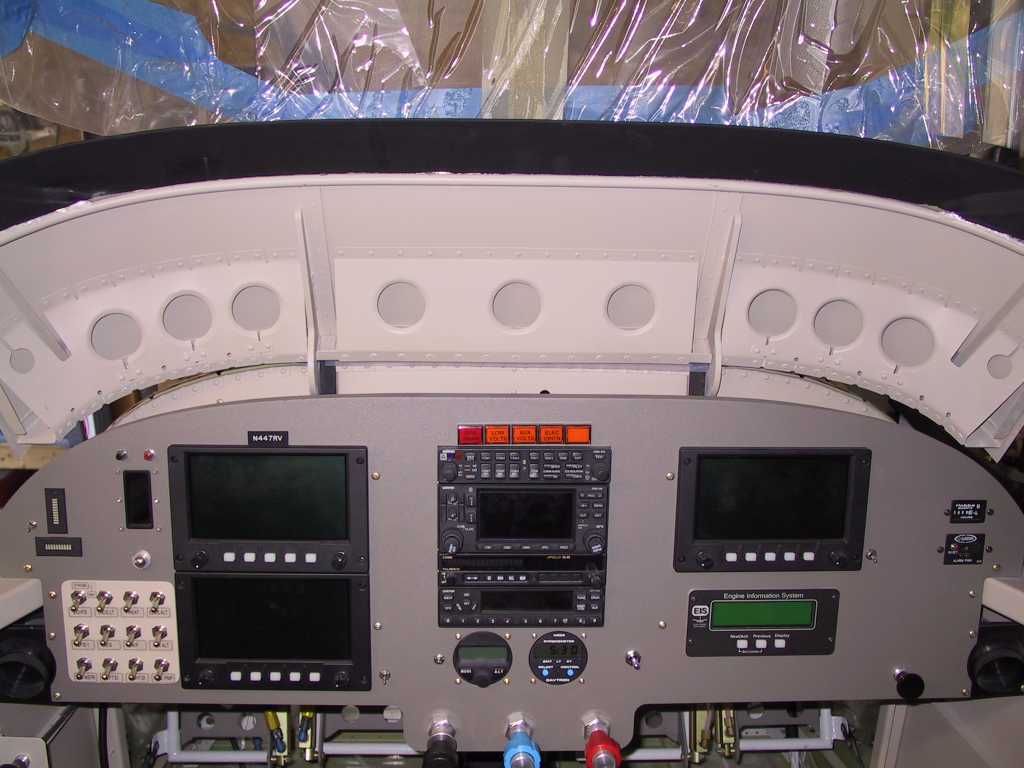
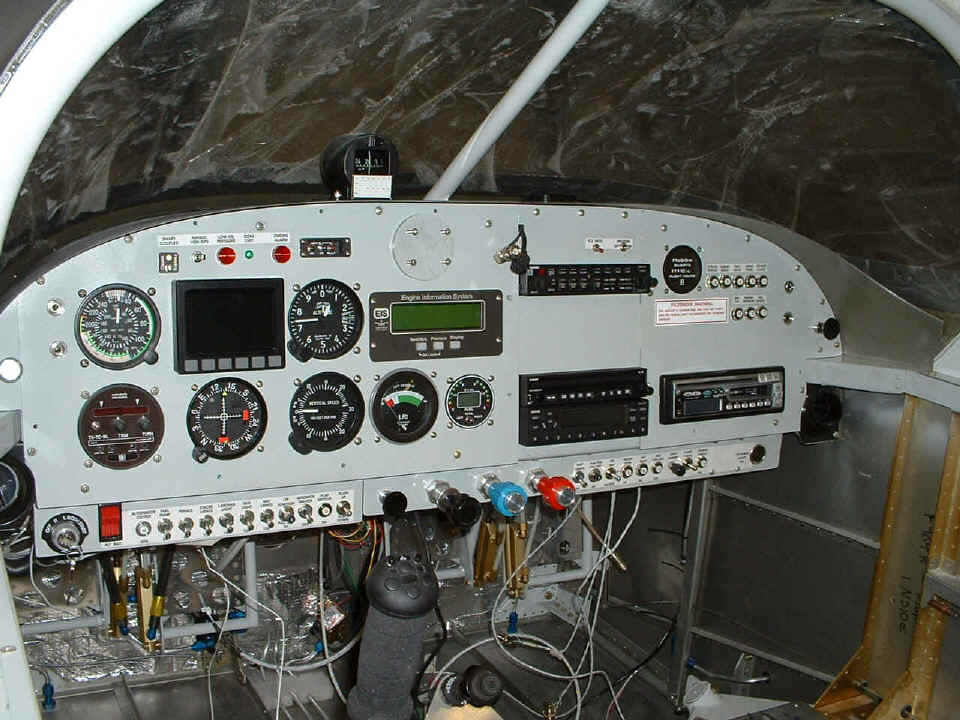
 
Here's mine almost finished....

Night VFR...
dsc001208jq.jpg
 
This is Jon Bakers panel.

"The interesting points are the use of the Piper Arrow quadrant and switch panel, and the small Mitchell engine guages.

My goal was to keep all my instruments in front of me and also to have room for a glove box and and a stereo.

The radio is stack is Garmin (430, 340, 320). The blank on the left is for the Garmin CDI which I still need to buy but can never seem to justify.

Jon Baker
RV6A N883TT "


N883TT_Panel.jpg
 
Here's mine. Steam gages, KMD150, SL40, SL70, PM3000 and a mix of EI and Van's gages. Basically a nite VFR..

Roberta

panelin10dc.jpg
 
Last edited:
OK..... it's not mine, and it's not a -7, but it's very cool :) If you can do this in an -8, just imagine what you could all stuff in a -7's panel :)


n661dm-5492.jpg
 
Good grief! Is that thing flying to Jupiter?

Steve Zicree
RV4 finishing (with earthly flights in mind)
 
I was hoping more people would post pics of their dash so I'll add mine. Well its not the dash of my RV-7 but it is what I plan to have on my yet to be completed RV-7. Its a 4 screen Grand rapids EFIS with a Dynon as a backup. The radio stack is all Garmin with a GMA 340 audio panel, SL 30 Nav/Com, SL 40 Com and GTX 330 transponder.

Edit: For some reason I could not upload my pic. But this is what I'm getting anyway.
 
Last edited:
Ed, email it to me and I can post it.

This panel is owned by Pete James. Check out the center console. Very cool! I was wondering when someone was going to do this.

Pete%20James%20Panel.jpg
 
robertahegy said:
Here's mine. Steam gages, KMD150, SL40, SL70, PM3000 and a mix of EI and Van's gages. Basically a nite VFR..

Roberta
Roberta:

Awesome panel. How do you like the KMD150? Also, there's a rib directly in front of the pilot behind the panel on the -7 tip-up (sorry, don't know the part# because I haven't gotten there yet!), but is your 6-pack a little off-center to deal with the rib or did you modify it? If it's off-center, does it bother you?

- Jamie, just thinking ahead here.
 
Pete James Console

Whoever, posted my RV-7 Panel with its' curved throttle console; thanks for the effort. I couldn't post the picture, I think because I have a Mac.

I made the console from two Canopy roll frames that I missed drilled.

If any one wants the constrcution details email me. I can also supply a Fiber glass, Kevlar or Carbon cover for the unit.

Keep riveting.

Pete.
 
Thank you, Jamie!! I absolutely love the KMD150. It is the best VFR GPS I have ever used. Easy and very informative. It also can be coupled directly to autopilots (I do not have one installed) and needs no separate interface. It is short and will fit between the panel and subpanel, so you do not need to cut a through hole in the subpanel for it. That allows you to leave the canopy release mechanism intact. I just needed to cut some of the HIHAT section below the mechanism for the SL40 and SL70. And it has its own cooling fan. My SL70 and SL40 did not need the cooling fans, so I did not have to add extra cooling equipment.

The gages stradle the stock rib confirguration and seem quite normal in placement. I set the AI and DG as close the the rib as possible and mounted the others spacing them so they were all symetrical. This basically placed the AI and DG right in front.

The key to a good looking panel is just plan it out as to what you want, then lay it out so things look organized and balanced. The 6 pack concept was laid out as most gyro panels are, giving you the typical T scan configuration. I just set the major components where they were needed most and set the other less used things where room permitted. The depth and the ribs in the RV panel do pose some problems, but with planning and/or some modification, many great panels have been installed.

Hope this answers your questions,

Roberta
 
This is I think a fairly recent pic of Walter Tondu's panel (hope he doesn't mind me posting it for him):

Img_5172.jpg
 
Davepar said:
This is I think a fairly recent pic of Walter Tondu's panel (hope he doesn't mind me posting it for him):


Imagine my surprise when I'm just browsing along and I see this panel that looks very much like mine... HEY! Who copied my panel? Wait a second. LOL.

http://rv7-a.com
Close to engine start.
 
A few people have emailed asking about the peice I used below my panel for switches and such. It was the support peice that came with my QB. It was easy to just plate nut to the bottom of the original panel.
subpanel.JPG
 
Panel

OK, K, didn't want to show you up, but you forced my hand!! One extreme to the other, huh! Sorry the switches aren't in, only picture I had here!
BB
panel18rz.jpg
 
ACS2002 to AF2500

Kahuna, be sure to snag the latest software download which will convert your ACS2002 into an AF2500. Way cool stuff...percent HP or actual HP, etc.

)_( Dan
RV-7 N714D
http://www.rvproject.com
 
Panel maniacs Unite!

I sent Jeff B a panel pic for N247DE. Thanks for hosting it Jeff! I still have quite a bit of room on the right side of the panel. I'm thinking about a microwave oven or play station for those long X countries.

Walter, you should bronze your panel dude! It looks like it belongs in a 777. "That one goes to 11 !"

Jeff
 
Roberta thanks Buddy. The panel is one of the reasons I wanted to build another plane. I know, would have been easier to just build another panel in the 6, but... well I wanted that 6 banger anyways.

Sharpie, thanks for the heads up on the new software. Seems I knew nothing about it.

Barefoot Billy, I hope you have sunglasses for your PAX cause that yellow is BRIGHT man.

Kahuna
S8 Painting the fuse next week
 
JCN247DE said:
Walter, you should bronze your panel dude! It looks like it belongs in a 777. "That one goes to 11 !"

Jeff

Well I can't take all the credit. Fabian Lefler at Affordable Panels helped tremendously on the layout. I told him what I wanted and approximately where I wanted it and he did the layout with the proper geometries, dimensions, etc. And of course I couldn't have done it without looking at what Dan C. did and used his ideas about moving the ribs behind the panel in order to get the displays exactly in front/center of the pilot and copilot. In fact I probably stole most of the ideas. That's what is great about building your own. In the end, it's a compilation of great ideas from great people. If I had built this panel two years earlier it would have been all steam guages, very familiar. Just wait two more years and see what folks are putting in their panels then, Holy Moly. I can't wait to fly this thing. I hope many of you will be able to attend this weekend's Planes of Fame airshow at Chino AND Dan's link with more info. You'll be able to see my panel first hand (and all the mistakes I made too).
 
Last edited:
Day/Night IFR panel for "Enterprise" RV-9A N2PZ.

This is the last picture of the panel with everything in it or ON it, except for my Garmin GPS 296. It connects to the Smart Coupler in the NavAid Devices wing leveler. The large blank panel in the radio stack is reserved for a GNS 480 IFR-approved GPS with WAAS when my budget will allow it. A Garmin AT SL-30 provides the IFR part of the panel for now. A Dynon D-10A is backed up by Van's altimeter, airspeed, and vertical speed air gauges. The switch panels are made from scrap 0.063" aluminum cut from the original Van's panel when I was making large "window" openings for the instruments to pass through it. The in-flight entertainment for the passenger is a Sanyo Tape/CD player combo unit routed through the Garmin GMA 340 audio panel.

I built this modular panel myself from a surplus road sign, 0.075" thick aluminum that measured 36" x 36". The original Van's panel serves as the back-up frame behind the panels that supports it all and the aluminum angles that became the mounting rails for the radio stack. I still have some labels to create, but it is all coming down to the airworthiness inspection scheduled for June 8, 2005.

DSCL0218.JPG

DSCK0365.JPG


Jerry K. Thorne
East Ridge, TN
RV-9A N2PZ
www.n2prise.org
 
Last edited:
Bob Collins said:
Man, looking at some of these panels, it's clear there should be a "how to print money" in the builder's tips section.

I was thinking the same thing; are these RVs or Space Shuttles?? Holy cow... most of that stuff is just too rich for me.
 
My low budget pannel plan is almost the exact same equipment at redbeardmark's. I may use the Dynon EIS though. Nice simple setup there!
 
Here's a sweet panel!

Here is an AWESOME panel. I took this photo at the recent Texas RV Fly-In. I need to go find the tail number of the plane, to give proper credit...

nice7si.jpg
 
Flush mounting radio stack

My panel will include a BMA EFIS Sport, EFIS Lite, AF 2500 and a mostly Garmin radio stack.
The EFIS Sport and the AF 2500 extend out from the panel about 1/8 of an inch. I plan on making a bracked to mount the EFIS Lite so that it also mount about 1/8 inch from the panel surface. The round gages all fit behind the panel.
Now my question. The radio stack will stick out about 1/2 of an inch. All the pictures that I have seen on the internet, the radio all seem to be sticking out. Has anyone mounted their radio closer? This would seam to give a more modern appearance.

Kent Byerley
RV 9A 90322 N94KJ
 
Txaviator, Did you find the name of the builder of the molded panel? I'm interested in trying something like that. I like the idea of the radios and other displays pointing more toward the PIC. Perhaps someone else knows where I can find a blank like that?

Kev
 
Panel

For some reason the photos won't load. My panel is carbon fiber with the carbon 45 degree biased with four layers of cloth behind the carbon. No carbon to aluminum.

Garmin 340, 430, SL40, 330S, 106A CDI, Trutrak Digiflight II VSGS, Dynon, ACS engine monitor, Trutrak T&B, EXP Bus switch panel, Approach Systems wiring hub.

Anyone interested can email direct for photos. I have the carbon panel blanks available. They are not cheap but the cool factor is high!!!!

Darwin N. Barrie
RV7, a couple months away!!
 
All electric day/night vfr

Here is our version of a basic panel. The blanked out spot is for a Trio single axis autopilot.

panel.jpg


Mark Mercier.
 
I give up!!

I give up on trying to get the entire panel posted. Sorry for the attempts.

Darwin
 
Boy, that is tricky!

RV7Guy, It was tricky, but I think I figured it out for you. I presume you figured out to click the "get links" spot on the original image shack page. After that, you just copy and paste into the text window. Don't use the "insert image" button as it will just add an additional image tag that image shack has already included.

So, here's RV7Guy's panel:
 
Back
Top