What's new
Van's Air Force

Don't miss anything! Register now for full access to the definitive RV support community.

Tip: Cutting and Buffing Paint

DanH

Legacy Member
Mentor
So how do you get paint with a perfect surface? You sand, compound, and polish. It is not technically difficult. The hardest thing is finding the courage to pull the trigger on the sander after all the time and money you spent to get shiny new paint on there in the first place.....

What follows is my current favorite cut and buff process. There are variations in individual methods, and everyone's methods change as products develop. As a used car dealer I've been doing this sort of thing on and off for 30 years. Even so, this particular 3M system is new to me, and auto panels don't have rivet lines. More education and recreation! Refinements always welcome.

3M has a YouTube channel;

https://www.youtube.com/channel/UCN4PO7Ubgdxk7v8_8gh6iDw

Paint finishing playlist here:

https://www.youtube.com/watch?v=mkwFD6gXqhw&list=PL3kOpnq8d04YdsLHgJpia290Luw-rO4p7

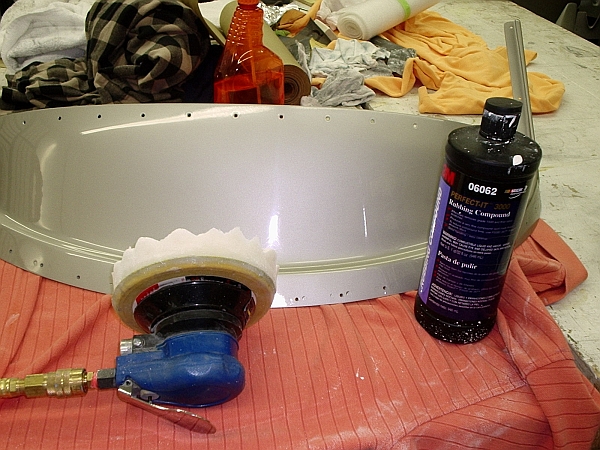
I'm cutting a light color so I can get away with a few less product steps. For me it's a 1500 grit Trizact disk, 3000 grit compound/white foam pad, and machine polish/black foam pad. Dark colors are far more sensitive to swirl marks and visible sanding scratches, so you'll perhaps you'll need 3000 and maybe even 5000 sanding before going to compound. My main focus in this thread is simply removing orange peel.

3M%20Materials.JPG


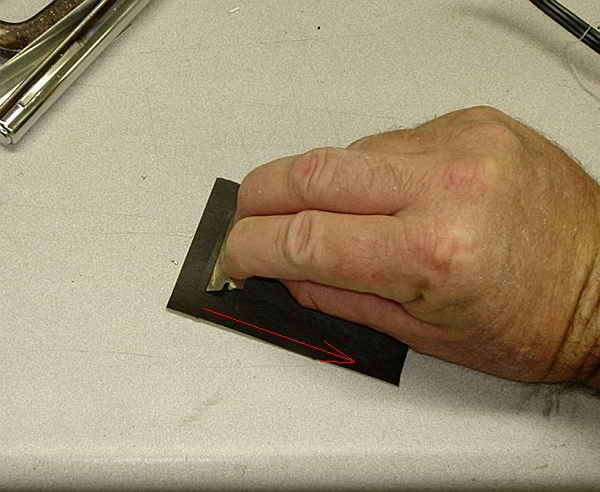
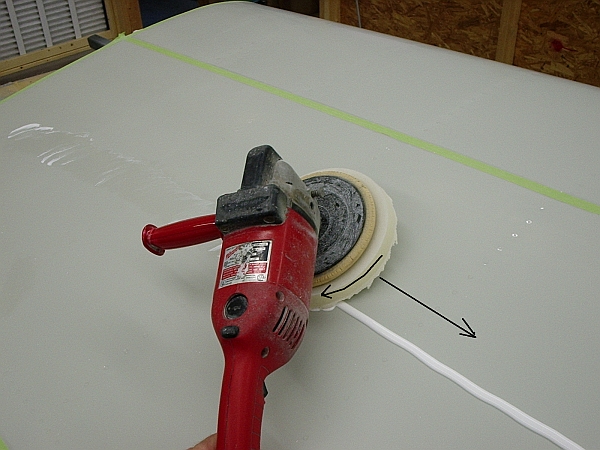
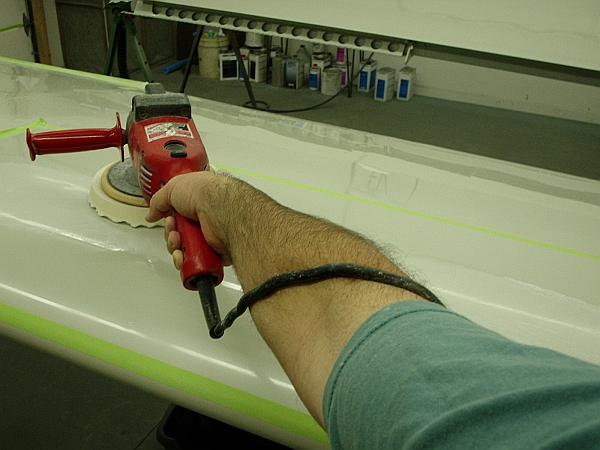
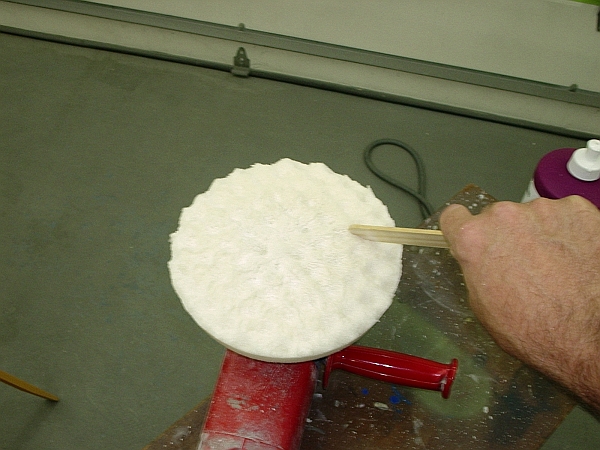
Gather (1) a bucket and a spray bottle, both with plain water, (2) a washrag and a few handfuls of drying rag or towels, (3) some 600 and 1500 grit wet-or-dry paper and assorted sanding blocks, and (4) some masking tape. The random orbital sander is equipped with the appropriate hook and loop pad, and a soft interface pad. Later you'll need a good buffer. Pro buffers run at 1500-2000 RPM. You'll need a hook and loop pad for the buffer too.

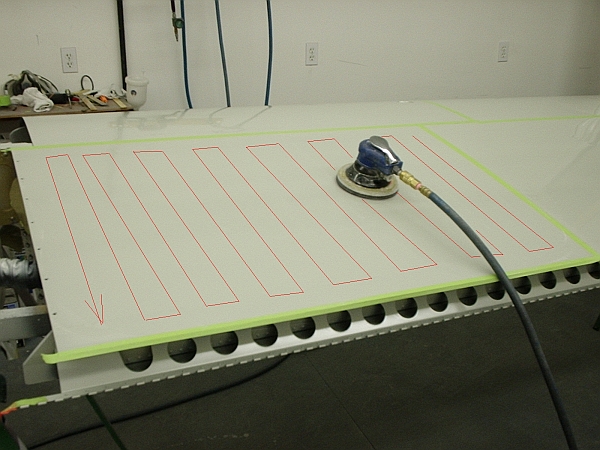
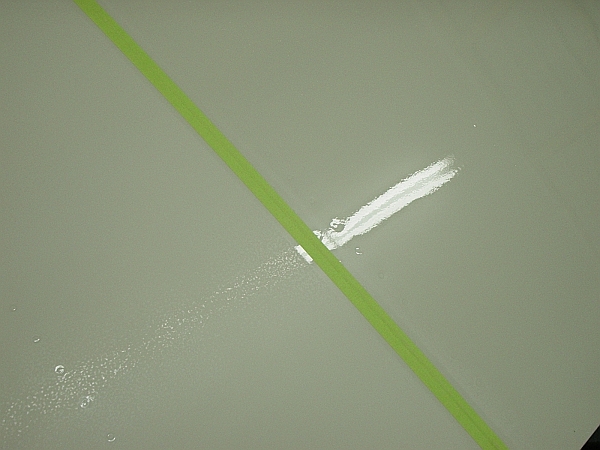
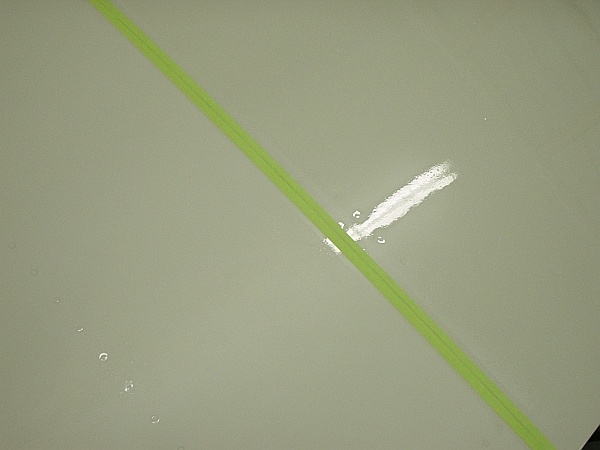
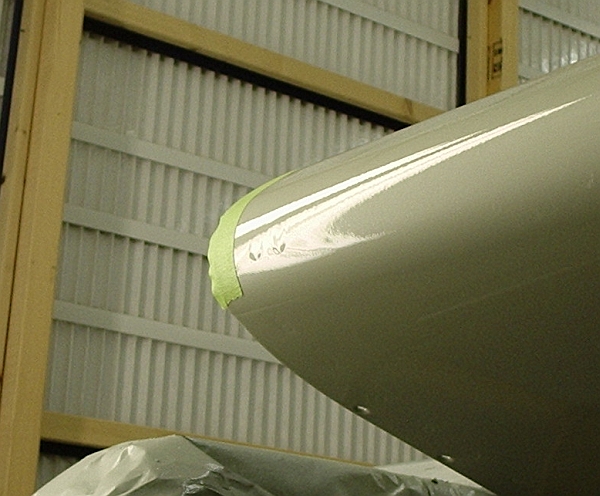
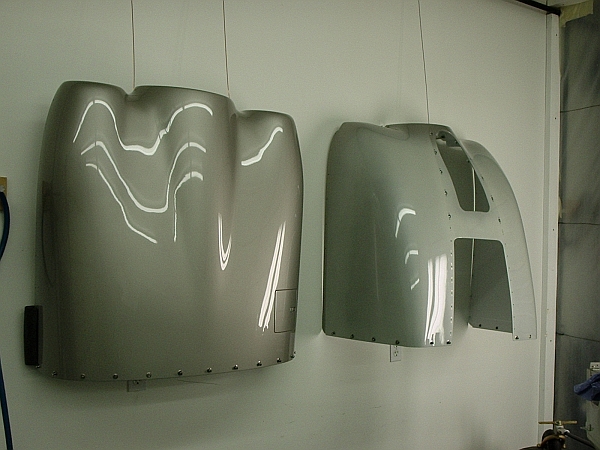
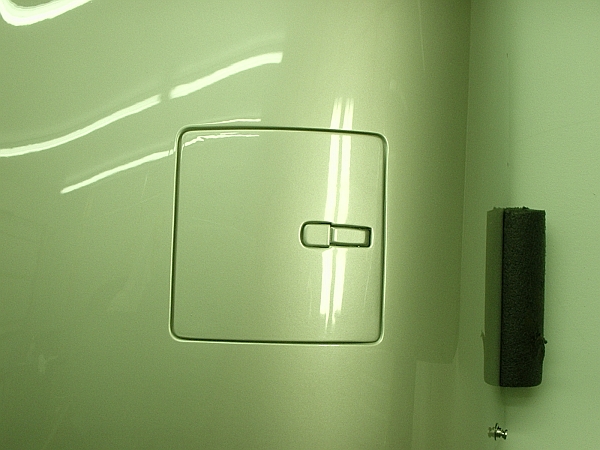
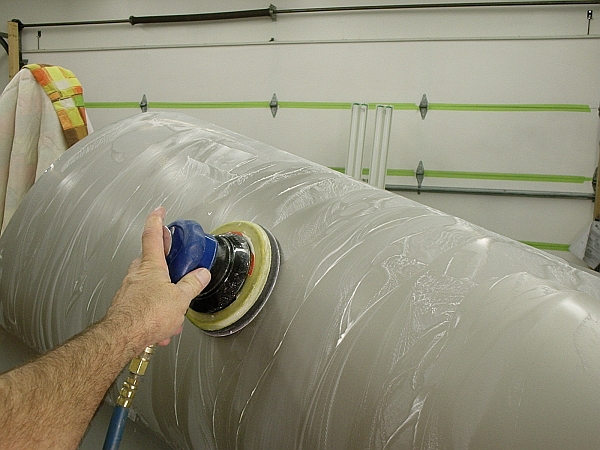
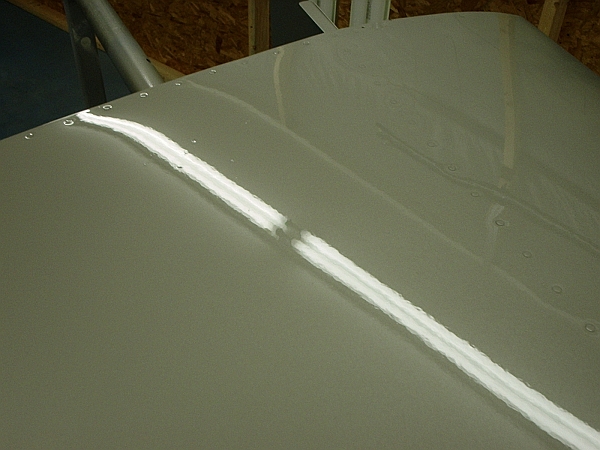
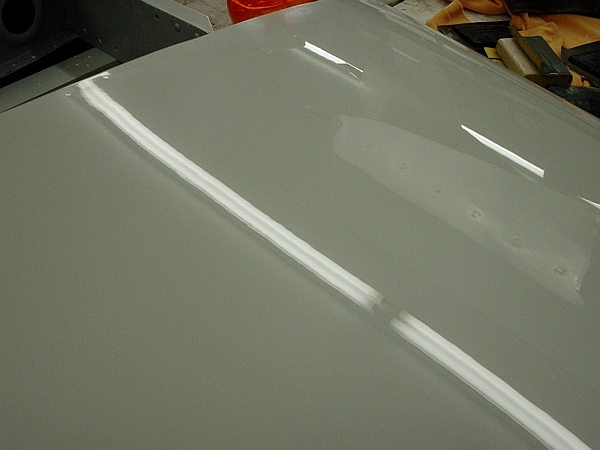
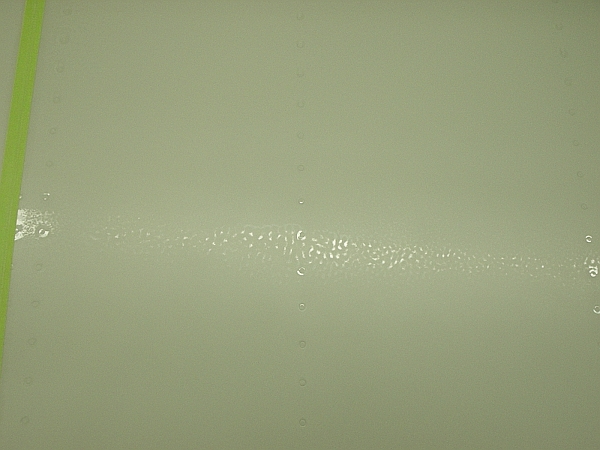
Work someplace with good overhead lighting, preferably fluorescent tube. The entire process revolves around seeing the contrast between shiny surface and dull surface. Dull is where you've sanded away a high spot. Shiny is a low spot not yet sanded. It looks like this....the band of shiny speckles you see below is the reflection of an overhead lighting tube. They're your indicator. When they're almost gone, you're done cutting. You must be able to see, so don't skimp on lighting.

High%20and%20Low.JPG


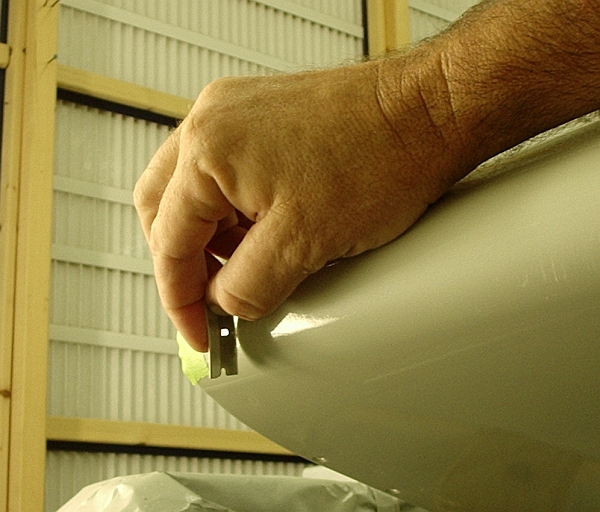
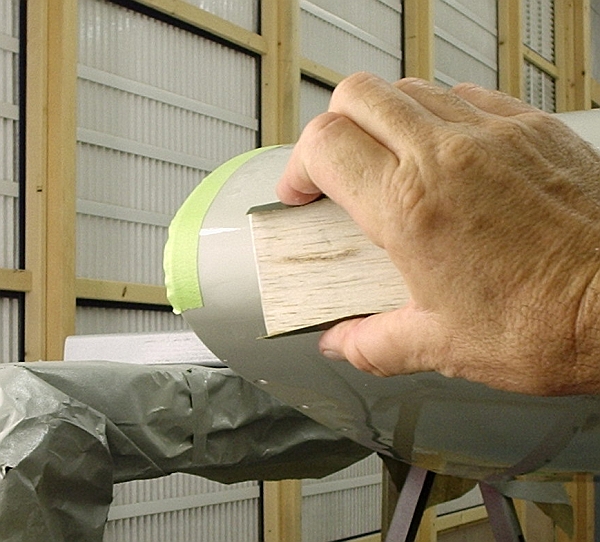
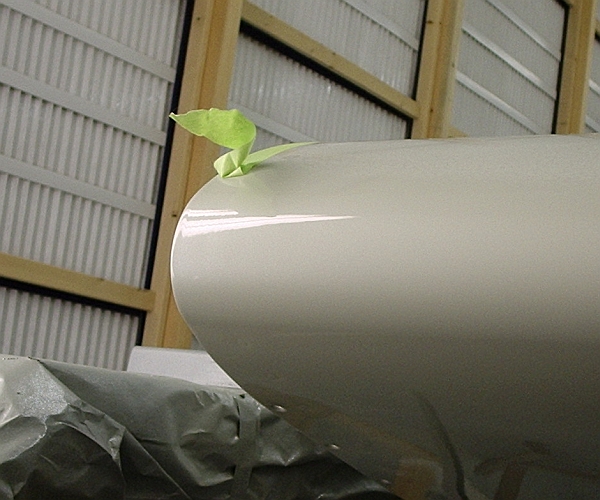
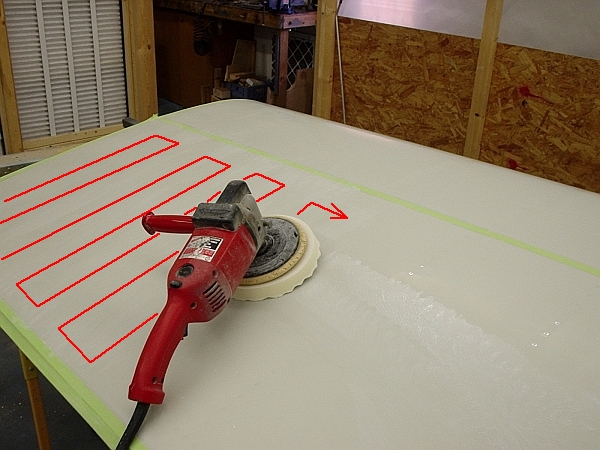
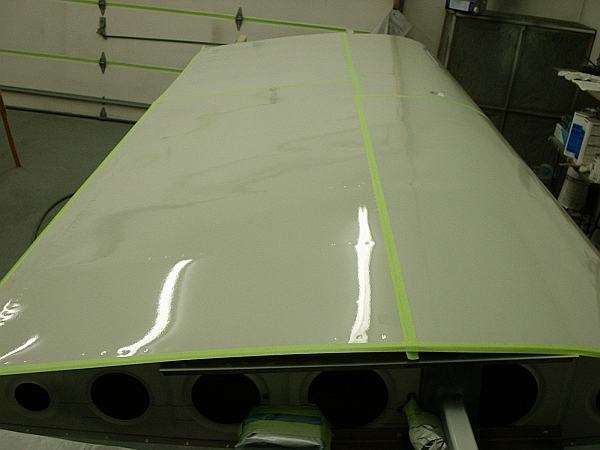
Start by taping all panel edges and screw lines. You can't accidentally cut through a taped edge. Well, you can, but you'll need to work at it:

Tape%20Edges.JPG
 
Last edited:
Pick up the spray bottle and squirt the pad, then mist the entire surface of the panel. Take a deep breath and start sanding.

It is very important to be consistent. Sand in rows, overlapping each pass on the previous much like how you run a spray gun. Do not move the sander in random patterns. Your goal is to remove the same material thickness everywhere on the panel. Random sanding tends to remove a lot over here and not enough over there....too easy to get a thin spot.

Sheet aluminum over ribs means the panel is slightly wavy; high at the rivet lines and low in the middles. Most of your sanding should be in rows parallel to the rivet lines, although early in the cutting process you can run patterns across them without risk. Keep the pad flat and don't press; just let it float. You want the foam interface pad to conform to the surface. As you near the end of the cutting process, just ease the pad edge up next to the rivet lines rather than over them and keep the bulk of the cut in the middles.

Sanding%20Path.JPG


You'll build up a nice froth of powdered paint and water. After a few passes (in a pattern!) stop, grab a wet rinse rag (remember the water bucket?), and wipe down the surface. Grab a dry towel and really wipe the surface nice and dry. Now you 'll be able to see exactly how deep you've cut. Here is the surface after the first round, uncut on the right for comparison. See the shiny speckles in the tube light's reflection? Needs more cutting.

Speckles%20Guide.JPG


Ok, so mist it again and cut some more. Stop from time to time, rinse and dry, then examine the surface again. Move your head around to walk the reflection across the panel and look at all of it. You might spot an area with no more speckles while the rest still needs more cutting. No problem, just mark it with some tape dots. It may be thin there or it may not, but there's no point in taking a chance. That spot has been cut enough.

Tape%20Dots.JPG


Continue working the panel. Eventually you'll reach a point where you can still see just a little bit of shiny speckle, the very last vestige of the demon orange peel:

Speckles%20Done.JPG


You're done.....move to the next panel. All that's left is the buffer, which we'll get to in a future installment. And yeah, we'll fix a run too....
 
Last edited:
Thanks Mike....gotta do something nice for the diligent ants, slaving away at home while the grasshoppers play at OSH :p

Let's fix a run.

Grab a razor blade and a piece of 400 or 600 grit paper. Hold the blade at a slant as shown and drag it across the paper a dozen times. You just put a microscopic curl on the edge:

Razor%20Curl.JPG


Now bend the razor blade like so, curled edge on the convex side:

Razor%20Bend.JPG


Here's our run.....ugly, ain't it?

Run.JPG


Drag the edge of the blade across the high spot in the run, holding it nearly perpendicular to the surface and using only light pressure. Don't try to cut or dig or anything like that...just sort of drag it. It will scrape very light feathers of material off the run with each pass. The bend in the razor isn't strictly necessary in this example, but if the run was on a flat surface it would prevent you from dragging the corners of the blade and making a scratch. In this case it just shows you which side has the curl.

Run%20Shave.JPG
 
Last edited:
When your fingers almost can't feel the lump any more, quit scraping. Grab some wet 600 grit paper and wrap it around a small hard block. This one is balsa. Hard rubber blocks work nice too. Foam blocks are too soft for this task.

Using light pressure skim the surface over the run. The idea is to cut the remaining high spots without skinning the surface around them. It will only take a few strokes to flatten the surface:

Run%20Blocking.JPG


Now switch to some wet 1500 grit, which you can hold freehand. Make a few more passes. Your goal isn't to remove any significant material. You just want to remove the 600 grit scratches. After that you can go straight to compound. It can wait until later when you're running the buffer, but for this example I just hand rubbed it a few minutes. Run all gone:

Run%20Buffed.JPG


Ok ants, let's get some work done....
 
Last edited:
Great Presentation

Dan, please give us info on the brand name of the paper that you use. Also, if there are any product numbers on that paper, please give that info too. that way, we may order the paper by name and product number .Thanks:cool:
 
Dan, please give us info on the brand name of the paper that you use. Also, if there are any product numbers on that paper, please give that info too. that way, we may order the paper by name and product number .Thanks:cool:

Ordinary wet-or-dry sheets for hand-sanding, 3M or Norton, common as dirt. Keep them soaking in your water bucket.

The purple P1500 Trizact clearcoat sanding discs are 3M # 02088. You also need the matching 05551 and 05777 pads to equip the sander:

BTW, don't confuse 3M's "Hookit" with "Hookit II" products...they're not interchangable.

Buffing: 06085 compound and 06064 polish, 05737 and 05738 foam pads:

Your buffer probably has a hook-and-loop backing pad.

Yeah, it's about $250 for all of it, but......

Cowls%20on%20Wall.JPG


Oil%20Door.JPG
 
Last edited:
Meanwhile...

...in unrelated news, 3M shares have risen two hundred points this morning on unconfirmed reports of a massive and as yet unexplained spike in sales by their cutting and polishing products division....
 
Dan you have given me hope my very mediocre paint job can actually be salvaged or at least improved! Thanks

Ken
 
As always, THANKS Dan.

I am curious about the paint color. It looks like VW Bug metallic light green. That's not the proper name just what I call it. I remember there was a fellow that designed his own plane a while back and it made all the magazines. Very sleek composite plane. He painted the whole plane with VW Bug light yellow metallic. It was beautiful.
 
Last edited:
Dan you have given me hope my very mediocre paint job can actually be salvaged or at least improved!

Most paint can be improved, even a very good hired gun job. As I mentioned elsewhere, this work has become routine in the autobody world. Even pros don't spray perfect paint every time.

Two quick notes. Less need to worry about rivet lines if your first pre-paint step is a good scuff with a 400 grit stick-on disc on a hard backup pad (clean, sand, clean again). Look close at the rivet heads when you pass over them and you'll immediately see any which are not flush. Block sand, shave, or replace and they won't haunt you later in the cut and buff stage. If you didn't do something like that and your paint is now on the airplane, make a light pass down the rivet lines with the 1500 disc, wipe clean, and study the heads. If the dulled (cut) surface forms a sharp line at the rivet edge, better watch out. Mark that one with a tape dot and stay off it with the sander. Really nervous about the rivet lines? Fine, don't sand them at all! You can sand just the middles between the rivet lines, then buff the whole surface. The result will mostly fool the eye of the observer; without the light just right he won't see the little bit of orange peel along the rivet lines.....the majority of the surface is slick.

Second thing.....none of this will work if you don't have enough paint on the surface. If you sprayed a very light, barely covered, every-ounce-counts paint job, perhaps you should forget about cutting and buffing...or at least the cutting part. The pro who does my car work shoots a very light tack coat of clear, then two wet coats. That's his comfort level in case he needs to cut it later. I sprayed a tack coat and three wet coats, the extra coat being insurance, and besides, I like the deep look over the pearl base.

Turtledeck%20Sanding.JPG


Moral of the story is "decide early". If you think you'll cut and buff, give yourself all the advantages from early in the paint process.

Jim: The color in the oil door photo is actually GM Silver Birch....the camera made it look green. The builder with the beautiful yellow composite airplane was Cory Bird.
 
Last edited:
Is what you are doing only for base coat/clear coat? Can I use it on a single stage urethane like Air-tech, or Superflite?
 
one more tip

Thanks for the info Dan. One tip that really helped speed up the cutting and buffing process was a squegee. After the rinse, use the squegee to wipe off the sanded paint and water. One swipe and the surface is dry. Saved a lot of paper towels.
 
Is what you are doing only for base coat/clear coat? Can I use it on a single stage urethane like Air-tech, or Superflite?

Certainly with a single-stage two-part auto paint. However, I can't speak specifically for Air-Tech or Superflite. Best I know, the polyurethanes for fabric airplanes are highly plasticized; they have to be or they would crack when the fabric stretches and flexes. I have no idea how well they sand and polish; never tried 'em. It's easy to find out. In my auto shop we get all kinds of paint finishes, so the first thing you teach a new detailer is to test solvents and polish methods on some out-of-the-way place on the car....a door jamb, under a trunk lid, whatever. Same goes here. Nobody will ever look real close at the underside of your wheel pants ;)

FWIW, I've sprayed a good bit of Polyfiber Aerothane and a little Superflite. The auto paints are a lot easier to spray and seem to present less of a health risk.
 
All of Dan's cut/buff info is spot on; however, one thing you have to be aware of if sanding into a single-stage is that the color can lighten as the paint gets thinner. Obviously, this can result in uneven coverage and look like heck. If the paint is nice and thick and the orange peel very slight things will go fine.
 
Not on Metallics though

All of Dan's cut/buff info is spot on; however, one thing you have to be aware of if sanding into a single-stage is that the color can lighten as the paint gets thinner. Obviously, this can result in uneven coverage and look like heck. If the paint is nice and thick and the orange peel very slight things will go fine.

Do NOT do this on single stage metallic colors unless you like to live dangerously! As you cut down into metallics, you will tend to end up with a mottled or striped look due to uneven exposure of the metallic particles in the paint (ask me how I know :rolleyes:). Not a problem with base/clear metallics since you are cutting in the clear rather than the color.
 
Dan,
How long do you let the paint cure before starting this process?
Ed

Depends on the paint I guess. The data sheet for DCU2021 clear says 12 hours at 70F before polish.

Sprayed primer and base Saturday and clear Sunday morning. Started cutting Tuesday morning. Only cutting the tops of the wings so I'm already done sanding. Planning to buff top and bottom Saturday morning and haul them to the airport in the afternoon.
 
Last edited:
Dan, did you paint parts as you completed them, or did you wait as long as possible to keep the paint batch the same for everything?
 
Dan, did you paint parts as you completed them, or did you wait as long as possible to keep the paint batch the same for everything?

I suppose there is some small risk of mismatch when you purchase paint at different times. For me it is outweighed by practical considerations. On the flip side, my new shop is set up to paint pretty much any time I wish, which is not true for all. My old shop was not and I did things different then.

Every builder's situation is different. Do what you gotta do.
 
So far I've only written of 3M's 1500 grit purple Trizact discs, mostly because I don't want first-time folks to get into trouble. 1500 cuts fairly slow and if you're only going to buy one kind of disc it is what you want. You can remove heavy orange peel with 1500, but it takes time and a few extra discs. If you have a lot of cutting to do (and you're bold), make your first cuts with a 3M finishing film disc in 800 or 1000 grit, using the same Hookit sander pad and foam interface pad as the Trizact discs:

Yeah, they only come in boxes of 100, but if your paint job is a mess it's cheaper and faster than starting over. For that matter, if you must sand for a repaint these are the hot ticket. You can cut clear quite heavily if necessary and respray more clear directly over an 800 grit scratch.
 
Last edited:
Onward to buffing. Tattoo these three basic details on the inside of your eyelids:

(1) If the pad is held really flat the buffer will be hard to control, in particular on a wavy surface like our RV sheetmetal. You want to tip it just slightly. When tipped it will pull or push in your hands in some particular direction; that's how you steer the thing without wearing yourself out. The pad rotates clockwise, so if you tip right the buffer will pull away from you, tip left and it will push back toward you, tip away and it will go left, etc.

(2) When near an edge the pad must buff off the edge, not onto the edge. Tip the buffer as necessary so the pad contact moves off the panel. If the contact is moving onto the panel it will cut through the paint on the edge very, very quickly.

(3) Just like with the sander, it is important to work in tidy overlapping patterns, so as to cut evenly everywhere. No random motion please.

A few practical points.

To apply compound, squirt a generous line across the panel, then roll the pad along the line like so....

Compound%20Application.JPG


....which will put the compound in the waffles under the pad just like magic. Slide the pad around a bit to distribute any excess compound, and only then pull the trigger and start buffing. Do not pull the trigger on the buffer and stick it in the compound, as you will instantly distribute the compound on the walls, the front of your shirt, etc.

Loop the cord over your arm. It is important to not contaminate the pad with dirt, so you don't want the cord flopping around on the surface and serving as a dirt transfer device.

Buffer%20Cord.JPG


Always move in an even pattern with consistent speed. Pay attention to the rotation direction of the contact patch when you get near an edge. Remember, always buff off the edge, not onto the edge, or run the pad so the contact is moving parallel to the edge. I can't stress this detail enough. It's not just a matter of cutting through the paint. If you let the pad's contact patch rotate into an edge and the pad hooks on the edge or a corner, you may even bend metal.

Buffer%20Path.JPG


From time to time you should "spur" the pad. The name comes from the official tool for this job, which really does look like somebody attached a handle to a stack of stars taken from old cowboy spurs. The points of the stars lift and fluff a wool pad and remove all the built up (and worn out) compound. You don't need a spur tool for a foam pad. Just hold an ordinary paint stick against the rotating pad and it will throw off the old compound quite nicely.

Buffer%20Pad%20Rake.JPG
 
Last edited:
More random details.

The 6085 and 6064 compounds are water soluble. Still have that water bucket handy, right? The easy way to clean a panel after compounding is to wipe it down with a sopping wet rag followed by a dry rag. Take a good look at the surface and compound again if necessary. After the machine polish step (6064) we usually just wash a car with soap and water to clear away all the compounds.

Buffer pads tend to wear more near the edge than the middle, a matter of velocity. Don't throw them away. Instead cut them down and stick them to your sander for use on small parts:

Polishing%20Glareshield.jpg


It's a little slower than a buffer, but you can work alone. The buffer will throw small parts across the room unless you have a helper to hold them tightly.

Buffers also throw compound. There's no way to prevent it, so cover adjacent surfaces and tools with a drop cloth, or work in a dedicated space, or move outside on the lawn.

To clean wax and compound out of cracks and crevices, take an ordinary 1" paintbrush and cut the bristles down to about 1/2" long. Let the wax dry, then just brush it out of the cracks.

I use paper towels during all the paint steps, but switch to cotton rag for all the cut and polish work.....big boxes of cast-off, laundered hotel washcloths and towels are usually less than $1 p/lb. The trick is finding your local rag guy.

Runs in the top coat can be fixed. Runs in the primer or base coats must be removed before spraying the next coat. If you try to cut topcoat over a primer or basecoat run you will cut through almost instantly.

Likewise, if you spray primer or base and get bad orange peel, spraying topcoat on it will not improve anything. Stop, sand it down, spray the primer or base again, then continue.

Don't make yourself crazy! You can see surface detail in the shop under good tube lighting which is unlikely to be seen outdoors....try it and see. And go study the factory paint on cars, in particular some high-end cars. You might be surprised about what you spot with your newly trained eye.

I am not a great painter. Thank God for sanders and buffers!

Peel%20After%20Sanded%20Primer.jpg


Peel%20None2.jpg


Have fun.
 
Last edited:
There's another important trick to this tipping stuff. When near an edge the pad must buff off the edge, not onto the edge. In the example below you would tip the buffer away from you so the pad contact was moving off the panel. If the contact is moving onto the panel it will cut through the paint on the edge very, very quickly.

But everyone will do it at least once, just to drive home the lesson! (which is why my HS has the best looking paint on the whole plane. (Got to do it twice))
Never daydream while running a buffer.
 
Awesome thread! I just bought a load of compound, polish, sanding discs, pads, etc to help clean up my botched elevators. I shot what I thought was my best work yet last night. This morning I went out and found what looks like solvent pop or overspray hazing along with orange peel scattered throughout. I will be buffing stewart systems poly base coat, which seems to be uncharted territory. Ill post the results when Im finished. Thanks for the tips!
 
Great job Dan!!

Great work Dan. I tried to use a razor once with less than perfect results so I stick with 1200, 1500 and 2000 grit. It goes slower but I get the desired result.

Here's what happens when u operate the buffer too fast. Talk about a heart breaker on an otherwise perfect 68 Corvette!

99i3pu.jpg


This post is a MUST READ for anyone thinking of painting & my suggestion is to practice on expendable parts. Intentionally create runs so you can practice fixing them.

Ditto on single stage metallic. Get it right the first time or switch to base coat clear coat which you can fix.

Thanks Dan.
 
Buffing Stewart Systems

Hey Rob,

I have painted my interior and am planning to paint my exterior with Stewart systems. Good stuff, minimal toxicity. I will be very interested to find out how Dan's polishing regimen works with a single coat system. I asked the folks and Stewart Systems and they said it should work fine. I wonder if one ought to use a couple more layers of paint?

Anyway, please post your results.

Regards,

Michael Wynn
RV 8 Finishing
San Ramon, CA
 
Experiment....

As a RV-12 builder, I wonder how this would work with round head rivets. Anyone have any thoughts?

Any raised surface that rises above the level of the alum around it is a candidate to get burned thru by the sand paper during color sanding or almost certainly when the wheel is used. If your rivets are perfectly flush or below the surface of the surrounding material, perhaps they'll survive.

It's easy to find out. Take a piece of scrap and prep and paint it using the same procedures you're planning for the plane. Install rivets alike those you will use on the 12. Color sand and polish using Dan's post. The rivets that are below the surrounding surface will remain painted. The others......

You can hide many sins with an air brush & blending.

Dan, if you plan to write about blending, I look forward to it.
 
yea Dan

blending please!!

It was a pleasure meeting you at Osh.

For those wondering, Dan's plane is every bit as great in person as in the pix.
 
Don't know much about blending. I'm a poor painter, thus lucky to be a half decent cut and buff guy.

Appreciate all the nice comments abour my airplane, but you guys would make terrible airplane judges ;)
 
Great Thread

Dan....Thanks for posting this. My airplane was painted years ago, but I'm at the paint stage of an E type restoration and your post has prompted me to do and cut and buff job. Doors are done and look great, I'm now working on that huge curvy bonnet. Best, simplest description I've seen of how to do this...thanks again

Joe Hine
 
Single stage vs base, clear coat

Dan, how are you painting your plane? Single or 2 stage? I am assuming that cutting and polishing will work either way.

Dave
 
I recently restored/refinished a propeller (to match my airplane's paint scheme) using Dan's instruction. It was my first project using metallic base and clearcoat. It was surprisingly easy and the results amazed me.

Thanks Dan.
 
I can't believe there are people reccomending cut and buff for single stage on this thread ! Even on solids it can distort color easily. At my shop (Maaco) we paint gallons of single stage everyday and only ever attempt to cut very small runs in single stage solids if they are in inconspicuous places. Lighter colors like white are most forgiving. I see people screwing up their paint jobs trying to buff all the time. All the time. Be careful and get help. Oh and start somewhere inconspicuous, like your friends car :). Base clear is heavier but fades less and does have much better metallic clarity and depth

Also most people don't know you have to get the temperature just right on a buffer. Temperature huh ? Yes you can't go too slow or too fast. Either something very bad will happen or nothing will happen and you wont get the shine back.
 
Last edited:
I can't believe there are people reccomending cut and buff for single stage on this thread ! Even on solids it can distort color easily. At my shop (Maaco) we paint gallons of single stage everyday and only ever attempt to cut very small runs in single stage solids if they are in inconspicuous places. Lighter colors like white are most forgiving. I see people screwing up their paint jobs trying to buff all the time. All the time. Be careful and get help. Oh and start somewhere inconspicuous, like your friends car :)

Also most people don't know you have to get the temperature just right on a buffer. Temperature huh ? Yes you can't go too slow or too fast. Either something very bad will happen or nothing will happen and you wont get the shine back.

I am no painter. But I have painted one RV-6, two VW's, a kit car, an S-10 and a bicycle with PPG Concept single stage paint (no metallics...I know my limits). All the projects except the bike were color sanded and buffed either a moderate amount or very extensively. I've had great success finishing these projects by color sanding and find this to be essential for paint projects that are mostly painted outdoors.

Another VW I restored was painted by professionals in a down-draft booth with PPG single stage paint. Yep, the pros color sanded and buffed the living daylights out of that finish until it looked like a mirror. Even the pros have to deal with the difficulties of painting modern low-VOC paints (orange peel).

Color sanding and buffing single stage paint is a lot of work and requires the proper equipment and technique. But it is well worth the effort and can result in superb results especially for those of us who don't have high-end booths.....and skills.
 
Last edited:
I can't believe there are people reccomending cut and buff for single stage on this thread ! Even on solids it can distort color easily. At my shop (Maaco) we paint gallons of single stage everyday and only ever attempt to cut very small runs in single stage solids if they are in inconspicuous places. Lighter colors like white are most forgiving. I see people screwing up their paint jobs trying to buff all the time. All the time. Be careful and get help. Oh and start somewhere inconspicuous, like your friends car :). Base clear is heavier but fades less and does have much better metallic clarity and depth

Also most people don't know you have to get the temperature just right on a buffer. Temperature huh ? Yes you can't go too slow or too fast. Either something very bad will happen or nothing will happen and you wont get the shine back.

I am no painter. But I have painted one RV-6, two VW's, a kit car, an S-10 and a bicycle with PPG Concept single stage paint (no metallics...I know my limits). All the projects except the bike were color sanded and buffed either a moderate amount or very extensively. I've had great success finishing these projects by color sanding and find this to be essential for paint projects that are mostly painted outdoors.

Another VW I restored was painted by professionals in a down-draft booth with PPG single stage paint. Yep, the pros color sanded and buffed the living daylights out of that finish until it looked like a mirror. Even the pros have to deal with the difficulties of painting modern low-VOC paints (orange peel).

Color sanding and buffing single stage paint is a lot of work and requires the proper equipment and technique. But it is well worth the effort and can result in superb results especially for those of us who don't have high-end booths.....and skills.

Yeah on solids. If you are going for heavy texture reduction It would have to be done very evenly.

This non-painter didn't have any issues with uneven results. Dan Horton's suggestions are spot-on.....sand only enough to remove the orange peel, then buff. Great results on single-stage, non-metallic paint, even with light and dark colors. Cutting/buffing is the way us hacks can get amazingly good paint finishes. I consider buffing skills to be as important as knowing how to handle a gun.
 
Last edited:
Cutting/buffing is the way us hacks can get amazingly good paint finishes. I consider buffing skills to be as important as knowing how to handle a gun.

Sam, I don't know about the "hack" part but I am learning that I can get amazing results with some careful color (or clear coat sanding) and good buffing "skills".

To anyone considering it - get a good buffer, pads, and compound (it won't break the bank). Take your time. The results will surprise you.

DanH - I can't thank you enough for this thread. It gave me the confidence to "give it a try" and I am so thankful I did. It's a whole new shiny world now :D
 
OK, this has me thinking about working on my rudder, which has some overspray etc. from a repair a few years ago. Having never done any of this sort of thing, anybody have a suggestion for a buffer that I can get for my wife for Christmas:D?

Greg
 
What is color sanding?

See the first few posts of this thread. That's what the 3M Hookit disks are for.


Interesting.....I sometimes spray a guide coat to block sand bodywork for flatness, but I've never seen anyone spray a guide coat to sand paint. Might help if you don't have good lighting, but it also might be hard to get out of the cracks around rivets and sheet metal seams. Whatever works.

Obviously you can use a machine sander, but in fairness it gets tricky on highly curved surfaces like emp tips and the tail fairing. There you hand sand for sure.

Do note the choice of 2000 grit for the last sanding prior to buffing the dark color on the hot rod parts. Dark colors show sanding scratches and swirl marks far more than light colors, so finer grits are better.
 
Last edited:
Back
Top