What's new
Van's Air Force

Don't miss anything! Register now for full access to the definitive RV support community.

Canopy making me regret picking the 9!!

dwranda

Well Known Member
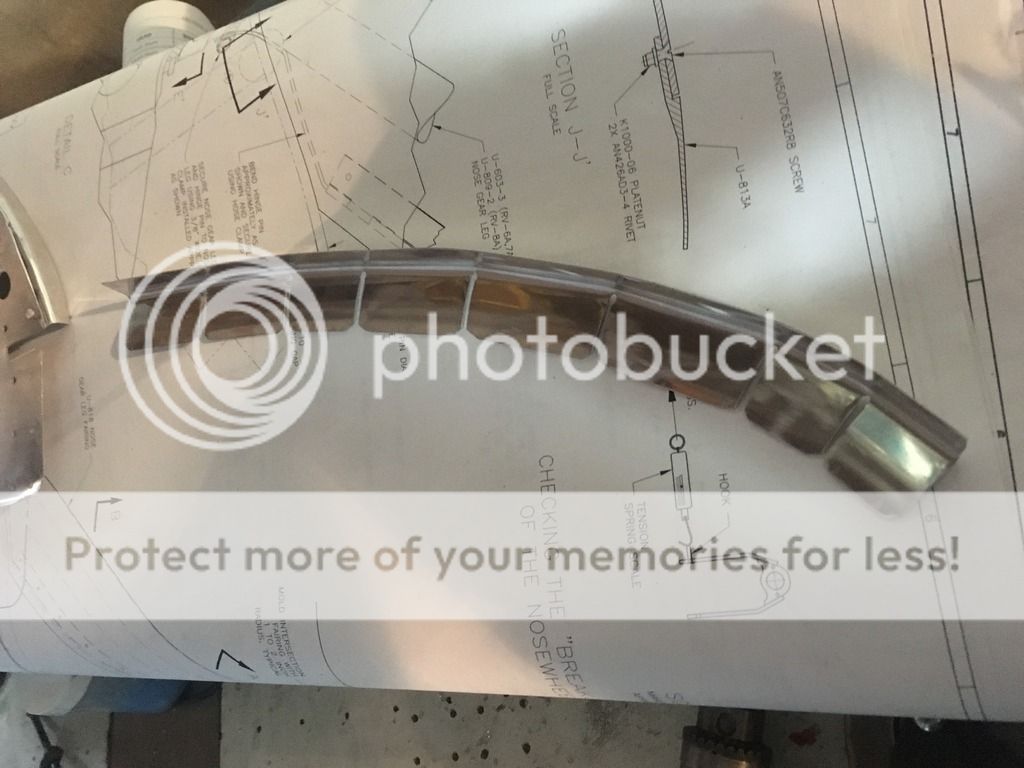
For the first time in my build I am regretting building the 9 instead of the 14. I had to get away from the plane before I ripped the canopy frame off and ran over it with the car. I thought I had it fitting pretty well then I cracked the tube on the frame. I had that welded then it still didn't fit right any more. I was carefully bending it to try to get it to fit and the other side started cracking. Motherf#$@^&!!
I read on Bruce Swayzes excellent build site that he riveted the sub panel structure to the plane so there would be no possible movement of anything that could screw up the canopy. So I just did that. I had a great riveting day when all the rivets came out perfect even the hard to reach ones. That doesn't happen too often. Didn't have to drill any out. I was HAPPY.
With much trepidation I just tried to fit the canopy frame. It fits worse than it ever has. I don't know at what point it stopped fitting well or what caused it. I was hoping it was the crack, but that was repaired and that still didn't help. It's as if the holes I drilled for the pivot points are wrong now.
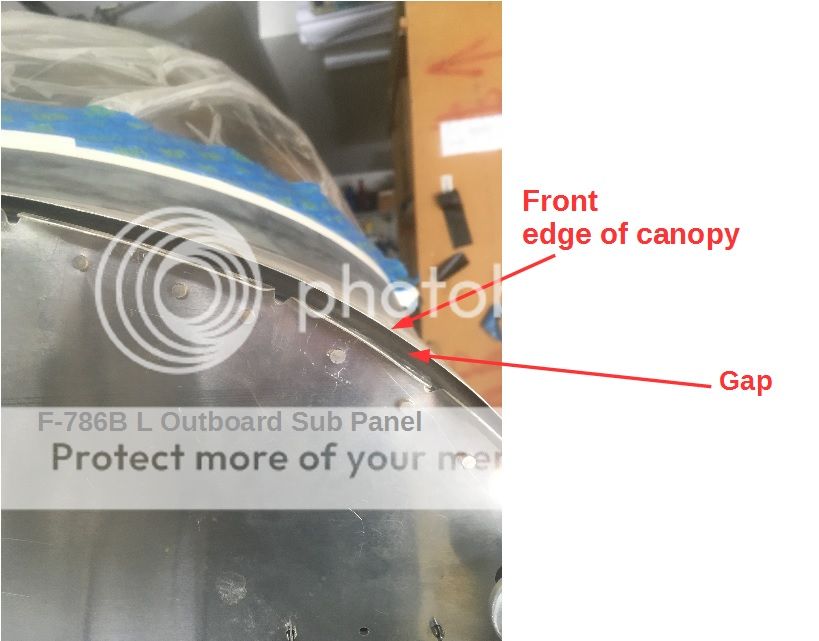
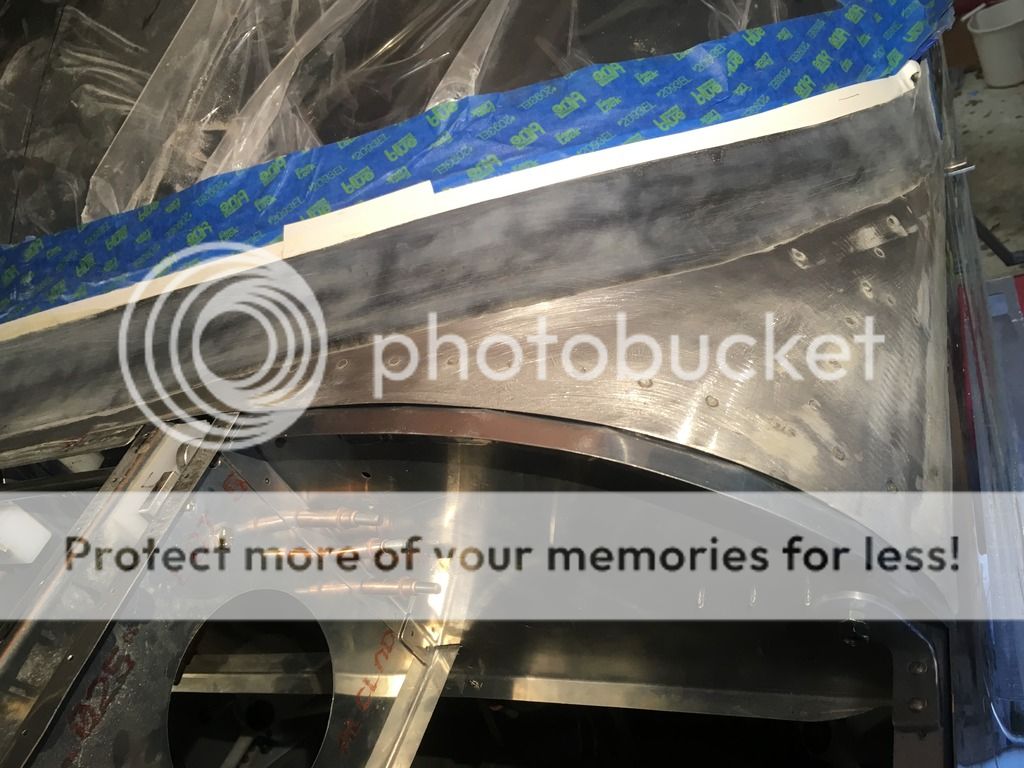
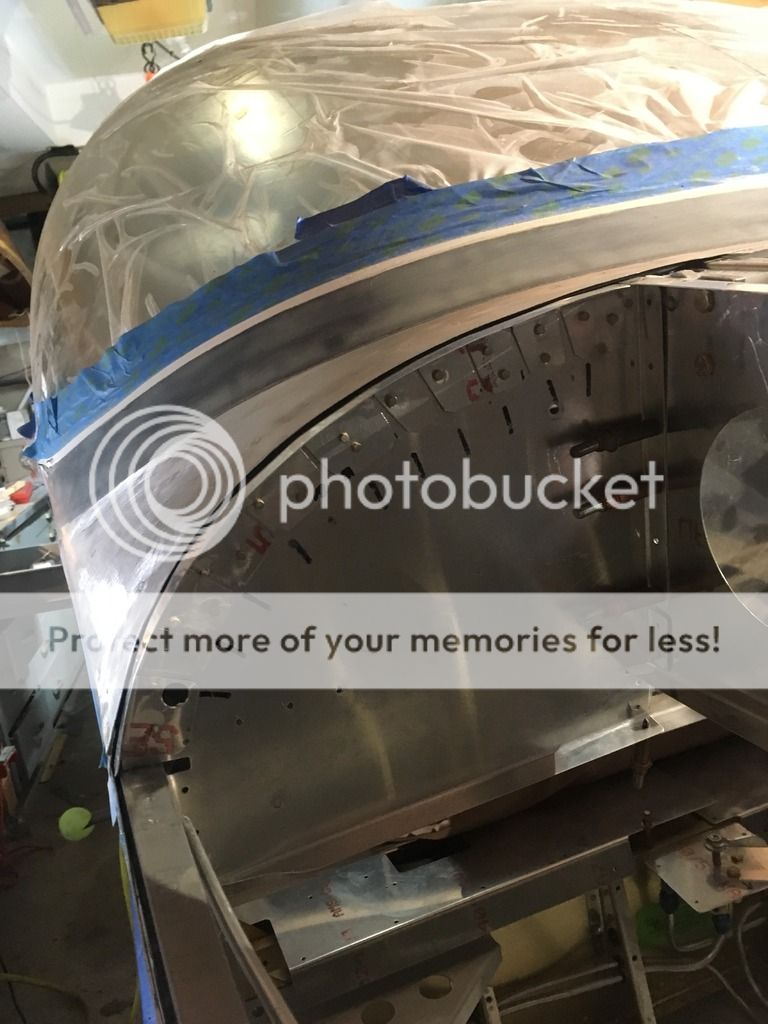
The only thing I can think to do is see if the welder can fill the pivot holes and push the canopy into a relatively decent fitting place and redrill the holes. Does that sound feasible? In the pics attached you can see the gap on the right side and the huge amount the frame sits above the front skin on the left side. It was never that high at the front like that. Anybody have any ideas???
2yxovup.jpg
[/IMG]
j933gl.jpg
[/IMG]
 
Like I tell everyone about the build process, once the canopy is done it is all downhill. This is the worst part of the build. You can get it close but nowhere near perfect. The curve of the canopy frame is nothing like the curve of the top fuselage skin. I messed around with this to no end. I still have a gap, but it isn't too ugly.

Suggestions? Pop out the hinge pins, strap it down where you think it should be and try to see where the new pivot holes would be. Then decide if filling with weld and redrilling will be worth it or not. If the new hole is too far off on the gooseneck of the canopy frame edge distance-wise, then leave it. You can also consider moving the other location factor which are the plastic blocks. It is probably better to drill an accurately placed hinge hole on the frame first, and then figure out where to drill the plastic blocks to match. You can buy the UHMW plastic from McMaster-Carr and make new ones easily that will put the holes where you need them.
 
What Bruce said...

After ending up with zero edge distance, I did exactly what Bruce described.
I drilled the canopy hinge holes first and used those to match drill the Delrin blocs and ribs. If you search in the forum, I believe you will find that was the process used for RV-6.

I sacrificed the ribs and used them to hold things together.
Have a look at my log entry around 3-8-2017 for illustration.

http://www.mykitlog.com/users/displ...project=2288&category=11189&log=253197&row=67
 
Last edited:
After ending up with zero edge distance, I did exactly what Bruce described.
I drilled the canopy hinge holes first and used those to match drill the Delrin blocs and ribs. If you search in the forum, I believe you will find that was the process used for RV-6.

I don't know about a 9 (I built a 7), but are you talking "zero edge distance" between the forward edge of the canopy and the aft edge of the forward fuselage skin? If so, then be careful...at least on the 7 tip-up, this can and will result in the tip-up skin catching on the fuse skin and bending...not a good thing. This is one thing I did NOT experience as I was very careful to leave just enough gap to avoid it, but I know others who have had it catch and bend...it makes an ugly bend.

You might be talking something else, and it may be different on the 9, just wanted to toss out a word of caution. I believe the instructions mention this issue, as well.
 
It is a little hard to see all of the needed cues to determine what is happening. If the center of the canopy skin to front skin gap is correct (.020-.040) and it widens as it comes down to the fuse rail, then the frame needs to close more. Is the inside frame-to-fuserail gap 1/8" at the back? If has to be. If it is greater then the splices to the canopy rails are off. Just for clarity, there is stagger, and gap. The stagger is a planar offset between the two skins, a gap is where stagger is zero, but they dont come together in the same plane.

Take a few more pictures and post so we can see that. Bruce has an excellent website with documentation and I have lots of posts on the canopy. Mine fits little stagger and small gap all way around, but it was a huge effort to get there with many non productive side roads. This canopy fitting is a challenge of any builders patience. But don't despair, it can be done in a definitive way without mystery.

I am on Bruces site ALL the time. I pretty much have a browser tab on his site permanently up on my computer. The strange thing about this is that I had everything fitting pretty well and I was happy with the gaps and stagger all around. Then one day things stopped fitting and my progress ground to a halt. I do have the frame to fuse 1/8 inch gap at the back.
I just re-drilled the left hinge plastic and ribs so that huge gap is gone on that side. I'm going to make some doublers to rivet to the ribs since the holes are enlarged now. Does that sound reasonable? I was able to reuse the plastic blocks by just flipping them over. The skins are now touching so I have to file them down enough so there is no binding.
I knew my canopy wouldn't be show quality but I want it acceptable to my standards. After looking at all the canopies at Oshkosh I was feeling good about mine. I saw a lot of uneven gaps. Hopefully I can get back to that feeling.
 
The 7 and the 9 has exactly the same fuselage. So the challenge is the same :eek:
It is the most difficult part of the project.. A lot of builders eventually build up the foward top skin to conform to the profile of the canopy frame.
 
I don't know about a 9 (I built a 7), but are you talking "zero edge distance" between the forward edge of the canopy and the aft edge of the forward fuselage skin? If so, then be careful...at least on the 7 tip-up, this can and will result in the tip-up skin catching on the fuse skin and bending...not a good thing. This is one thing I did NOT experience as I was very careful to leave just enough gap to avoid it, but I know others who have had it catch and bend...it makes an ugly bend.

You might be talking something else, and it may be different on the 9, just wanted to toss out a word of caution. I believe the instructions mention this issue, as well.

With zero edge distance, I meant it in a bad way. I completely messed up the location of the hole, see log entry: http://www.mykitlog.com/users/displ...project=2288&category=11189&log=253192&row=71

Luckily, I only had #40 pilot hole drilled, but I could see where it was heading.
Van's said weld it shut and drill again.

Good point about the gap between the canopy and skin. Getting it to snag the skin will crush both the canopy skin and your soul........
I used flashing material stuck under the canopy skin until I was certain it didn't get snagged. The canopy contraption moves around like crazy until the forward skin is riveted and the structure firms up, it can snag the forward skin at any time. The struts pulls it 1/8 forward unless you use stops (like Bruce snd others have done).

Like the previous poster said RV-7 and RV-9 are identical in this area.
 
Last edited:
I built a 7A tip up. Like someone said this is the most frustrating and difficult part of the build. I never could get the distance right between the forward canopy skin and the fuselage forward top skin. No matter what I did it was catching and binding. Once I had enough distance so that wasn't a problem, the gap was unacceptable..... it looked horrible!
I ended up removing and replacing the fuselage top skin. Now that top skin extends well aft of the joint. When the canopy is closed, the canopies forward skin is on top of the fuselage skin. The fuselage skin extends far enough aft so the closing of the canopy can't catch on it anyplace. Not per the planes but it worked.
 
There are many build features which lead me to wanting to build the 14, The canopy of course is a major one. The one build feature that keeps me wanting to build the nine over the 14 is dollars.

What to do?

Bob
 
I built a 7 tip up and here is the process I used to get this part done and it went well with very even and correct gap. You might be pass this point but just in case you are going to get a new hinge bracket or weld/fill and redrill.
Once the frame was built, I drilled the hinges (on the table and unmounted) center with good edge distance and symmetric and installed the bushing. Then I drilled the supporting brackets/UHMW all as if it was in place with the measurement that is given in the instructions. Then I put a pin to hold everything together with the pin was cut off just so everything can be held together and still would fit between the two mounting bracket. Then I put the entire parts assembly as one unit in place and while I was inside, I had a friend to close the canopy and position it just right in relation to the forward skin and sides. Then I clamped the supporting parts firmly between the two brackets that they get mounted to. Once I was happy with the position and everything else, I drilled the holes thru those brackets that hold the supporting bracket/UHMW. If memory serves me right, there are two bolts that holds them together.

Good luck
 
The 7 and the 9 has exactly the same fuselage. So the challenge is the same :eek:
It is the most difficult part of the project.. A lot of builders eventually build up the foward top skin to conform to the profile of the canopy frame.

I had everything done and no adjustments left, no more arrows in the quiver . . then removed the forward skin, made a custom skin and shimmed it to eliminate the stagger. I think he is a long way from that at this point , though. This is probably the last possible adjustment.

He still has eccentric pivot bushings to try before then. :D
 
Good point about the gap between the canopy and skin. Getting it to snag the skin will crush both the canopy skin and your soul........
I used flashing material stuck under the canopy skin until I was certain it didn't get snagged. The canopy contraption moves around like crazy until the forward skin is riveted and the structure firms up, it can snag the forward skin at any time. The struts pulls it 1/8 forward unless you use stops (like Bruce snd others have done).

Bjorn is spot-on with his comments. I shimmed up the front edge of the canopy skin to assure it wouldn't snag the fwd fuse skin, as much as 0.040 to 0.050 in the center, and then less toward the sides. (I saw two RVs where it did snag .... very ugly and a little hard to repair perfectly w/o removing the canopy completely.)
Everything seems to move around and change clearances from day to day until that whole front structure is riveted and "ridgidified".
The fwd canopy stops - to prevent the struts from pulling the canopy forward and messing up all your finest work - are a lifesaver. ..... and really easy to install! :)
 
There are many build features which lead me to wanting to build the 14, The canopy of course is a major one. The one build feature that keeps me wanting to build the nine over the 14 is dollars.

What to do?

Bob

Build a -9 Slider:D
 
Tipper mod

Not sure if this pic thing is going to work...

It seems all tipper builders go through the same grief trying to get a nice even gap with the forward and canopy skins level with each other. I had it perfect with about a 3/32" gap prior to riveting. Then one day upon partially opening the canopy I heard a horrible little clicking sound. Sure enough the canopy skin had caught the forward skin and put a small bend in it. Very upsetting to say the least. I did not like the idea of a gap never mind a larger one so I cut a 1" wide strip of .032" about 2" longer than the canopy forward skin. I riveted it in place on top of the forward skin so that 1/2" overlapped the while the rest went under the canopy skin. I reasoned that since the canopy and forward skins were flush that the canopy would seal tight to this strip. I then riveted everything together and added a 1/2" wide strip of the teflon flap tape under the forward end of the canopy skin which rested on top of the forward fuselage skin when the canopy was closed. This was to prevent scratching of the skins when the canopy opens and closes. It has worked great for the past year and 185 hrs with no gap to see with the canopy closed.

axbajk.jpg

1zckfw9.jpg


Al
 
Well I got the skins as close as I could so decided it wasn't getting any better so I started riveting it together. Thanks to everyone for the ideas. Hopefully I'll have a good outcome to share in a few days when I get the riveting done.
 
I shimmed the front skin to make up some of the difference in height at the curve, then got a bit more by crawling underneath with a long wood block and hammer and gently tapping the front skin rivet line outward.
 
Same problem

Dave, I had the same problem - as have many others. Let me find some pictures and talk you thru how I solved it.
 
Dave,

If I understand your issue correctly, the skin in front of the canopy is too low.
Apparently this is a common problem, and is probably due to an inaccurate canopy frame assembly. This is a photo of mine:
Canopy%20Gap%20Argentieri_zps45raoevv.jpg


I ended-up removing the flange from the subpanel,
7810FEB6-4706-49DA-9741-1C7D4714E635_zpsxzjlauam.jpg


Then riveted on a new flange that I fabricated from stock
F3574FA3-6BCB-4B22-8546-7D8587F06A51_zpsc88aqdb9.jpg


This worked-out perfectly
22DE95B6-C88D-42A4-99A6-4CF1D7328F3E_zpsuz2980qw.jpg


Here's the opposite side - I left the flange a little lower so that I could shim when I eventually riveted
501BABE7-8869-4606-9EE0-692A0E3DD2B9_zps24gb8t9v.jpg


The only problem is that you will need a new (longer) front of canopy skin. I ordered a sheet from Vans.

Let me know if you have any questions.
 
Canopy skin is riveted along with the strengthening pieces on the inside. Today got the struts installed. I'll have some alignment work with the forward skin of course, but I'm moving forward and will work on that after the fiberglassing is done. Next is to cut the holes for the defrost fans then prepare to Sika the canopy on. In the one pic you can see I used washers to fill in the space where the skin doesn't hit the bar. I got that idea from a fellow builder. I'll most likely fill that void with epoxy like many do.
9u5du0.jpg
[/IMG]
1e6phi.jpg
[/IMG]

This thread makes me appreciate the -14A canopy for sure. Some tricky fitting but nothing like your troubles. I think your solution looks good and when it's filled and painted you'll forget about it.
 
Back
Top