What's new
Van's Air Force

Don't miss anything! Register now for full access to the definitive RV support community.

Sniffle Valve, Throttle cable, and Fuel Flow Xducr

TCONROY

Well Known Member
I am building an RV-7 with standard IO-360-M1B from Van's and am running into a few minor issues after installing the exhaust.
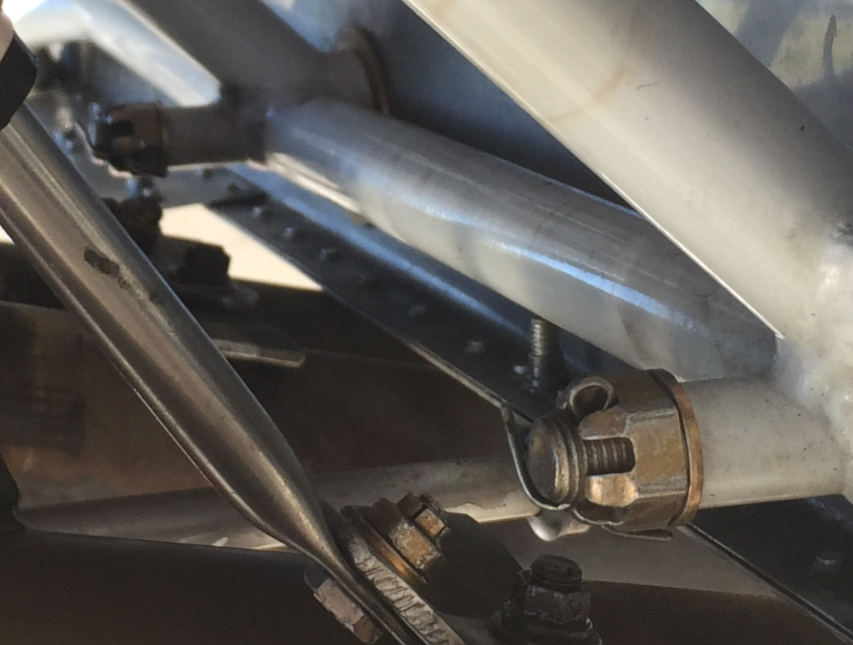
1: The sniffle valve rubber hose is pretty close to the exhaust. I am able to angle it rearward with the soft AL tubing but is this going to be an issue? Is it safe to have that soft Al tube so close to the exhaust?
Sniffle1.jpg


Sniffle2.jpg


2: The throttle cable (with firesleeve) is almost touching the exhaust. There isn't enough room for the heat-shield that Van's provides. I don't see how the exhaust could be adjusted to allow for more room... ?
Throttle1.jpg


Throttle2.jpg


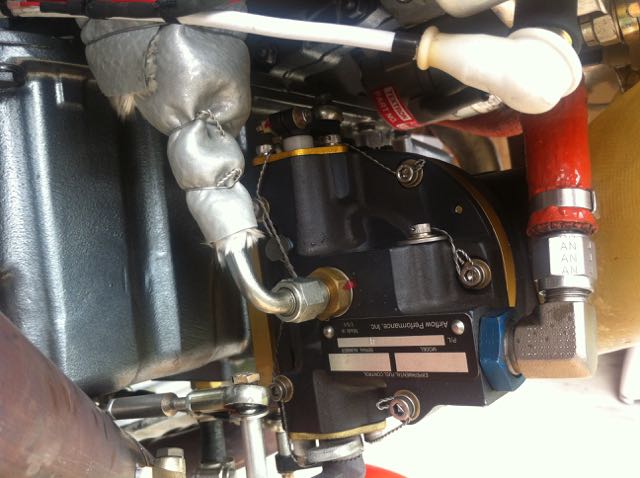
3: For those A&P's here...what do you think of my proposed fuel flow transducer (red cube) installation? I've messed with this for quite some time and need to finish this up now that the exhaust is in place. I'm thinking of using an adel clamp to help support the flexible line at the output of the fuel servo. This adds just enough rigidity that the transducer cannot move aft, interfering with the throttle linkage. I haven't seen this done before but several folks in the hangar say its sound. I'd like the opinions of the VAF community.
FuelFlow1.jpg

FuelFlow2.jpg


Much appreciated!
 
Last edited:
Not an expert here but...

1: The rubber hose is too close to the exhaust pipe. Fire sleeve may help. Also a metal heat shield will help.

2: Fire sleeved throttle cable it way too close to the exhaust pipe. A metal heat shield may not even help here. Is there such a thing as a double shield?

3: The fire sleeve that the red cube is "bundled" with is held together with a zip tie that may not handle the heat your are trying to avoid, thereby reducing your heat shielding. You don't want all that stuff falling down and sitting directly on the exhaust. "maybe add stainless lock wire in several places to do the job of the zip tie. Otherwise, find another method/location for the red cube.

Bevan
 
Here is what I have done, it’s been nearly 6 years and 500 hours.

1- Installed a 45 degree connector and routed with aluminum line. Zero issues so far
2- Installed a heat shield and fire sleeves just as you have done, no issues thus far
3- Installed Red cube between the electric and engine driven pump inside. The accuracy is within .2/.3 of a gallon in 30-33 gallon of fill up. I compare this every single time I fill up my tank and it has been repeatable without fail. With that accuracy, I think it is not worth the complication of installing in it in such tight spot which can cause other issues.

Mehrdad
 
good fuel flow sensor spot for me...

This shot has all three ;)

Fuel flow sensor, close to exhaust pipe linkage, and sniffle valve.

The flow sensor has given good results... It died on me and was replaced... I do not have fire sleeve on it now... lots of airflow between the cylinders there and have not had any issue 1100 hours now.

I have the throttle and mixture under the pan form a boss with one very close to the #1 exhaust stack... I have an extension to the cable end so it is a solid piece rather than the actual lined cable so there is no issue with melting the sleeve... lots of airflow here as well.

oJqhRN9Y.jpg
 
I took a different route with the sniffle valve. I did not want the fuel dripping on to my cowl then on to the floor, second, the close proximity seemed to to solvable with a Piper 491-091 90 degree angled valve. Extending it with an aluminum tubing was just the ticket.
 
dripping on the cowl???

I took a different route with the sniffle valve. I did not want the fuel dripping on to my cowl then on to the floor, second, the close proximity seemed to to solvable with a Piper 491-091 90 degree angled valve. Extending it with an aluminum tubing was just the ticket.

... dripping on the cowl??? my plans show taking it aft with 1/4 AL tubing just past the cowl opening with an adel at the firewall.

matVzi5O.png
 
Last edited:
Sniffle valve - used a 45 degree fitting, then aluminum tube all the way back, wrapped in some heat-reflective material I got as a sample from a speed shop or someplace like that (yes, it goes all the way back to the firewall, then bends down a touch and cut at a nice angle to look good).

Red cube - mounted in the same general location, fabricated a steel "L" shape which is mounted to the sump and then then the cube is mounted to that (okay'd by the manufacturer)...no issues, 300 hours. Wrapped in firesleeve just as you have.

Also, whenever I needed a zip-tie firewall forward, I used the blue, high-temperature Tefzel zip-ties. Pricey, but holding up with no problems. (I also used Adel clamps with the high-temp blue cushions on anything on the engine, such as clamping the ignition leads, etc.).
 
On my 7 I put a heat shield at both the sniffle valve and the throttle cable. It is a tight fit at the throttle cable, but it is important to have it.

However, one note about the heat shields is that they are located at the crossover sliding joint.

I had read here on VAF about an exhaust flange failure that was possibly due to a frozen slip joint.

So I contacted Vetterman's and they said not to put the strap of the heat shield over the slip joint. The tight mounting strap could over time cause problems.

So I used the longer 4 inch heat shield and moved the mounting straps so they were outside the slip joint.
 
Throttle cable

What you have done with the throttle cable will not work! At normal cruise speed there will be enough airflow to keep the throttle cable from melting, but at low speed the fire sleeve will act just like an oven, and will not save the cable from melting around the inter cable. It will freeze in place when it cools.

Example: Flying at 90k from Ripon to landing at Oshkosh, cables that close to the exhaust with or without fire sleeve will melt! Don't ask me how I know. My problem was with the mixture cable near, but not as close as your throttle cable. The mixture bell crank set up sold my Van's will move the mixture cable out of harms way, but I don't see a fix for your throttle cable short of a reroute of the exhaust. You might consider using a higher quality cable some guys are using that are not the plastic boat cables most of us installed.

I also vote on moving the red cube inside. I put the Doll's cube just after the fuel valve on the suction side of both pumps. I know, it won't work there. RIGHT.....
It works just fine, and has been giving me very accurate measurement for the last fifteen years! While I'm at it....I'll start another fire. No gascolators are required or even desirable in the RV set up. The low point in the system are the tank detains. Try to avoid anything that can act as a heat sink on the firewall side! The Doll has one fuel line running from the firewall fitting to the engine driven fuel pump. That's it! Everything else was installed by Lycoming and came with the engine, or is on the cool side of the firewall.
 
Last edited:
Get sniffle valve from Don at Airflow

I don't know about the second two problems, but I went with a sniffle valve from Don at Airflow Performance. It was about $25, and connected directly to an AN 45 flare fitting to Al tubing. The tubing routs back to the cowling as per the plans and as Christo has done it. No rubber tubing is used.

David
 
I used a brass 45 street ell on the sniffle valve. Gives good clearance on my M1B. Short hose and aluminum pipe to the cowl exit as has been already said.

My throttle cable is the same as yours, with fire sleeve and no shield but I bent the bracket to get all the clearance possible (nesting the cable up towards the sump). No cable damage so far due to this close proximity (350 hrs). However, I would put a bit of sleeve over the blue rubber bushing. They will dry out, crack and fall off without it.

What you have done with the throttle cable will not work! At normal cruise speed there will be enough airflow to keep the throttle cable from melting, but at low speed the fire sleeve will act just like an oven, and will not save the cable from melting around the inter cable. It will freeze in place when it cools.

Danny, he has used the bracketry and exhaust provided by Vans for the M1B. Its not custom work. They do call for a heat shield there but there is no room. When building, I initially agreed with your assessment and watched this area closely during phase 1 (and still do). I'm not sure why our experiences have been so different.
 
Last edited:
Throttle Cable

I used a brass 45 street ell on the sniffle valve. Gives good clearance on my M1B. Short hose and aluminum pipe to the cowl exit as has been already said.

My throttle cable is the same as yours, with fire sleeve and no shield but I bent the bracket to get all the clearance possible (nesting the cable up towards the sump). No cable damage so far due to this close proximity (350 hrs). However, I would put a bit of sleeve over the blue rubber bushing. They will dry out, crack and fall off without it.


Danny, he has used the bracketry and exhaust provided by Vans for the M1B. Its not custom work. They do call for a heat shield there but there is no room. When building, I initially agreed with your assessment and watched this area closely during phase 1 (and still do). I'm not sure why our experiences have been so different.

My problem appeared many hours after the first flight. In-fact, it happened as I explained in my example flying into Oshkosh. Others have had the same thing happen. I'm sure you can fine other examples in the archives. I believe it was Iron Flight that mentioned a company that can make custom cables that are of aircraft quality, and can handle much higher temps. They are expensive, but might be worth it in this case. If you are forced to fly slow for an extended period of time, you may very well suffer the same fate. You are totally grounded until the cable is replaced. In my case, I removed the cowling in front of Home builders headquarters and put maximum force on the servo lever while a friend put maximum force on the cockpit mixture lever and suddenly the cable broke free. It was very stiff, but I was able to limp it home. I fixed the problem by installing Van's mixture bell crank moving the mixture cable away from the exhaust. Over time, my throttle cable became stiff and had to be replaced, and it had a metal shield.

This is a recurring problem with many RVs. Another fix would be to make a bracket that holds the cable further aft from its present position and use an extended threaded nut to make up the distance to the throttle lever.

I hope you never encounter this problem, but looking at the picture of the installed throttle cable, I can't see how it would be different.
 
Is it worth considering . . . .

Is it worth considering - moving the exhaust pipe down 1/2"? That looks too close to be the exact design intention.
 
no sniffle for me, always use the Purge valve to shutdown,so no fuel available to leak.
my throttle cable is further from the exhaust than yours and started getting stiff at 100hrs, so added a heat shield. Still working (290hrs), but not as smooth as originally installed.
originally has the red cube in your location, tried wrapping it like you. I had stumbling issues at idle when landing that we tracked to boiling fuel. Still had trouble after trying rerouting, more firesleeve, etc. finally moved the cube behind the firewall installed between the boost pump and mechanical pump....stumble problem solved.

sent you a PM about sniffle valve
 
Solutions...

Here are some solutions:
1. Sniffle Valve too close to exhaust:
I spoke with Don at AirFlow Performance and ordered a 45-street elbow and his sniffle valve. From what I can tell, this should be a great solution to get the rubber hose/aluminum tubing away from the exhaust.


2. Throttle cable too close to exhaust:
I have to give Adam Burch(sp?) credit for the solution to my throttle cable problem. I happened to ran across a page in his builder log which is exactly what I needed! I simply removed the bracket and rotated it so the throttle cable is moved about 1.5-2" to the right of the engine. I also had to increase the bend in the bracket as it was hitting the bottom of the engine with the new orientation. Previously the firesleeve was touching the exhaust, now there is more than enough room to install a heatshield with a 1.75" gap between it and the firesleeve.

IMG_6173.JPG

IMG_6174.JPG

IMG_6177.JPG


3. Fuel Flow Transducer
I found a 1-1/4" long 1/4-20 bolt to go all the way through the snorkel and provide a shank to bolt an adel clamp to on the backside of the fuel servo. I installed the flow transducer and secured temporarily so I could determine where the output fuel line needs to be shortened where it screws into the flow divider on top of the engine. Marked the fuel line and send to Tom at TS Flightlines.

IMG_6172.JPG


Sure appreciate everyone's input! I'd have to scratch my head a whole lot more without Doug providing this great forum!
 
Back
Top