What's new
Van's Air Force

Don't miss anything! Register now for full access to the definitive RV support community.

Inconsistent Cherry Rivets

TASEsq

Well Known Member
Patron
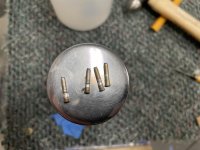
I’m building a rv14 and the lower longeron uses 6 cherry rivets CR3212-4-5.

I tapped the mandrel loose and added some lps-2 then tapped them back together as per the Van’s video.

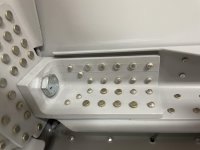
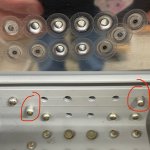
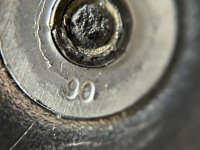
They all set well and looked good from the outside - the mandrel flush with the skin (or very marginally under).

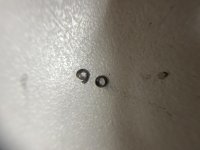
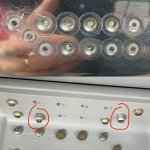
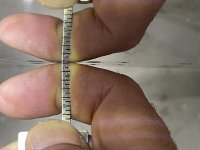
On the inside however they are all very inconsistent. Of course - Van’s only sends you one spare. The mandrels have pulled into each of the rivets properly - but the shop head sizes are different. Perhaps I had some different part numbers in the bag, but they all looked to be the same length.

What is the consensus on these rivets? Do they need to come out?
 

Attachments

  • AA031C38-5D1C-472B-A095-E3DBD8AB9BC0.jpeg
    AA031C38-5D1C-472B-A095-E3DBD8AB9BC0.jpeg
    830.3 KB · Views: 264
  • FB93E66F-3010-4786-A38F-0B6471D32480.jpeg
    FB93E66F-3010-4786-A38F-0B6471D32480.jpeg
    801.9 KB · Views: 233
Last edited:
When setting Cherry riviets the mandrel in the centre should break off flush with the manufactured head and is locked in place by a collet. It's a little difficult to be sure however I believe a couple of your rivets have not set correctly and these are most likely the ones which have a longer shop head on the rear side.

Personally I hate Cherry riverts and do everything I can to avoid using them. I've not built a "14" but looking at the photos I would have to ask why you are made to use Cherry's as it looks like you can get a dolly in there to buck solids. I guess there is a valid reason. Anyone know?

If you have to remove any Cherry rivets use a sharp drilll to first drill out the collet. Be very accurate. Then you can use a punch to tap the mandrel out, then run an undersize drill bit through the core and finally tap out the remains before trying again. You should be able to buy a handful of these locally but they're expensive... you'll probably be paying AUD$3 or $4 each for them.

On the plus side there are "oversize" Cherry's available that use a 9/64" drill bit, if you should find yourself needing to go up a size. Its better than stepping up to a 5/32" rivet.
 
Tool related??

Trent, When pulling the rivets, do you get one even pull from initiation to mandrel separation or is it needed to reset the tool part way through?

Maybe an unrelated experience, but I used a Marson standard pull rivet tool to a few Cherry Max rivets on my -7. On this tool, there is insufficient pull stroke to "break" the mandrel in one squeeze.

After having trouble with the mandrel break point leaving some above the rivet, my pull procedure was to pull maybe 20% of the stroke, then resettle the tool to full open and do the last segment of the pull in one action. This seemed to yield a full set and allow the mandrel to separate at the correct point of its length about 90% of the time as opposed to 40% of the time.

It is my theory that stopping the pull process late in the cycle adds adverse static friction force to the pull when restarting and results in a premature separation of the mandrel. Thoughts?

For those with Cherry specific pull tools, do you find good consistency with a single pull to set the rivet?
 
Last edited:
If you have to remove any Cherry rivets use a sharp drilll to first drill out the collet. Be very accurate. Then you can use a punch to tap the mandrel out, then run an undersize drill bit through the core and finally tap out the remains before trying again. You should be able to buy a handful of these locally but they're expensive... you'll probably be paying AUD$3 or $4 each

To be honest o had no idea there was a collet? I’ve removed a couple in the project so far and I just tapped the mandrel out with a thin punch, then drilled #31 down into the centre until I could snap the head off, then tapped the rivet out. Seemed to come out ok!

Trent, When pulling the rivets, do you get one even pull from initiation to mandrel separation or is it needed to reset the tool part way through?

I’ve just been using my pneumatic rivet puller.

https://youtu.be/vNBugge2M_Y
 
So in the -14 fuselage kit the only CR3212 (cherry flush) we are sent are -4-5 for the fuselage sides and some -4-3 used for the roll bar brace.

I was reading the cherry process manual assuming I had done something wrong in my technique etc, and read that the rivets are marked with their length.

Getting out my super magnifier it turns out the 4 rivets which are no good, are all -6 length. You can clearly see a “5” on the good rivets, but the bad ones have a “6”.

I assume Van’s had mixed up their rivets. Which is a massive pain because if I screw up removing one of these now, and toast my fuselage side skins or lower longerons / engine mount parts… *feeling annoyed*

I found my grip gauge - hole measures just shy of the -5 line.

I can get 10 more -5 for $25 so I’m tending toward just replacing them… maybe. It’s a risk to take I guess given where these are.

For future builders, check the cherry rivets vans sends you. I didn’t visibly notice the -6 amongst the bag of -5 (not that I lined them up of course).
 

Attachments

  • 4366229A-8578-4F2E-AAF5-E26254402A52.jpg
    4366229A-8578-4F2E-AAF5-E26254402A52.jpg
    266.1 KB · Views: 101
  • 9699061B-3379-45DD-8D53-840F688AF9CA.jpg
    9699061B-3379-45DD-8D53-840F688AF9CA.jpg
    295.1 KB · Views: 110
  • EB1160F7-6571-4ACC-B9CB-F0CF576F2383.jpg
    EB1160F7-6571-4ACC-B9CB-F0CF576F2383.jpg
    256.2 KB · Views: 119
Last edited:
I have used Cherry Max's on transport aircraft for decades. I suspect these results are because of a poor puller or that the nose piece on the puller is not fully screwed on. Also use the set that has the smallest possible hole that the stem will fit into.
Those rivets look like they may be a size too long. Also a big problem with Cherry rivets is that as soon as they are removed from the sealed bag the lubrication disappears. Once the bag is opened their shelf life drops dramatically, I know Vans sends them loose and that's a bad practice.
I don't get why Vans doesn't allow a AD rivet, usually it's the other way around. Maybe talk to a different engineer at Vans.
 
Last edited:
Cherry rivets are certainly able to be used in structurally important areas and this may well be the reason for them being employed here. I wouldn't go swapping them out without first asking Vans. I was just curious if there was a reason for it, or whether it was just convenience.

Bill and Tommy are right - the Cherry rivets are difficult to set correctly if you're not using the right tool. The genuine Cherry pnematic pullers work best but they are shockingly expensive to purchase and not at all worth considering for so few rivets on just one aircraft. The cheap pullers you get from the local hardware store are hardly up to the job and until you use a genuine Cherry puller you will not understand why. The Cherry rivets like a single good pull and you certainly can't achieve this on a manual hand puller, so as Billl suggests, give it that first 20% then do the second pull all the way to the locking and snap.

If you decide to remove any of those rivets just be real careful not to drill off centre. Get that mandrel out first... if it stays in there you end up with the drill skipping off the steel core and running down the side. If it all turns to monkey dung, just remember you can go up to an oversize rivet. The part number should be CR3242-4-x
 
I suspect the pneumatic puller is the issue. There is a Cherry Max specific puller. I have used it on all my CR’s and never had an issue.

To be honest o had no idea there was a collet? I’ve removed a couple in the project so far and I just tapped the mandrel out with a thin punch, then drilled #31 down into the centre until I could snap the head off, then tapped the rivet out. Seemed to come out ok!


I’ve just been using my pneumatic rivet puller.

https://youtu.be/vNBugge2M_Y
 
After having difficulty setting these Cherry rivets I called Vans and asked if I could just use solid rivets instead because bucking access is not an issue. I was told they were specified by the engineers so substituting solid rivets was not approved. My memory is a little foggy but maybe shear strength was the underlying reason. Scott mentioned a long time ago Cherry rivets are stronger than solid in shear.

https://vansairforce.net/community/showthread.php?t=134074#:~:text=Solid%20rivets%20will%20usually%20be,rivet%20is%20a%20cherrymax%20though.

Correct, and the answer is still the same...
The type of Cherry rivet used on the RV-14 has a higher shear strength than a AN426AD rivet of the same diameter.

If the mandrel of a Cherry rivet can be driven out with a punch after installation, it is proof that it didn't set correctly and needed to be replaced.
The locking ring that engages on the mandrel at the top of the rivet head makes that impossible if the rivet is fully/properly set.

A properly installed Cherry rivet requires grinding off about 30% of the manufactured head to get rid of the locking ring before the mandrel can be driven out.

This is easy to do on the dome head style rivets with a small cutting disk in a die grinder. The flush head style Cherrys are a bit more difficult. I have done it with a very small diam gutting disk or a small burr cutter in a dremal tool.
 
I suspect the pneumatic puller is the issue. There is a Cherry Max specific puller. I have used it on all my CR’s and never had an issue.

A pneumatic puller will work on cherry rivets but most people use way to high of a pressure when using them.

You should use a pressure just high enough for the tool to fully stroke and set the rivet (I think the instructions that come with them actually mention this, but who reads the instructions :rolleyes:).
A good working pressure is usually around 50 psi but varys depending on the rivet being set.

The side benefit is that the tool doesn't jump nearly as much when the mandrel breaks so it is much easier to control and you are less likely to bounce it on your skin surface, but I still always put my second hand against the skin and hold the nose of the tool when pulling the trigger.
 
If you do decide to remove them you must get the locking ring out first. I use a very small ball rotary file in a high speed grinder. It is easy for it to get away from you. I have done thousands at work and I still need to be very careful. Once that ring is out they are easy to drill.
 
If the mandrel of a Cherry rivet can be driven out with a punch after installation, it is proof that it didn't set correctly and needed to be replaced.
The locking ring that engages on the mandrel at the top of the rivet head makes that impossible if the rivet is fully/properly set.

A properly installed Cherry rivet requires grinding off about 30% of the manufactured head to get rid of the locking ring before the mandrel can be driven out.

Thanks Scott. I don’t think I fully understood how a cherry worked - another gem of info (which is what this is about after all).

I had a small punch, smaller than the diameter of the mandrel and tapped on each of the long tail rivets - each one the mandrel came out with light taps. The locking collars could be removed by just angling the punch in the hole and popping it out, or punching it through to the other side. I will drill these out and replace them with the proper length rivets.

I then tapped all the others - all were solid and the mandrel didn’t budge and was locked in place.

I’m completely certain the rivets which did not set properly were too long a grip length (-6). They all came in the same bag 3059 with some LP4-4. So you may have a small quality control issue at your end perhaps?

Photos of the removed mandrels as well as a couple of removed locking collars.
 

Attachments

  • 872879AA-9DEA-4F03-AA36-A1C93D334DC2.jpg
    872879AA-9DEA-4F03-AA36-A1C93D334DC2.jpg
    255.1 KB · Views: 114
  • D5A26B4A-C42C-4AC2-86C7-23E79A199E1F.jpg
    D5A26B4A-C42C-4AC2-86C7-23E79A199E1F.jpg
    177 KB · Views: 128
A pneumatic puller will work on cherry rivets but most people use way to high of a pressure when using them.

A good working pressure is usually around 50 psi but varys depending on the rivet being set.

Yep! I had mine set to 90psi thinking it was just like the squeezer. It really whacked them as you can see in the video. I will try 50psi on the replacement ones - thank you for your advice.
 
If you don't have a genuine cherry gun, I recommend you at least get the G27 hand puller.
 
Thank you to all for the assistance.

I received my replacement cherrys in the post today and had them installed before the postie had driven down the driveway.

I used the same pneumatic puller and the only change to my technique was to use 50psi on the regulator. It set the rivets great, was just slower and more gentle. Much easier to control. Thanks for the tip Scott!!

So the TLDR: I had some -6 length cherries in the bag form Van’s labelled as -5. They set poorly as the material was below the minimum grip for -6. The mandrel tapped out easily as the steel collar has not set, and therefore the rivets drilled out easily. They were easily replaced in 5 mins with the correct length ones.
 

Attachments

  • EEF4BC7B-13DE-4EED-88F2-0BB75A3AB55B.jpg
    EEF4BC7B-13DE-4EED-88F2-0BB75A3AB55B.jpg
    219.1 KB · Views: 104
Back
Top