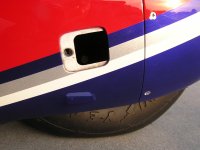
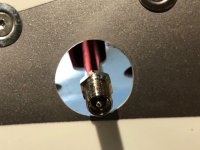
Greetings all. I presently have a 1 inch hole with a spring close door in my main wheel pants to access the tire stem. It's really difficult to get the valve cover on and off and insert the extension for the inflation of the tire. I would like to modify the present set up and wanted to see what everyone else uses. Please show me your set up. Thanks.......

Van's Air Force
You are using an out of date browser. It may not display this or other websites correctly.
You should upgrade or use an alternative browser.
You should upgrade or use an alternative browser.
Tire inflation access on wheel pants
- Thread starter Mark Cigal
- Start date

Bill Boyd
Well Known Member
I leave the valve caps off. Access the 90 degree stems through a hole similar to yours using an inflator with a whip hose on the end. Ground off the toggle latching mechanism so it functions as a straight push-on chuck. The hose is stiff enough to push and stay on the stem if you hold it there while inflating. Did this with the 6A and now with the 10.
All I lack now is index paint marks on the tires so I can know when the stem is aligned with the hole inn the pant.
I was daydreaming the other day about magnets, reed switches and a way to have an LED in the nose of the pant light up when the position is correct.
All I lack now is index paint marks on the tires so I can know when the stem is aligned with the hole inn the pant.
I was daydreaming the other day about magnets, reed switches and a way to have an LED in the nose of the pant light up when the position is correct.
wirejock
Well Known Member
Hose
Seems like a section of hose would fit over the valve stem cap. Cut a piece the right size maybe 2" long. Snug fit over a piece of rod for a handle. Once loose it will come off. Leave it in the tool. Screw it back on and pull the tool off.
I haven't tried making it so maybe it won't work.
As an old bus tire mechanic, there are all sorts of staight chucks for inflating. Something like this on a straight section of threaded pipe.
EPAuto 2 Pack Open Flow Straight Lock-On Air Chuck with Clip for Tire Inflator https://a.co/d/i9oNU3e
Last edited:
Roadjunkie1
Well Known Member
Seems like a section of hose would fit over the valve stem cap. Cut a piece the right size maybe 2" long. Snug fit over a piece of rod for a handle. Once loose it will come off. Leave it in the tool. Screw it back on and pull the tool off.
That is exactly what I use. I have a hole in the wheel pant covered with a hole snap fitting that is held more firmly with a screw going through that into a small rectangle of aluminum with a RivNut on the inside of the wheel pant. I have a 3 inch piece of old 3/8 inch fuel line hose that stays in my aircraft tool kit. I have one with a handle in my hangar tool box. Someone sells them somewhere but the fuel line works very well. I used a scrap I took off the Cub. Simple. Works well.
I have two valve stem extensions that, put together, are the perfect length to stick out of the wheel pant and allow for easy inflation. Not sure where I got them but AutoZone etc comes to mind..... Also in my aircraft tool box....
Last edited:
Carl Froehlich
Well Known Member
I carry a 1/4” drive handle with a 10mm socket in it. A tire mark pointing down when the stem is lined up with the wheel pant hole. I found this to work much better than the hose method - and the 10mm socket fits the valve extension to make sure it is tight on the valve stem.
Carl
Carl
Ralph Inkster
Well Known Member
I also have the spring loaded round access covers. What a pain. If I were to ever re-due the covers, I would fabricate a fiberglass door cover that would be held in place with a single screw. I have seen pictures of this solution in some of the forums.
This is what I found best solution for me. I also use the hunk of hose to remove the cap & 4" valve extension to fill the tire.
koupster
Well Known Member
Made an extension long enough to fit my application by using three inexpensive 1 1/4 inch extensions piggybacked.
https://www.oreillyauto.com/detail/c/xtra-seal/tire---wheel/tire-valves---caps/tire-valve-caps---extensions/a2d285af7e77/xtra-seal-1-1-4-inch-tire-valve-extension/xts0/15497?pos=12
Put a little super glue on the threads, and they've stayed connected.
https://www.oreillyauto.com/detail/c/xtra-seal/tire---wheel/tire-valves---caps/tire-valve-caps---extensions/a2d285af7e77/xtra-seal-1-1-4-inch-tire-valve-extension/xts0/15497?pos=12
Put a little super glue on the threads, and they've stayed connected.
Buy this through Amazon or where even: 6 Inch Valve Stem Extenders (used for Dually Valve Stem)
As mentioned, make a mark on the tire so when the mark is at the lowest point the stem aligns with the hole in the wheel pant
Buy about 6 inches of tube that the stem cover (cap) will slide into, I think 3/8 inch, stick a piece of dowling mostly into the tube, this acts a stiffener, leaving enough space for the stem cap to slide into the other end. This becomes a stem cap remover/installer.
RV8Squaz
Well Known Member
This what I did many years ago. I use a 3/8” nut driver to remove the valve stem cap and access the valve stem with a 6” extension.
Attachments

Lots of good ideas here for making a quick-access to the tire valves. I did that too. But now... I never use them...
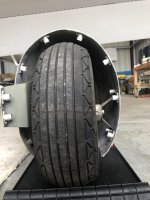
When its time to add air, I take off my wheel pants and look things over... especially the brake pads to see if they need replacing.
Using Nord-Lock washers instead of safety wiring the 7/16 bolt makes removing the wheel pants a breeze...
When its time to add air, I take off my wheel pants and look things over... especially the brake pads to see if they need replacing.
Using Nord-Lock washers instead of safety wiring the 7/16 bolt makes removing the wheel pants a breeze...
Last edited:
Scott Hersha
Well Known Member
This is what I’ve used on all 6 of my RV’s to plug the 1”access hole:
https://www.lowes.com/pd/Hillman-2-Pack-3-7-in-White-Plastic-Hole-Plug/3109067
They come in black and white where I live, and they are paintable. I use my pocket knife to pry it off. Then I use a piece of fuel line rubber hose to remove the valve stem cap. I have a valve extension that threads onto the valve stem - easily - and holds air. The whole process takes a couple minutes and costs very little.
I have a couple of those spring loaded hole covers that I have never used because of the perceived difficulty with in use servicing. Plus the extra effort required to install them. The plastic caps snap right into the 1” hole you make. Buy a couple extras because they are so cheap.

Larry DeCamp
Well Known Member
Access hole size
I have small holes in the fairing that will pass a 10mm socket to remove the Michelin inner tube stem cap. The hole is so small I don’t cover it. I could turn custom plastic plugs like Scott purchased, but don't know if it matters. What is the problem with a small diameter hole ?
I have small holes in the fairing that will pass a 10mm socket to remove the Michelin inner tube stem cap. The hole is so small I don’t cover it. I could turn custom plastic plugs like Scott purchased, but don't know if it matters. What is the problem with a small diameter hole ?
BH1166
Well Known Member
I use hole covers like Scott uses. I don’t use valve stem caps ( no attacking please) , mark the tire with tire marking crayon, a valve extension ( such as this)
https://www.amazon.com/Dually-Valve...m+extenders&qid=1662895069&sr=8-2-spons&psc=1
Pretty simple.
https://www.amazon.com/Dually-Valve...m+extenders&qid=1662895069&sr=8-2-spons&psc=1
Pretty simple.
Bill Boyd
Well Known Member
Not attacking (I'm on your team), but I'm clearly not understanding the perceived importance of valve stem caps. I ditched them about a decade into my 20 year RV-6A ownership and never looked back, tossed the next set in the trash when I was building the RV-10, and do not see any tragedy that may be lurking just because they aren't still in my way every time I want to check or add air. They may keep dirt out (never an operational problem in my experience) but they don't hold air inside if the Schrader valve is leaking.
I'm honestly not sure why we preserve this ritual. Is it like safety wiring an oil filter - we've just always done it and we can't seem to stop?
I'm honestly not sure why we preserve this ritual. Is it like safety wiring an oil filter - we've just always done it and we can't seem to stop?
Kyle Boatright
Well Known Member
Not attacking (I'm on your team), but I'm clearly not understanding the perceived importance of valve stem caps.
I ditched the stem caps years ago too. Then landed one day after a visit to a local grass field and had a low tire that went totally flat while I went to the FBO for a drink and a restroom visit. The culprit was a piece of trash that fouled the valve stem.
I went back to the stem caps after that.
Anecdotal, I know...
Carl Froehlich
Well Known Member
Caps keep dirt and brake dust out of the stem opening. That dirt is pushed into the valve when putting air in. There is potential for that dirt to hold the value open causing a value stem leak.
+1
And it is simple to remove and replace the valve stem cap with a 10mm socket.
Carl


Interested with the holes in the wheel fairings. My question is how do you mark the holes to match the valve stems to cut the holes?
Remove wheel fairing, park plane with valve stem in desired spot, shine laser on valve stem, reinstall wheel fairing, drill hole.
Larry DeCamp
Well Known Member
Mark valve stem
The laser idea is cool. I just drilled a piece of aluminum with two small holes . One was for the bolt in gear leg threaded cap, and the other was for a center punch or marker corresponding to the valve stem radius from the axle center.
Put he bolt in the wheel pant and mark the pant for hole location you want to access the stem.
BTW, no one responded to my question about “why plug the hole”. Obviously aesthetics is a personal priority. Is there a significant aerodynamic reason to plug it ?
Scott Hersha
Well Known Member
The laser idea is cool. I just drilled a piece of aluminum with two small holes . One was for the bolt in gear leg threaded cap, and the other was for a center punch or marker corresponding to the valve stem radius from the axle center.
Put he bolt in the wheel pant and mark the pant for hole location you want to access the stem.
BTW, no one responded to my question about “why plug the hole”. Obviously aesthetics is a personal priority. Is there a significant aerodynamic reason to plug it ?
I doubt there is a measurable aerodymic difference by just leaving it open. If you haven’t drilled your holes yet, go fly and take some measurements, then drill the holes and see if you can tell. If you already have the holes, use some tape and let us know what you find. I have a friend with an RV8 with the open holes. He has no trouble keeping up with everyone in formation, but I seriously doubt he has done any testing.
HFS
Well Known Member
Valve Stem Extender
The valve stem is very rarely aligned perpendicular to the face of the wheel pant at the extended "contact" point. What this means is that unless you allow (somehow) for that fact - if you drill the access hole in the WP based on where the end of the stem is, you probably won't have the alignment you expected after drilling the hole. You could drill a small "pilot" hole and then modify your alignment from there - assuming the correct alignment hole diameter still contains the pilot hole.
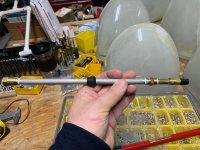
The solution I came up with (probably stole it from someone else, been so long don't remember) is to make a valve stem "extender" that projects the actual alignment of the stem to whatever distance is required to mark the same on the inside of the WP with a pencil. You can make the mark along the circular path made by rotating the tire slightly when marking. Then you can choose where on that arc you would like the hole for servicing.
The unit shown is make from some all thread tubing for lighting projects - but any thing that matches the diameter of the pencil you are using will work. I silver brazed a "retention" nut on one end to hold the pencil in place. But even this is optional - with a little care and a pair of heavy duty "tweezers", you can slide out the pencil, after installing the extender, enough to contact/mark the inside of the WP. I usually put some light masking tape in the area of interest, to help the pencil mark show up better.
YMMV - but this way assures alignment at the WP face.
HFS
The valve stem is very rarely aligned perpendicular to the face of the wheel pant at the extended "contact" point. What this means is that unless you allow (somehow) for that fact - if you drill the access hole in the WP based on where the end of the stem is, you probably won't have the alignment you expected after drilling the hole. You could drill a small "pilot" hole and then modify your alignment from there - assuming the correct alignment hole diameter still contains the pilot hole.
The solution I came up with (probably stole it from someone else, been so long don't remember) is to make a valve stem "extender" that projects the actual alignment of the stem to whatever distance is required to mark the same on the inside of the WP with a pencil. You can make the mark along the circular path made by rotating the tire slightly when marking. Then you can choose where on that arc you would like the hole for servicing.
The unit shown is make from some all thread tubing for lighting projects - but any thing that matches the diameter of the pencil you are using will work. I silver brazed a "retention" nut on one end to hold the pencil in place. But even this is optional - with a little care and a pair of heavy duty "tweezers", you can slide out the pencil, after installing the extender, enough to contact/mark the inside of the WP. I usually put some light masking tape in the area of interest, to help the pencil mark show up better.
YMMV - but this way assures alignment at the WP face.
HFS
Attachments
Not attacking (I'm on your team), but I'm clearly not understanding the perceived importance of valve stem caps. I ditched them about a decade into my 20 year RV-6A ownership and never looked back, tossed the next set in the trash when I was building the RV-10, and do not see any tragedy that may be lurking just because they aren't still in my way every time I want to check or add air. They may keep dirt out (never an operational problem in my experience) but they don't hold air inside if the Schrader valve is leaking.
I'm honestly not sure why we preserve this ritual. Is it like safety wiring an oil filter - we've just always done it and we can't seem to stop?
Have you ever examined the sealing mechanism in a schrader valve? It is a very small cap with rubber and a very weak spring. If any dirt particles enter the stem, they will be forced into the small gap at this rubber piece by the air pressure during filling and if they lodge in the sealing surface, you have a leak. It only takes dust to create a slow leak in a schrader valve and there is plenty of brake dust in that wheel pant. The caps prevent this scenario and cheap insurance from debris related leaks.
Further, the avaiation steel caps have a rubber sealing surface and if in good condition and tightened properly will hold 25+ PSI, providing a layer of limited redundancy for leaks in the schrader valve. I got a set of tubes once that had machining debris covering the surfaces that the schrader seals against. The tires would drop to 30 PSI in a few days and stay there indefinitely, due to the caps. This is different than the plastic auto caps that will not hold any pressure
Not saying that what you are doing is wrong, only that there are tangible benefits to the caps.
Larry
Last edited:
Here's what I use
I too quit using stem caps a long time ago. Just make sure you valve stems are well seated and clear.
I recommend the straight tube approach for checking/adding air. I bought a Milton straight nipple from Amazon years ago and then use either a 3/4" rubber hole cap, or a Camloc spring door, to cover a hole lined up with the valve stem on the wheel fairing.
This is quick and works very well.
TIP: paint a vertical white line (or use a tire marker) on the side of the tire to know when the stem is lined up with the opening.
Attachments
Last edited:
D-Dubya
Well Known Member
Going Capless
Regarding the value of having a screw-on valve stem cap, I remember way back in the last century when I lived in Buffalo, NY (much colder than where I now live). A buddy and I washed a car in his heated garage in the middle of winter. When we pulled the car back out into the sub-freezing temperatures, there was apparently some residual water in the one valve stem that didn't have a cap. It froze pretty quickly, and the expansion of the ice allowed air to leak out. In a couple hours, we had a flat tire. It took us some head scratching to figure out what happened. We had to get a hair dryer, thaw out the valve stem, blow the water out, then air it up again. Problem solved, and it never happened again.
Granted, the mechanism of failure wouldn't be exactly the same, but it could be possible for water to freeze when climbing to altitude. Far fetched? Maybe. Would centrifugal force expel any water that was in the valve stem? Probably. But that experience always stuck with me and I ALWAYS put the caps on my cars and my plane.
When I was debating the need for an access door during my build, I read a post on this subject (I think it was from Paul Dye). I don't want to misquote, but he basically said that it's not a bad idea to pull the front half off of the wheel pants and inspect everything in there on a regular basis, which negates the need for an access door to the valve stem. If you have good tubes like the Michelin Airstops, leakage is almost non-existent. So that's what I chose to do. It's not a big deal to pull the front half off.
I have basically zero experince with it.... but seems to me that it's probably a great idea t pull the fairing for an inspection.....
except
I can imagine scenarios when it might be nice to quickly top up a tire...
pouring rain and the tire is very low. Wouldn't it be nice to air it up a little so you can roll the plane into the maintenance hangar for a better look?
except
I can imagine scenarios when it might be nice to quickly top up a tire...
pouring rain and the tire is very low. Wouldn't it be nice to air it up a little so you can roll the plane into the maintenance hangar for a better look?
gmcjetpilot
Well Known Member
I was reading all through thread and got to the last one posted. Stole my thunder. I just take the screws off fairing, pull the fairing. I get a good look at tire, brake pads, line. It takes a few minutes to take off and put on, including adding air and inspection. Takes a little less with small battery electric screwdriver. I played with idea of cutting a circular 2" hole in the fairing and using a Metal Snap-In Panel Plug. I do have an idea of how low to ground fairing is with proper tire pressure. If it's low on psi's, I can see it....... pull the fairing for an inspection.....
except....
PS My intersection fairing is bonded and intergral to the fairing halves, and they do not require screws.
Last edited:
I have a 1” hole with a metal snap plug. The hole was originally 3/4” and I spent sometimes 20-30 minutes getting hole and valve stem lined up and valve cap removed through that little hole. It would have been way quicker to just remove the 11 screws to take off wheel pant. Instead i soldiered on and decided to increased hole size to 1” and it did make it much easier to add air through the hole but it takes about the same time as if I just remove the wheel pant.
HFS
Well Known Member
Can You Say Borescope?
I've posted this before - didn't get much "traction" then, but maybe some of the posters on this thread didn't read it. It's certainly not the end all, be all of tire inflation options - but it is one, IF you are using the hole in the WP with a snap plug cover.
It helps in locating the stem in the center of the hole to make the inflation easier. And yes, I know you can mark your tire for the same purpose, but, if you are pushing/pulling your airplane to rotate the tire, you are (I think) having to alternate back and forth between the pushing/pulling aspect to looking for the tire mark.
With this system, use a simple (read cheap) borescope you may already have for valve inspection, to indicate stem position on your Android or iPhone while pushing/pulling it. I am an old man, and any more movement on my part than is absolutely necessary is a negative.
YMMV - But this is one (easy) way of locating the stem.
HFS
Attachments
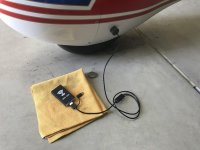
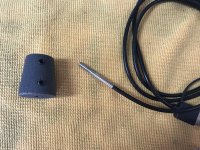
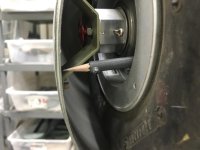
Cut 1" hole in the wheel pant. Plastic snap plug covers the hole. Add air using 6" screw on Schrader extension. Pop the plug, feel around for the valve stem. No stem? Roll the plane, feel for the stem. Adjust a little more for alignment and screw on the extension. Check and fill. Each side takes me maybe 2 minutes. Worked fine now for 22 years.
Last edited:
bruceh
Well Known Member
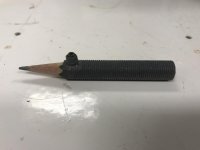
I bought a set of nut drivers from Harbor Freight. The 3/8" one was very hard to get into that small access hole for the valve stem unless it was aligned perfectly. I ended up taking the nut driver plastic handle to the grinder and took off the lower part of the handle and now it easily fits in the hole and can reach the valve stem. Customized tool!
Cleaveland tool used to sell a nice long reach tire inflator with a gauge. I bought one at Oshkosh a few years back. I just looked on their site, but don't see it available anymore.
Cleaveland tool used to sell a nice long reach tire inflator with a gauge. I bought one at Oshkosh a few years back. I just looked on their site, but don't see it available anymore.
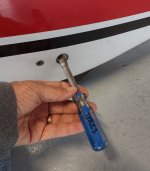
Wow such the thread for a seemingly simple thing.
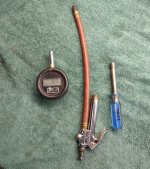
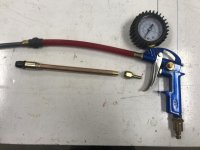
Here's my set-up - pretty simple, works.
Some have suggested leaving off the cap but the o-ring in the cap adds some redundancy in the event of a valve core failure. May seem unlikely but I've seen it happen.
Here's my set-up - pretty simple, works.
Some have suggested leaving off the cap but the o-ring in the cap adds some redundancy in the event of a valve core failure. May seem unlikely but I've seen it happen.
Attachments
Scott Hersha
Well Known Member
Maybe I’m lucky (because I know I’m not good), but it’s never taken me more than 15 minutes to check/inflate my tires through the 1” opening in the aft wheel pant, covered by a snap cover. No need to remove the forward wheel pant. I use a piece of rubber flexible hose to capture and remove/reinstall the valve cover cap, and my extension shader valve easily bridges the gap. I carry spare parts of these items in my fly away kit.
Erimo
Well Known Member
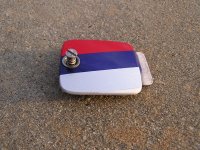
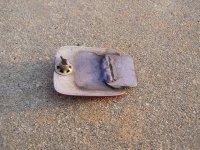
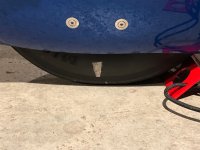
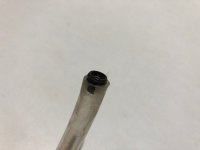
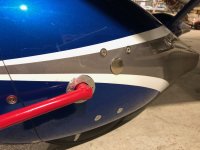
I made a hole in each wheel fairing, which I plug with a metal clip. A white mark on the tire allows the valve to be positioned opposite the hole in the fairing.
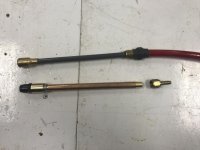
All I need is a rigid valve extension and a piece of semi-flexible tubing.
The tube is used to unscrew the valve cap.
I need two minutes by tire.
All I need is a rigid valve extension and a piece of semi-flexible tubing.
The tube is used to unscrew the valve cap.
I need two minutes by tire.
Attachments

Bill Boyd
Well Known Member
I have a spot marked on the floor for each tire. I just roll it into place and the stems line right up with the 1" access holes.....
I bet that works - exactly once.
And then randomly after the first time.
Like another poster above, if you don't have marks on the tires, you will get very good at reaching in and feeling for the stem between pushes. It is sometimes possible on a very level floor with no flat-spot set in the tires to move the plane by pushing on the pant or grabbing the leading edge while under there, until you feel the stem touch your finger.
Roadjunkie1
Well Known Member
Easy, fast, uncomplicated
Exactly! Maybe even 10 minutes to do both. I have the tire/wheel marked so I know where the valve is and it is nothing to roll the airplane so it is lined up. Easy. Fast. Uncomplicated...
Maybe I’m lucky (because I know I’m not good), but it’s never taken me more than 15 minutes to check/inflate my tires through the 1” opening in the aft wheel pant, covered by a snap cover. No need to remove the forward wheel pant. I use a piece of rubber flexible hose to capture and remove/reinstall the valve cover cap, and my extension shader valve easily bridges the gap. I carry spare parts of these items in my fly away kit.
Exactly! Maybe even 10 minutes to do both. I have the tire/wheel marked so I know where the valve is and it is nothing to roll the airplane so it is lined up. Easy. Fast. Uncomplicated...
[email protected]
Well Known Member
I hate the small access holes so I put automotive Bluetooth pressure sending units on all 3 tubes. Now I only take the front half of the pant off to inflate the tires when necessary, which isn’t often since I buy the no leak tubes.
HFS
Well Known Member
6" Inflator Valve Extension - Offer & Pricing
Not here to debate the + & - of adding air to main gear tires w/o removing the WP. Only that I do it, and am offering the following (until I run out - 8) inflator valve extensions @ my cost + shipping (~ $5.00). I am also including the P/N's and vendors where I obtained my parts - total unit cost <$10.00.
1. Tire Chuck, Brass/Steel. Vendor: Zoro P/N G2143127 or Grainger P/N 1KUH2
Both under $5.00
2. 6" x 1/8 NPT Brass Pipe Nipple. Amazon P/N LTWFITTING Brass Pipe 6" Long
Nipple Fitting 1/8 Male NPT (Pack of 5). Unit cost: $3.85
3. 1/4 Male x 1/8 Female Bushing Adapter. McMaster-Carr P/N 4638K351.
Unit cost: $.98
I turned off the "flats" on the body of the Tre Chuck to give a little better "streamline" for putting it into the hole (whatever size you have) in the WP.
I am giving away my time for the lathe work & assembly. If anybody wants one for the materials cost + shipping - call it $15.00, just PM me and we can work out the details. I only made 8, but the vendor list & P/N's should be enough to get started.
I put mine on a flex hose, pistol grip style inflator & like it for the ease and convenience. I do have another inflator that has a lever style "trigger" with the sliding pressure scale, which has the extension rigidly attached to the body of the inflator - I don't like it as well as the "flex" unit, but that's just me. To each his own.
YMMV - But this does work!
HFS
Attachments
Tug hole
Thanks. Looks quality, but pricey. Might be able to lathe something similar.FlyBoy Accessories sells this product -
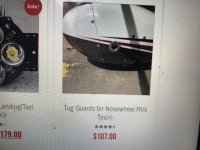
Tug ring
I used these as tug ring hole protectors… from Amazon
https://www.google.com/url?sa=t&rct...p/B07R8KKW6L&usg=AOvVaw1VzV2HIWpZQ_H-8pgDyoGc
I used these as tug ring hole protectors… from Amazon
https://www.google.com/url?sa=t&rct...p/B07R8KKW6L&usg=AOvVaw1VzV2HIWpZQ_H-8pgDyoGc

