-POSTING RULES

-Advertise in here!
-
Today's Posts
|
Insert Pics
Keep VAF
Going
w/a Donation
VAF on Twitter:
@VansAirForceNet
|

06-27-2020, 04:01 PM
|
 |
|
|
Join Date: Jul 2013
Location: Clarkston, MI
Posts: 996
|
|
RV-8 Misfit Canopy
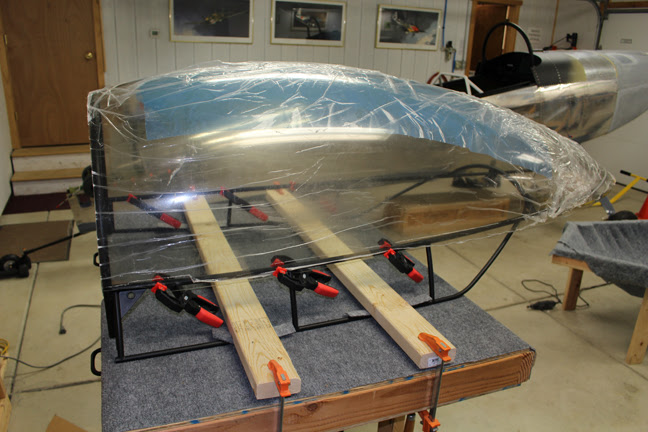
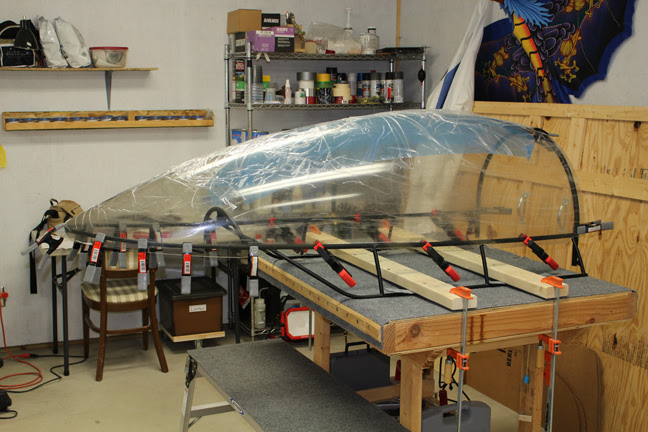
When initially fitting my canopy to the frame and fuselage, it looked like I would have problems fitting the canopy to the aft end of the canopy frame. Terry Lutz and Carl Franz were helping me with the fitting; I pointed out the large gaps between the aft canopy and the frame on both sides. They advised me to get the fit correct at the front and on the hoops, get the Big Cut done and see where I was at. I also called Van?s Builder Support prior to the Big Cut to discuss both the Big Cut and the large gaps. I don?t remember who I spoke with, but he was an experienced RV-8 builder. His suggestion was that after the Big Cut was done, I should start clamping the canopy to the frame at the front and work toward the back, clamping as I went, and see how it well it would pull together. Today I began the process, making sure the bottom edge of the canopy would fit around the vertical tubes of the canopy frame skirt. After setting three clamps on each side, it wasn?t looking good at all.

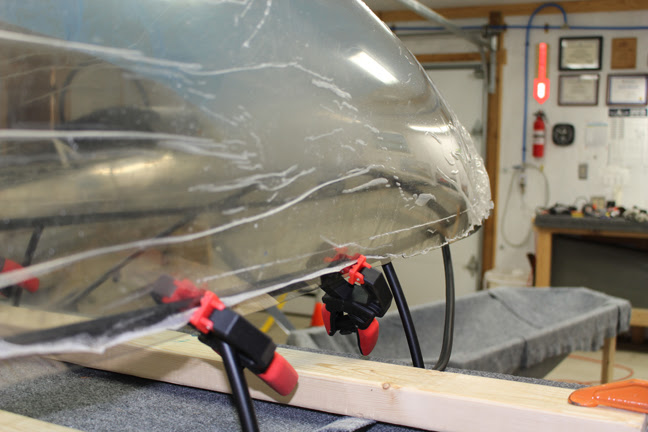
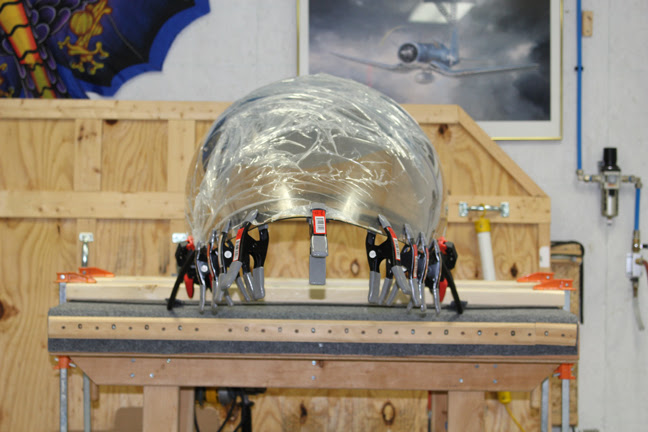
You can see in the second photo how much the canopy still tries to bow outward. I took the following photos from underneath, holding up the short rule to show how big the gaps are between the canopy edges and the frame.

Don?t be fooled by this photo; it gives the illusion that the canopy is draping low over the frame and resting on the skirt tube. The earlier photos provide a better angle to assess how low the canopy is sitting, which is to say, not much. The canopy is fitting well around the front bow and resting on the tip of the aft bow.

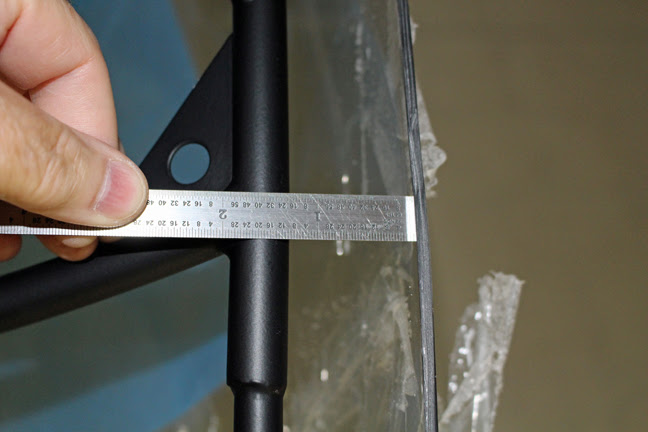
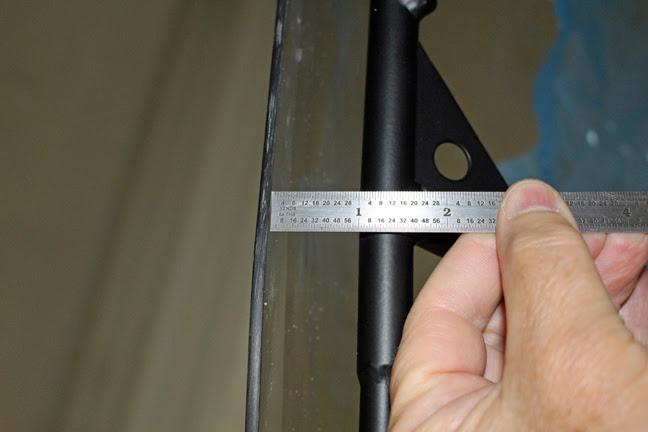
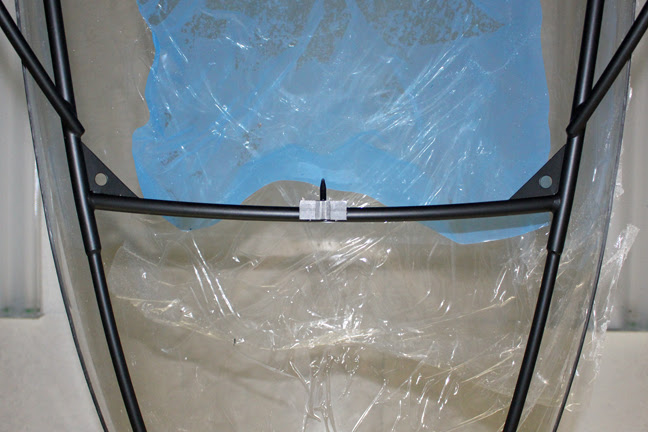
As you can see in the last two photos, the gaps between the canopy and the frame at the crossover support tube are huge; a total combined gap of about 2.25 inches. The canopy can be squeezed in to touch the frame, but that distorts the fit everywhere else and puts a lot of stress on the canopy; far more stress than I would ever want to build in to the assembly.
This can?t possibly be normal, can it? With the canopy already resting on the hoops, no amount of fore/aft movement or trimming can change the gaps in the relaxed fit of canopy to frame. I?m planning to get some of the local builders of RV and composite aircraft out to my shop to take a look at these parts and see what they think. In the meantime, I?d like to hear what the VAF community and Van?s Aircraft have to say about how this looks to them. It doesn?t look good to me at all.
|

06-28-2020, 02:30 AM
|
 |
|
|
Join Date: Jan 2006
Location: South Africa
Posts: 950
|
|
I have never built an 8 but did build seven other RVs. Right now I am busy replacing a 7A tip-up canopy damaged by a bird strike.
It is had to see in your photos, but would it be possible to move it forward a bit in order to get the rear gap smaller?
__________________
Jan Hanekom
South Africa
Approved Person nr 325
RV10 - ZU-IBA - Flying and getting lots of TLC
RV10 - ZU-XOX - (Flying)
RV7A - ZU-JRV - (Flying)
RV10 - ZU-JVR - (Written off)
RV7 - ZU-LOL - (Flying)
RV10 - ZU-RVI - (Flying)
RV7A - ZU-MER (Bought back)(Sold again) Flying
RV7A - ZU-JAD (Sold Flying)
Dues paid for 2023 WITH A SMILE - A BARGAIN AT THE SAME PRICE AS FIVE HAMBURGERS
|

06-28-2020, 03:12 AM
|
 |
|
|
Join Date: Jun 2010
Location: Wiltshire, UK.
Posts: 276
|
|
We couldn?t get our canopy to fit well at the front and back before the big cut.
Once they were split, we fitted the aft section and started from the back and worked forward. This gave the best fit, though the sides at the points where the canopy frame tubes make that step change in size needed light pressure to hold them in. I ended up cutting about a inch section off the whole forward edge of the aft bubble once it was sat comfortably.
__________________
Ed.
RV-3B G-LILB - Ex-N159SJ UK import Sept 2022
RV-3B G-CCTG - Purchased May 2020
RV-8 G-MIRV - Finished July 2019 - sold
RV-6 G-BZRV - Finished July 2002 - sold
|

06-28-2020, 09:46 AM
|
|
|
Join Date: Oct 2014
Location: Charlotte, NC
Posts: 52
|
|
I worked from back to front
Martin,
I'm building an 8 and worked from back to front when clamping the canopy to drill - worked well for me.
General steps followed:
- Cut and drill the canopy using instructions from Airplane Plastics. I used a dremel and and a diamond blade from the hardware store. For drilling use Diamond Dust bits from Craftics.
- I used the grommet method to attach canopy to frame. Allow sufficient edge distance for the larger holes. Time will tell if it reduces propensity to crack.
- Make cuts when the canopy is warm - about 80 degrees. Cut the flat base of the canopy away and place on the frame. Then cut canopy until it touches roll bar. Sneak up on it with little cuts and it fits great.
- Drawing 44 says the canopy frame rear bow should be 5/8" - 3/4" from the top of the rear slide rail and that's with the weight of the canopy. Mine was 5/8" with the canopy off. Putting it on drops it to 3/8". I bent the frame back up to 15/16" unloaded and it goes to 3/4" loaded. Remembering to maintain edge distance for those rivets that will attach canopy to frame, start cutting rear of canopy.
- On an 80 degree day in the workshop, canopy ready for the big cut. Clamp it, tape it and cut with dremel. Then smooth edges with 220 grit.
- Start drilling frame and canopy. Use a piece of tape on the frame to see the line for where to drill canopy holes by pressing the frame against the tape. This ensured I drilled at the tangent and lets me drill the frame with a drill punch and the canopy off. Drill from rear to front drilling into frame first with #40 then put canopy in place and drill with #40 plex bit. Work one hold on left and one on right then move forward. Cleko as I go. It worked well.
I also used the following tips from Scott Thompson's build site: - Drill the vertical roll bar part of the canopy first because once the horizontal holes are drilled it fixes the vertical distance available.
- Don't trim the canopy to the edge of the frame; leave another half inch. The extra plexiglas won't be a problem and will give some extra edge distance for the holes if you want to enlarge them a bit.
- Ensure as accurate precision as possible when marking intersecting line on the canopy that are to be used to locate the matching holes in the skirt. Use a fine tip marker to add a bit more precision. It only takes a slight deviation to miss the hole. I cut a piece of hard plastic at a 90 degree angle from an old salad container and used that as my template.
Bob
__________________
RV-8 Under construction
Dues Paid
|

06-28-2020, 01:29 PM
|
 |
|
|
Join Date: Jul 2013
Location: Clarkston, MI
Posts: 996
|
|
Follow up
After reviewing the suggestions here, I consulted with Curt Martin (multiple aircraft builder) in the shop. He agreed that it was best to start from the back, and although he understood my concerns about building stress into the assembly, his comment was "If a normal spring clamp can pull it into place easily (which it can), it will be fine once assembled". So I continued clamping, fitting, checking, trimming, sanding, smoothing, refitting and rechecking and now I'm to this point.

I think I have it where I want it now. I will carefully review the instructions again and all the suggestions here before proceeding further, but I'm pretty sure I'm ready to start drilling holes. I know I will have a final trim to do on both edges, but I may wait until after the holes are drilled and smoothed and determine my final cut line in relation to their placement for continuity. I like the idea of the extra material around the holes during the clamping and drilling process, but I'm not absolutely certain that having the holes in place doesn't create a risk for stress concentrations during trimming. I'm also pondering Sikaflex for the front windscreen and maybe both Sikaflex and rivets (belt and suspenders) for the canopy. Thank you all for the good advice. I'll keep you posted... but you knew that. 
Last edited by goatflieg : 06-28-2020 at 01:32 PM.
|

06-28-2020, 05:41 PM
|
 |
|
|
Join Date: Jan 2005
Location: Houston, Texas
Posts: 471
|
|
Also consider cutting off the back couple of inches of the aft canopy tip. That made all the difference in the world on my installation. The fiberglass skirt will cover it.
__________________
William Slaughter
Houston, TX
RV-8QB
|

06-28-2020, 06:44 PM
|
|
|
Join Date: Feb 2008
Location: va.
Posts: 767
|
|
I cut the back off mine too and it helped a lot. That was as instructed by Todd?s Canopies.
|

06-29-2020, 05:59 AM
|
 |
|
|
Join Date: Jun 2010
Location: Wiltshire, UK.
Posts: 276
|
|
Quote:
Originally Posted by goatflieg
I'm also pondering Sikaflex for the front windscreen and maybe both Sikaflex and rivets (belt and suspenders) for the canopy. Thank you all for the good advice. I'll keep you posted... but you knew that. 
|
We Sika'd our canopy - if you're going to go that route, take a look at the requirements for spacing the bubble off the frame for the glue joint - it may impact any further trimming you might do to the plexiglass. Don't Sika and rivet, there's no need!
__________________
Ed.
RV-3B G-LILB - Ex-N159SJ UK import Sept 2022
RV-3B G-CCTG - Purchased May 2020
RV-8 G-MIRV - Finished July 2019 - sold
RV-6 G-BZRV - Finished July 2002 - sold
|

02-15-2023, 01:11 PM
|
|
|
Join Date: Jan 2016
Location: Buenos Aires
Posts: 11
|
|
Bad canopy fit
Hi guys, probably too late, just saw this thread. Experienced the exact same issue few years ago when building mine. Heated the plexi and used a bunch of clips to fit to the steel structure as Vans suggested. Drilled and mounted everything with success. But few months later started to notice cracks here and there. It was too late to fix it and ended replacing my plexi for a local manufactured. Asked the specialist and said that a lot of tension builds up and the only way is to send the whole thing for a heat treatment that wipes the tensions out. Too late for me too.
Maybe the sica bond may avoid the cracks, but stress is still there.
|
Thread Tools |
Search this Thread |
|
|
Display Modes |
Linear Mode
|
Posting Rules
|
You may not post new threads
You may not post replies
You may not post attachments
You may not edit your posts
HTML code is Off
|
|
|
All times are GMT -6. The time now is 06:21 PM.
|