![]() |
Urgent Heater Muff/Exhaust Heads Up!
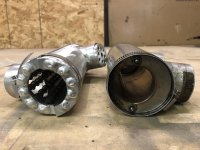
I discovered a problem with one of the heat muffs on my -14A today. Actually, the heat muff was only part of the problem, which also involved the exhaust system. As a data point, the airplane has 700 hours on it.
I thought that both muffs fit tightly enough on the exhaust pipe when I installed them. They are held in place by bendable tabs. Today I noticed that the tabs on the inside diameter of one of the end plates on a muff had worn off. The resulting sharp edge had cut a groove into the exhaust pipe around a portion of its circumference. I did not measure the depth of the cut but it is very definitely noticeable. I just ordered replacement end plates for both muffs and will pull the assembly apart tomorrow to have a better look at it. There may be damage to the exhaust pipe under the other three end plates but I only noticed this one in the limited time I had. 
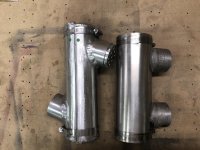
This is an area you may want to pay attention to as it is not very noticeable and could create some exhaust pipe damage before you see it. And clearly, an exhaust pipe leak into a heater muff is not a good situation. I don't now how tightly the end plates are supposed to grasp the exhaust pipe, but certainly I intend to bend the tabs sufficiently to tighten up that joint when I install the new parts. It would be be an improvement if the end plates were designed such that they could be attached rigidly to the exhaust pipe with a hose clamp instead of via a friction fit based on how you bend the tabs. |
More info and pics
Good catch.
I'm looking at my exhaust pipe heat muffs and trying to correlate your description of exactly what failed. i think that I see the area that may be the part that failed. Can you post pictures of the portion that wore off of the bendable tabs on the inside circumference of the end plates after you get into it some more? |
Yes, I'll take and post a couple photos tomorrow when I get it apart.
|
I just removed a 'front' heat muff from a 14 that had failed, some of the parts had broken off and others were deformed.
|
At only 78 hours the outer most muff on the right side did the same thing.
|
RV 14 heat muffs
Timely!
I found that the heat muffs keeps loosening after a few hours of flying. Tightening the "hose" clamps deformed the very flimsy/fragile endplates. Just replacing the endplates are not an option. Did so and it failed a second time. One solution might be to install two endplates (back to back) on each end of the muffler to beef up the surface area and strengthen the endplates so that the clamp force can be increased. Are thicker/heavier end plates available or any other solutions out there? Thanking a solution in advance :-) |
Wonder which supplier is making the heat muffs for Vans these days, or if the design has changed. I think I had a Robbins heat muff on my RV-8A and it's got over 1000 hours on it with no issues.
|
Mine has 140 hours and hasn’t quite failed but isn’t very sturdy either. It’s the forward one that is the worst. I can’t tighten it because of the deformation when the clamp is secured. I’m looking forward to anyone having this problem solved.
Maybe this is better? https://www.aircraftspruce.com/catal...at05-15249.php |
Quote:
Larry |
better muff
Quote:
|
Quote:
|
Same here, both become loose again after about 50 hours of flying.
|
Part number
As an FYI until I get some pix today, the part number involved is EX-00013C and in my plans is shown on page 48-04, figure 2.
On this drawing you can see what I call "tabs" on both the O.D. and the I.D. of the part. The outer tabs lie against the heat muff skin and the inner tabs lie against the exhaust pipe. The only way to secure the entire assembly to the exhaust pipe is by bending the tabs on the I.D. so that they press firmly against the pipe. From what I saw yesterday, and will photograph and post later today, is that some of these inner tabs apparently wore away, allowing the sharp edge remaining to cut into the exhaust pipe. As others have pointed out, this is very thin material and is easily distorted. I suspect this situation is ripe for a solution, either by Van's or some aftermarket source. Will know much more when I disassembly mine, take photos and post them. Stand by... |
Quote:
Last I checked, he offered them for 1.5 and 1.75" exhaust pipes. Given the potential market to replace what appears to be a less than optimal design, I am sure he would tool up to make them for whatever size pipe is used on the 390's. Larry |
FYI - I have a Vetterman exhaust (IO-390] which I believe I ordered in 2018. The exhaust muffs are from Robbins Wings. The ports on the muffs are set up for the RV-14. The flange that rests against the exhaust pipe is one piece versus the tab design.
Bill, thanks for this post. You’re helping us non-mechanics do a better job maintaining our planes. |
Heat muff photos
Today I removed both of the heat muffs from the airplane. I have new end plates on order from Van's but they alone will not solve the problem seen in the photos below.
I may use the replacement parts along with some modification to them but will also look at whatever aftermarket muffs are available. Based on what I saw, I do not believe the existing components will last long term due to both the thin material used on the end plates and the friction mechanism for holding them in place on the exhaust pipe. Vibration causes the friction tabs on the I.D. of the end plates to erode against the exhaust. This causes even more erosion with the result that the end plates become guillotines that cut into the exhaust pipe. ![]() This is what I first saw in a routine inspection of the aft muff. Nothing appeared out of the ordinary. ![]() Looking at a different angle showed some erosion of the forward end plate. ![]() After removing the muffs, this is what appeared under the plate in the above photo. You can see two different cuts into the exhaust pipe. The lower one is not quite as visible in the photo. ![]() Note the two arrows. They show areas where the friction tabs on the I.D. of the end plates have worn off, leaving a razor sharp stainless steel cutting knife that was working its way into the exhaust pipe. Also note the two broken off parts where the end plate halves bolt together. Three of my four end plates were broken like this. The areas of the exhaust under the other three end plates did have wear but not cuts like shown in the photo above. In all three of those cases, the friction tabs on the I.D. of the end plate were still intact. To me, this is a problem area that needs to be solved. Sure, you can take off the muffs and inspect under them but the real solution is a design that does not have the capability of cutting into an exhaust pipe in the first place. |
What size pipe is the standard Vans exhaust?
For the two muffs, what are the angles for the connections? I could take them off my plane and measure them but maybe someone else already has it apart..... Mine is in flying condition today! I suppose you could put a pair of hose clamps on the exhaust pipe, and have the muff ride on between the clamps, with some material clamped between the muff and the pipe. That would reduce a fret of the pipe itself. Not sure how to execute that. |
I looked at some of the Robbins' muffs on the Internet. Perhaps we don't need the muff part entirely. Would the end-pieces of the Robbins muff match our existing "shroud" part? So all we get to improve things is the Robbin's ends?
|
Exhaust RV 14 Vans stock
1.75" OD.
Scott come in, Scott come in. :) |
Quote:
Downside is the higher cost but the larger problem is that we would have to get two different ones manufactured with the correct inlet/outlet locations and angles. |
RV 14 Heat muff
I just replaced one on the forward most muff.
Terry at Vans helped with the drawings it is Vans part number EX-00013C. Will be watching it closely |
We have noted a lack of longevity of the heat muff end ribs and it is currently being looked at by engineering.
More info when I have it. In the mean time, be sure to do a thorough exhaust system inspection during each condition inspection in accordance with AC43.13 Appendix D. |
Talked with Rick Robbins. What is the diameter of the muff? If it is 2-3/4 then his endplates can work with our muff bodies.
|
Priority one
So glad to hear that Van's is looking into this.
Obviously, the most serious result of a leak from the exhaust into the heat muff would be CO poisoning. And a failure would start with a very small leak that would easily go unnoticed in its early stages unless the CO in the cockpit was being monitored. I am nearing completion and think that I may be doing first flight in a couple of months. I'll will watch this closely and look into getting a CO monitor which now has a higher priority. |
Quote:
Thanks for the lead to Rick Robbins. |
Follow up information
Quote:
As Scott posted, Van's is working on this now and if Rick can still make up end plates, it looks like we can use the existing skins. I have a call into Rick but have not heard back yet. I'm making up some end plate doublers and clamping angles that will work in a pinch to strengthen the Van's end plates I have on order and allow them to be clamped to the exhaust pipe. It isn't elegant but should work if I cannot get something better from Rick Robbins or Van's. I'm AOG now and neither I nor my airplane like that! |
Bill, did Clint mention where he’s getting his heat muffs from if Rick is retired?
|
Quote:
|
Jeffw@sc47 - check your PM’s
|
James - got it
Thanks, looks like a good option.
I went ahead and bought a Klein Tools CO Meter - ET110 to try before I put in a mounted unit. The ET110 is nice because it displays the PPM, uses 4-AAA batteries, a clip on the back side to hang it somewhere, has a 2 yr warranty and the sensor can be expected to go for 5 years before replacement - current cost to update sensor is $50. I had not come across the GD-40 in previous searching, I like its features, price, and that it is mounted remotely. |
Maybe our good friends at Aircraft Specialty can quickly produce a solution to this problem. :)
|
Follow up information
Today I received the four heat muff end plates that I ordered from Rick Robbins. They installed with the other existing hardware just perfectly and are tight around the exhaust pipes. I am almost certain these are the same design I had on my RV-8A when I built it back in 2000. The inner cut out of each plate is off center, which allows the skeleton of the assembly to be rotated as needed for clearance from other engine components. The material is also thicker than what came with the kit-supplied muff end plates, and of course, does not have the problematic, faceted edges that caused the problem in the first place.
I don’t know what Van’s is doing to resolve this issue – maybe contracting with Rick? BTW, I was misinformed about his being retired. He is full time in the heat muff business but took down his web site due to excessive non-aviation queries. If you want to replace the existing end plates in the near future, you can email him at rarobbins@axint.net or call him at 303 423 7002. That’s in Denver. You can see the old and new plates, plus an install picture, below. The two sets, including shipping, were $69.75. As a heads up, I noted in reinstalling the muff skins that the rear one (number 3 cylinder) can only be installed in one orientation. But the front skin (number 1 cylinder) can be installed two different ways and still fit just fine. The difference is that the exit should have a baffle in it but my plans said nothing about that. The baffle is a plate with a number of holes in it. The purpose is to delay air in the muff to increase its temperature and each muff has one of them. The aft skin cannot be installed backwards but the front one can. You should be aware that this increase in heat is accompanied by a decrease in flow volume due to the restrictions. Depending on your own situation, you may find it advantageous to cut away the front muff baffle entirely if air volume is insufficient. Rick told me that in two muff systems, he only uses the baffle in one muff for this very reason. Your call as to how you wish to proceed. ![]() The replacement plate on the right, showing the offset center hole and solid edges. ![]() Installed skeleton on the number 1 cylinder exhaust pipe. ![]() The two muffs lined up. The top muff is on the aft cylinder and has both an angled entry and a perpendicular exit. The exit has the baffle. The bottom muff can be installed as shown or rotated 180 degrees. The correct orientation is with the baffle on the exit side. ![]() This is the baffle in the number 3 cylinder muff exit. |
Endplates
Thanks for the update.
|
I have a Vetterman trombone exhaust on my RV14 that came with these Robbins muffs. I have over 700 hours on a Superior XP400 and now Lycoming 390. Following this thread, I did an inspection and found no evidence of wear or deterioration.
|
Turboheat
4 Attachment(s)
I have checked pipes annually, (600 hours TT) but noticed some wear under the heat muff this year. Have the stock Vetterman pipes, 1.75OD and recently changed to the Turboheat muff sold by spruce. It weighs twice what the stock one does. It has machined ends that fit tight enough to hold it in place without clamps while fitting. Much easier to get on and off, thicker materials and better heat transfer. Can be custom ordered with specific angles, length and clocking.
I was able to increase the length from 8 to 9 inches, and changed the outputs to opposing sides for easier routing. The air coming out is noticeably warmer. Wanted to let you know there are other options out there. |
Quote:
Additionally, each one of their units comes with a removable baffle (or restrictor if you prefer), that can be modified as needed to control air flow and heat output, within limits. The muffs would have to be made to fit the specific geometry of the -14, and there are two different configurations involved since the two we use are not the same. I don't know how much this adds to the cost but it is worth a call to them to find out. |
Installation tip on the Robbins muff
Just a tidbit to keep an eye out for on the Robbins heat muffs.
I found that when installing it on my Vetterman exhaust for the RV-8, it would not really clamp down as tight onto the exhaust pipe as I would like, and small movement was possible. The reason the clamps could not squeeze down enough was that the end cap holes for the stainless steel spacer rods were bearing on the rods and not allowing the two halves of the end cap to clamp down any smaller. I just oval-ed the holes slightly to allow a little more closure of the end caps. Problem solved. After doing that, the muff has not moved, even the tiniest bit. |
Thanks Bill, just ordering up the ends for mine. My exhaust was fine but the ears on the end caps have cracks on them and need to be replaced.
|
Muff
Joel, I just ordered one and was wondering how you left the exit baffle? Stock, omit, or drilled somewhat?
Quote:
|
Quote:
Not sure how the -8 baffling is different, but my stock intake and stock firewall heat box are unchanged. I originally had the scat tubing run just under the cylinders, and used silicone to keep it off the oil return tubes but never liked that. Always thought that was a problem waiting to happen. With the opposed outputs, I ran the scat on the other side of the intake tubes and made a heat shield to keep it off #3 exhaust. Still use silicone to keep it from wearing, but nowhere near the oil return lines now. |
All times are GMT -6. The time now is 03:49 PM. |