Van's Air Force
You are using an out of date browser. It may not display this or other websites correctly.
You should upgrade or use an alternative browser.
You should upgrade or use an alternative browser.
Installing the Canopy - Using glue
- Thread starter ron_nx
- Start date

rv8builder
Member
comments from Mike Stewart
I have been doing some digging on the internet and discovered Mike Stewart's Web Site.
http://www2.mstewart.net:8080/super8/index.htm
I sent him an email asking basically if he would do it again (glue vs rivet) and his response (parphrased) was he "would never touch a canopy with a rivet or screw again!"
I am planning to glue mine
Take care and keep your nose up in the turns!
Dale Ellis
Greer, SC
Serial # 81436
Canopy attach
Van's is right - there is nothing wrong with using rivets to attach the canopy. Done properly, rivets are a secure, low-cost, and attractive method of attaching the canopy.
The reason I chose not to use rivets is that I have read a lot of stories about builders cracking their canopy when either drilling or riveting the canopy. I've also seen dozens of aircraft at various events with cracks in their canopy, usually originating with one of the holes drilled for a rivet.
I know that done properly there should be no cracks, and there are a lot of canopies without a crack. I also know of builders that did everything "right", and "by the book", and they still ended up with a crack. Some know what they did wrong, but others have said they really don't know where they erred. I decided that since it is *very* rare that I do anything right the first time I try it, I wanted to use a system that is less likely to cause a crack - glue.
If I were to do it again, I would still glue, but I would do it better. In any case, I don't have any cracks, and my canopy is very securely attached to the frame.
Sharp new plexiglass drills
Sharp new plexiglass drills (I bought mine from Avery Tool) for drilling the the holes in the plexiglas are important. The plexiglass drills can be recognized by the high angle on the tip of the drill.
If you plan to "glue" anything especially something as big and critical as the canopy you should be forewarned and forearmed. Delamination and breakage over time due to many causes needs to be included in your planning. Here are some causes and there is no big effort on my part to make the list exhaustive:
The worst thing is no matter how good the assembly looks (what you can see of it) you never know when it is going to fail.
Bob Axsom
Sharp new plexiglass drills (I bought mine from Avery Tool) for drilling the the holes in the plexiglas are important. The plexiglass drills can be recognized by the high angle on the tip of the drill.
If you plan to "glue" anything especially something as big and critical as the canopy you should be forewarned and forearmed. Delamination and breakage over time due to many causes needs to be included in your planning. Here are some causes and there is no big effort on my part to make the list exhaustive:
- improper material control (starting with the raw materials and continuing through the manufacturing and delivery system before the end user ever sees the "glue" and finally the end user's storage and usage),
- incompatible materials usage,
- improper preparation (the "glue" and the the interfaces to be joined,
- contaminated surfaces,
- improper application,
- movement during the curing,
- incorrect temperature during the curing,
- incorrect joint configuration,
- voids in the joint,
- chemical reactions,
- thermal reactions (the "glue", the materials being joined and the different rates of expansion),
- aging characteristics,
- vibration,
- shock,
- etc.
The worst thing is no matter how good the assembly looks (what you can see of it) you never know when it is going to fail.
Bob Axsom
Evaluate the risks
Very true. Anyone that is considering deviating from the plans in any way should evaluate all the risks as thoroughly as possible.Bob Axsom said:... If you plan to "glue" anything especially something as big and critical as the canopy you should be forewarned and forearmed. Delamination and breakage over time due to many causes needs to be included in your planning. ...
Gluing the canopy
I also have glued my canopy using the Sika-flex glue. It went on like breeze and it it is very secure. I had a gap at the base of the windscreen near the roll bar - with the glue I set the gap right where I needed it and let the glue set. I am gluing the skirts right now to the canopy and will rivet the skirts to frame below. I drilled the plexiglass for clecos to hold the skirt, but they will be filled with the Sika flex and should put no stress on the plexi bubble.
So far so good, I'll keep the group up to date.
Cheers
FM
skirts
I didn't have the courage to drill the holes in the plexi for the canopy skirts. I'm glad that worked for you! How much of a gap, if any, do you have between the skirts and the canopy for the glue?FMF15E said:... I drilled the plexiglass for clecos to hold the skirt, but they will be filled with the Sika flex and should put no stress on the plexi bubble.
So far so good, I'll keep the group up to date. ...
Canopy skirts with glue
Mickey,
I kept waiting for you to figure it out and post a solution!..but I need to move along. I have almost no gap at the top of the skirt where it meets the canopy. I plan to place a fillet at the base of the canopy/skirt junction. I will rivet the skirt to the frame so it should only need to stay sealed to the canopy. Sika has tech data to indicate a good bond between fiberglass and plexi. I would have planned on a gap if I had to do it over again - if it seems too loose I will drill the holes further into the frame and rivet or screw.
The canopy is really on well - I hope the skirts turn out the same.
Cheers
FM
Canopy skirt
Due to the very low temperatures and high humidity in my workshop, I've put off further fiberglass work until it warms up a bit. (lame excuse, I know!)
I'm currently leaning towards using Scotchweld on the skirt. I agree that it will not be structural, since the rivets through the frame will hold the skirt on. It would be great if some clever person came up with a way to make the skirt removable, to make prep and painting easier. I'm really not sure what the paint shops want there, but I guess they are able to work with just about anything.
Windscreen attach
Ron, I have not yet installed my windscreen. I've got to wait until I've finished the FWF and panel before I put on the F821PP forward skin. I don't plan to use any bolts or screw or rivets on the windscreen - just fiberglass and epoxy in the front, and Sikaflex around the "roll bar".ron_nx said:Did you use bolts as described in the manual?!
Windscreen
I used only Sikaflex and it went on great. I got a 2 foot section of washer machine hose, cut it into 1" sections and put those on the roll bar to act as a spacer. I put the windscreen directly on a bed of Sikaflex laid on the 821 skin during the final assembly. I am not worried about the bond to the F-821 skin as I will put a fairing made of glass over the small Sikaflex joint. After the first blobs that were placed between the spacers hardened, I pulled them out and then made a very nice fillet on the front and back side of the roll bar. The key is to just use small blobs to get it into the exact position, secured with clamps and tape - then let dry. After it is set and everything has checked out as just right, go back and fill in all the seams with a full load of Sikaflex. I use generous amounts and then draw a curved scraper to set the exact shape of the fillet. Then smooth and clean with lots of lacquer thinner. I have had 50+ people get in my unfinished cockpit and they all seem to pull on the windscreen top - it has held up so far.
Cheers
FM
Ron,ron_nx said:Did you use bolts as described in the manual?!
I used only Sikaflex and it went on great. I got a 2 foot section of washer machine hose, cut it into 1" sections and put those on the roll bar to act as a spacer. I put the windscreen directly on a bed of Sikaflex laid on the 821 skin during the final assembly. I am not worried about the bond to the F-821 skin as I will put a fairing made of glass over the small Sikaflex joint. After the first blobs that were placed between the spacers hardened, I pulled them out and then made a very nice fillet on the front and back side of the roll bar. The key is to just use small blobs to get it into the exact position, secured with clamps and tape - then let dry. After it is set and everything has checked out as just right, go back and fill in all the seams with a full load of Sikaflex. I use generous amounts and then draw a curved scraper to set the exact shape of the fillet. Then smooth and clean with lots of lacquer thinner. I have had 50+ people get in my unfinished cockpit and they all seem to pull on the windscreen top - it has held up so far.
Cheers
FM
Skirt
Mickey,
I ordered some extra fabric from my seats from Cleveland tool and I plan to just use Super 77 adhesive to stick it on. I was going to use my interior paint to do the inside of the skirts but I was afraid I would screw it up with the black glue and have a mess. Now I only have a few coats of primer and if I make a black stripe or two, the fabric will cover. I am also going to try an experiment - I am going to put a washer between the skirt and canopy every place I have a cleco. If the fit is still good, I will use that to hold the skirt while the blobs of Sikaflex dry and then I will go back andfill in the voids. Your comment about spacing was right, I need some space for the glue to work best.
Cheers
FM
rv8ch said:I'm currently leaning towards using Scotchweld on the skirt. I agree that it will not be structural, since the rivets through the frame will hold the skirt on. It would be great if some clever person came up with a way to make the skirt removable, to make prep and painting easier. I'm really not sure what the paint shops want there, but I guess they are able to work with just about anything.
Mickey,
I ordered some extra fabric from my seats from Cleveland tool and I plan to just use Super 77 adhesive to stick it on. I was going to use my interior paint to do the inside of the skirts but I was afraid I would screw it up with the black glue and have a mess. Now I only have a few coats of primer and if I make a black stripe or two, the fabric will cover. I am also going to try an experiment - I am going to put a washer between the skirt and canopy every place I have a cleco. If the fit is still good, I will use that to hold the skirt while the blobs of Sikaflex dry and then I will go back andfill in the voids. Your comment about spacing was right, I need some space for the glue to work best.
Cheers
FM
Canopy skirts with glue
Mickey et al,
Here are the results from the canopy skirt glue experiment:
I drilled the skirts and the plexi but not the frame as though I was going to rivet the skirts on. I used Vans spacing and marking technique. I used the Sika cleaner and primer on the skirt and the outside of the plexi bubble after taping and sanding them both. I put in all the #30 clecos in the skirt, laid a thick bead of Sika 295 between each cleco and then put a #10 washer on each cleco. I put the whole mess onto the canopy and put each cleco into it's proper hole. I let the thing set for 8 hours and then removed the clecos and used a gound/modified hacksaw blade to push the #10 washers up and out of the gap between the skirt and canopy. Then after another 6 hours I used a brand new Sika nozzle (fine point) and placed it right on the hole in the skirt for the cleco. I pumped in Sika 295 until I had good extrusion above and below the skirt. I assume it also went into the hole drilled in the plexi for some additional strength. I used a curved scraper to finish the fillet above and below, let dry and then pop riveted the skirt to the frame below. It is rock solid and seems on for good. The gap looks uniform and the skirt is smooth. I think I will call it done and hopefully fly this darn thing some day soon.
Cheers
FM
dan
Well Known Member
this is such a bandwagon
Hearing things like this drives me nuts. Drawing a conclusion on the validity of an implementation without ever having flown the plane, let alone having lots of flight time on it to confirm that it's safe, it works, and it doesn't have its shortcomings...how can you be so confident yet? "Very securely" while sitting in your hangar. How about at (or just below) Vne throughout a wide range of temperatures, and after several years of temperature swings?
This "glue the canopy thing" is a real bandwagon if you ask me. The concept is spreading quickly, and the appeal for some reason is quite strong.
Van's completion count is up to what...nearly 4500 now? How many of those canopies were drilled? Gee, I wonder. And surely a large percentage of those had cracks in their canopies during construction, right?
I don't look forward to it, but I feel it's only a matter of time before I read an NTSB report: "Canopy departed aircraft, pilot made forced landing." Fortunately there were no injuries (at least I hope). But I believe it's going to happen. Not everybody does everything perfectly, and I believe the "glue" method leaves a lot more room for error than just sticking with the tried-and-true plans. As usual, it comes down to applying good technique. Are you unsure of yourself? No problem! We all are when we start out. Enlist the help of somebody who has been-there-done-that. Take advantage of the EAA's Technical Counselor program. Find somebody who has done it right and can help you do it right.
I know people will get on my case to the tune of -- if nobody experimented with this type of stuff, how would we make progress? Sure. But is this really an area where it is worth experimenting? What is the overarching benefit here? Not having to drill some holes in plexi? Doesn't seem substantial enough to me to override the risks.
Look, I'm not saying it's not going to work. I would just advocate a serious degree of caution if you are considering straying from the plans in this area. This is not a wing tip lens cover or an intersection fairing. This "little piece of plastic," if it were to depart, could really ruin your day.
Just a very conservative 2 cents. My flame suit is on (it has been on for years).
)_( Dan
RV-7 N714D (800 hours)
http://www.rvproject.com
rv8ch said:If I were to do it again, I would still glue, but I would do it better. In any case, I don't have any cracks, and my canopy is very securely attached to the frame.
Hearing things like this drives me nuts. Drawing a conclusion on the validity of an implementation without ever having flown the plane, let alone having lots of flight time on it to confirm that it's safe, it works, and it doesn't have its shortcomings...how can you be so confident yet? "Very securely" while sitting in your hangar. How about at (or just below) Vne throughout a wide range of temperatures, and after several years of temperature swings?
This "glue the canopy thing" is a real bandwagon if you ask me. The concept is spreading quickly, and the appeal for some reason is quite strong.
Van's completion count is up to what...nearly 4500 now? How many of those canopies were drilled? Gee, I wonder. And surely a large percentage of those had cracks in their canopies during construction, right?
I don't look forward to it, but I feel it's only a matter of time before I read an NTSB report: "Canopy departed aircraft, pilot made forced landing." Fortunately there were no injuries (at least I hope). But I believe it's going to happen. Not everybody does everything perfectly, and I believe the "glue" method leaves a lot more room for error than just sticking with the tried-and-true plans. As usual, it comes down to applying good technique. Are you unsure of yourself? No problem! We all are when we start out. Enlist the help of somebody who has been-there-done-that. Take advantage of the EAA's Technical Counselor program. Find somebody who has done it right and can help you do it right.
I know people will get on my case to the tune of -- if nobody experimented with this type of stuff, how would we make progress? Sure. But is this really an area where it is worth experimenting? What is the overarching benefit here? Not having to drill some holes in plexi? Doesn't seem substantial enough to me to override the risks.
Look, I'm not saying it's not going to work. I would just advocate a serious degree of caution if you are considering straying from the plans in this area. This is not a wing tip lens cover or an intersection fairing. This "little piece of plastic," if it were to depart, could really ruin your day.
Just a very conservative 2 cents. My flame suit is on (it has been on for years).
)_( Dan
RV-7 N714D (800 hours)
http://www.rvproject.com
Canopy glue risks
Mike Stewart's flying his Super 8 with a glued on canopy, and it seems to be holding. He has not yet been flying for very many years, so the jury is still out on his installation.
I do know of one guy that has flow his RV6 for around 10 years now with a sikaflex glue attached canopy. So far it's holding, but he is hangaring his aircraft, and not flying anywhere near as much as you are. Also, since he's in Germany they don't get much sun there.
There are a couple of pictures of a guy doing a test on sikaflex here, if you want to get an idea of the strength (click image for more details):

The guy in the photo is hanging on 8 inches of glued canopy. I did a similar test in my workshop, but I don't have any photos. I used about 4 inches of sikaflex. It's strong today, but as you said, time, temperature, and exposure to the elements can change that.
I personally feel that this method is more secure than using rivets, for a variety of reasons. However, I strongly urge anyone considering this method to do their own research. In any case, anyone that reads my site must know that I'm a bit of an eccentric - I'm installing an auto conversion in my aircraft!")
Dan, I think you are right - there are risks involved in gluing on the canopy. If it is not done right, the canopy can come off in flight. It might work great for 10 years, and then stop holding. The UV exposure could cause the glue to weaken, without any obvious problem until it just releases from the frame. I have not yet flow, so anyone that is gluing on their canopy as the result of my postings should know that my installation is untested.dan said:Hearing things like this drives me nuts. Drawing a conclusion on the validity of an implementation without ever having flown the plane, let alone having lots of flight time on it to confirm that it's safe, it works, and it doesn't have its shortcomings...how can you be so confident yet? "Very securely" while sitting in your hangar. How about at (or just below) Vne throughout a wide range of temperatures, and after several years of temperature swings?...
Mike Stewart's flying his Super 8 with a glued on canopy, and it seems to be holding. He has not yet been flying for very many years, so the jury is still out on his installation.
I do know of one guy that has flow his RV6 for around 10 years now with a sikaflex glue attached canopy. So far it's holding, but he is hangaring his aircraft, and not flying anywhere near as much as you are. Also, since he's in Germany they don't get much sun there.
There are a couple of pictures of a guy doing a test on sikaflex here, if you want to get an idea of the strength (click image for more details):
The guy in the photo is hanging on 8 inches of glued canopy. I did a similar test in my workshop, but I don't have any photos. I used about 4 inches of sikaflex. It's strong today, but as you said, time, temperature, and exposure to the elements can change that.
I personally feel that this method is more secure than using rivets, for a variety of reasons. However, I strongly urge anyone considering this method to do their own research. In any case, anyone that reads my site must know that I'm a bit of an eccentric - I'm installing an auto conversion in my aircraft!
Gluing is not so bad
Gee, thanks for the encouragement. I for one do not think that a glued canopy will depart from flight.
I did glue the canopy on my RV-8A. I'm generally a follow-the-plans kind of guy, but I didn't want to deal with cracks on the canopy. I believe that the RV-8/8A canopy is the most severe case because it is longer than other RV's and the differential expansion really adds up over 6 feet.
Several RV's are flying with glued canopies.
One thing to consider is that after 20 years, the glue or the adhesion to the canopy appears to be degrading, then it can be replaced by carefully cutting out the old glue, sanding, priming, & regluing. This could be done in sections at a time so that the canopy would never have to come off. If the canopy were cracked, the only way to fix it is to replace the canopy and skirts, which is a much bigger job.
Another thing to consider is that the surface area that the glue contacts the canopy & frame is HUGE. Also, remember that canopy skirt is glued to the outside of the canopy, then pop riveted to the frame. For the canopy to depart the plane in flight would require that all of the glue inside and outside of the canopy would have to suddenly loose adhesion. I believe that inspections will reveal any problems with the joint.
dan said:I don't look forward to it, but I feel it's only a matter of time before I read an NTSB report: "Canopy departed aircraft, pilot made forced landing." Fortunately there were no injuries (at least I hope). But I believe it's going to happen.
)_( Dan
RV-7 N714D (800 hours)
http://www.rvproject.com
Gee, thanks for the encouragement. I for one do not think that a glued canopy will depart from flight.
I did glue the canopy on my RV-8A. I'm generally a follow-the-plans kind of guy, but I didn't want to deal with cracks on the canopy. I believe that the RV-8/8A canopy is the most severe case because it is longer than other RV's and the differential expansion really adds up over 6 feet.
Several RV's are flying with glued canopies.
One thing to consider is that after 20 years, the glue or the adhesion to the canopy appears to be degrading, then it can be replaced by carefully cutting out the old glue, sanding, priming, & regluing. This could be done in sections at a time so that the canopy would never have to come off. If the canopy were cracked, the only way to fix it is to replace the canopy and skirts, which is a much bigger job.
Another thing to consider is that the surface area that the glue contacts the canopy & frame is HUGE. Also, remember that canopy skirt is glued to the outside of the canopy, then pop riveted to the frame. For the canopy to depart the plane in flight would require that all of the glue inside and outside of the canopy would have to suddenly loose adhesion. I believe that inspections will reveal any problems with the joint.
My method
Now that I said my bit about the safety of gluing the canopy, I thought I would offer my method. This method is for the RV-8 canopy, but I would think that other RV's would apply.
I glued my canopy a little differently than most. I basically followed Mickey's website, but with some modifications to the procedure (thanks for the excellent website Mickey, I'm not crazy enough to install an auto engine, but I did glue my canopy ).
The insructions for Sika say that the 295 needs to be applied between 30 minutes and 2 hours of applying the primer (gee thanks for the generous window). Mickey and others have done it by applying small blobs to tack the canopy on the frame, then come back after it sets and finish the job with smooth pretty fillets. I figured that if the 295 was applied within the 2 hours, it would have better adhesion than after 24 hours. Here is what I did (actually, this is what I would have done, taking out the extra steps of fixing my mistakes ):
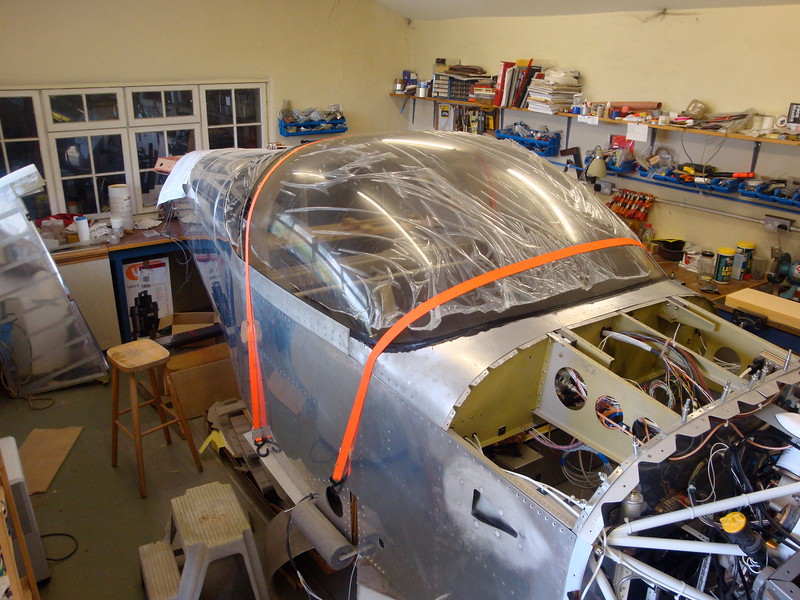
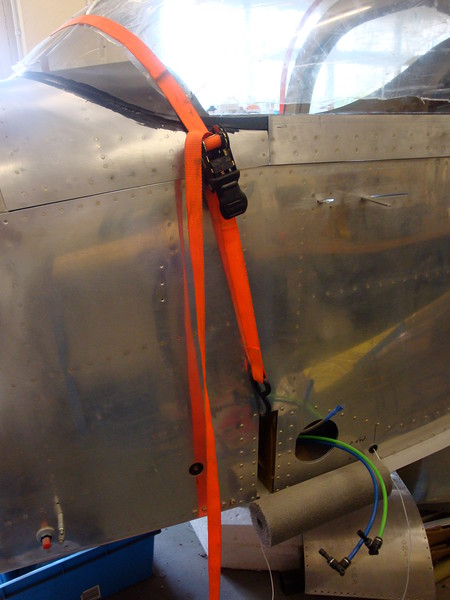
1) I used the doubled up garden hose and spring clamps (per Mickey) to space the canopy during cutting/fitup.
2) I taped (with blue masking tape) off the canopy and frame to where I wanted the glue to go. I decided to glue less of the canopy than Mickey. I ended up with 3/4-7/8" from the edge. This is mostly preference. The main thing is that I didn't want it to obstruct my vision around the roll bar and I wanted the skirts to cover the glue joint. When taping the frame, tape it off at the point where the fillet would taper off if you were to use a squegee to smooth out the 295.
3) Take the canopy off the frame and scuff both the frame and canopy. Clean using the Sika cleaner. Buy some 3/16" thick adhesive backed rubber sheet, shore 40 (I bought mine from McMaster) and cut into rougly 3/8" X 3/8" squares. Stick them on the frame everywhere that you want a spring clamp. When the clamps are applied, the 3/16" spacer will compress to 1/8".
4) Apply another layer of tape covering slightly more than the first layer of tape. This is so that after the first application of 295, you will be able to pull the tape off and be left with a little room to apply a cosmetic coat after the first application sets.
5) Paint the primer on the canopy and frame. Get the canopy on the frame immediately after it dries and apply the clamps. You may have to reposition some of the rubber spacers if they moved while placing the canopy.
6) Working somewhat quickely, squirt the 295 into the joint from both top and bottom. Smooth it out with a squegee and make sure to get the fillet on the second layer of tape or slightly within the tape line. Work in sections at a time as the 295 sets up rather quickly (I found this out the hard way). Do not be concerned about making it look pretty since you have to get through the whole canopy within 2 hours of applying the primer. Just get it within your tape joint, smooth it out roughly, and move on to the next section. Peel off the top layer of tape before the 295 cures. Leave the rubber spacers in the joint, they will become a permanent part of the plane. The sika instructions say that you can do this.
7) Now you are left with the final tape joint to apply a cosmetic coat. After 24 hours, you can come back and do sections at a time while taking your time. Apply primer in the small area that the top tape layer was covering and apply 295 again, but this time taking your time to smooth it out to a pleasing finish. Peel the tape off as you go.
This method gets 95% of the glue in the joint within the specified 2 hours and still allows you to make a pretty fillet. There may be better ideas out there, this is just how I did it. Regardless of how you do it, it is messy and requires many pairs of surgical gloves and rags, but if you can get through sealing your tanks, you can get through this.
Now that I said my bit about the safety of gluing the canopy, I thought I would offer my method. This method is for the RV-8 canopy, but I would think that other RV's would apply.
I glued my canopy a little differently than most. I basically followed Mickey's website, but with some modifications to the procedure (thanks for the excellent website Mickey, I'm not crazy enough to install an auto engine, but I did glue my canopy
).The insructions for Sika say that the 295 needs to be applied between 30 minutes and 2 hours of applying the primer (gee thanks for the generous window). Mickey and others have done it by applying small blobs to tack the canopy on the frame, then come back after it sets and finish the job with smooth pretty fillets. I figured that if the 295 was applied within the 2 hours, it would have better adhesion than after 24 hours. Here is what I did (actually, this is what I would have done, taking out the extra steps of fixing my mistakes
):1) I used the doubled up garden hose and spring clamps (per Mickey) to space the canopy during cutting/fitup.
2) I taped (with blue masking tape) off the canopy and frame to where I wanted the glue to go. I decided to glue less of the canopy than Mickey. I ended up with 3/4-7/8" from the edge. This is mostly preference. The main thing is that I didn't want it to obstruct my vision around the roll bar and I wanted the skirts to cover the glue joint. When taping the frame, tape it off at the point where the fillet would taper off if you were to use a squegee to smooth out the 295.
3) Take the canopy off the frame and scuff both the frame and canopy. Clean using the Sika cleaner. Buy some 3/16" thick adhesive backed rubber sheet, shore 40 (I bought mine from McMaster) and cut into rougly 3/8" X 3/8" squares. Stick them on the frame everywhere that you want a spring clamp. When the clamps are applied, the 3/16" spacer will compress to 1/8".
4) Apply another layer of tape covering slightly more than the first layer of tape. This is so that after the first application of 295, you will be able to pull the tape off and be left with a little room to apply a cosmetic coat after the first application sets.
5) Paint the primer on the canopy and frame. Get the canopy on the frame immediately after it dries and apply the clamps. You may have to reposition some of the rubber spacers if they moved while placing the canopy.
6) Working somewhat quickely, squirt the 295 into the joint from both top and bottom. Smooth it out with a squegee and make sure to get the fillet on the second layer of tape or slightly within the tape line. Work in sections at a time as the 295 sets up rather quickly (I found this out the hard way). Do not be concerned about making it look pretty since you have to get through the whole canopy within 2 hours of applying the primer. Just get it within your tape joint, smooth it out roughly, and move on to the next section. Peel off the top layer of tape before the 295 cures. Leave the rubber spacers in the joint, they will become a permanent part of the plane. The sika instructions say that you can do this.
7) Now you are left with the final tape joint to apply a cosmetic coat. After 24 hours, you can come back and do sections at a time while taking your time. Apply primer in the small area that the top tape layer was covering and apply 295 again, but this time taking your time to smooth it out to a pleasing finish. Peel the tape off as you go.
This method gets 95% of the glue in the joint within the specified 2 hours and still allows you to make a pretty fillet. There may be better ideas out there, this is just how I did it. Regardless of how you do it, it is messy and requires many pairs of surgical gloves and rags, but if you can get through sealing your tanks, you can get through this.
Sad Bandwagon post
I do not understand a post like that.
The accident comment was an unfortunate choice of words. I get the same reaction from lay people when I tell them I am building an aircraft. But of course, they know nothing about aircraft or my extensive aviation background. I must say that I did not expect that sort of thing here.
There are always room for improvements. It is not as though this idea came way out of left field or that none of us using the method did our homework. Sika has been used to secure automotive windshields (which are structural roll "bars" by the way) for many many years. It is not some magical epoxy that is subject proportional errors. It is a well known product with well known characteristics and limitations. There is no historical data on a 15yr old RV that spent half its life on the ramp. So what! There are 15+ year old automobiles that can give us a reasonable expectancy of performance. The canopy bond can be inspected tested over time and if it shows sign of deterioration, then it is a simple matter of drilling holes and installing screws. I was not "scared to drill a few holes" (I drilled alignment holes by the way). I believe it will make the canopy stronger by providing a continuous perimeter bond and relieve stress by allowing the canopy to flex. I also think this flexibility will give the canopy better impact strength in the unfortunate case of bird strike or rollover. Those are just a few of my reasons for going this route ( before I even read about Mickey's choice) . Oops jumping on the bandwagon I guess. My post was originally allot longer, but the login timed out and I had to type this $@#6 post again.
You are free to be as conservative as you like, but that doesn't necessarily make you any "safer". I wish you the happiest and longest of "RVating".
1/8"
1/8" is what you want to use for a gap. I remember reading that the "glue pioniers" called the makers of Sika and they recommended 1/8". I would use Mickey's website and my super long post above as a guide. As you can see, my method differs from Mickey's method a little bit. Let me know if I can help with pictures or further explaination.ron_nx said:between the metal frame and the canopy using Sika fles 295?
I will apperciate if you can send me detailed explanation and pics.
I ordered the Glue and should get it soon, I am in abusiness trip now and plan to GLUE the canopy next week.
Any detailed explanation, pictures will be appreciated!
Thanks
Ron
ericwolf said:As you can see, my method differs from Mickey's method a little bit. Let me know if I can help with pictures or further explaination.
I ordered the Glue and should get it soon, I am in abusiness trip now and plan to GLUE the canopy next week.
Any detailed explanation, pictures will be appreciated!
Thanks
Ron
DGlaeser
Well Known Member
Glueing a tip-up canopy question
A question for someone who has glued a tip-up:
The sides of the canopy are sandwiched between the frame and the skirt with no designed in gap (since it is designed to be fastened). Did you do anything special in that area to get more of a gap for the SikaFlex?
Dennis Glaeser
7A Fuselage (just starting)
Gaps
I've got some pics of my spacers here: http://www.rv8.ch/article.php?story=2005061620363366
Gaps required by the sikaflex are one of the drawbacks of gluing. Creating a gap is easy - just use some kind of spacer. Clearly this moves the outside edge of the canopy out a bit, so the skirt will need to be done slightly differently. I have no experience with a tipup at all, so all I can offer is to do some test fitting to make sure the skirt will still fit nicely.DGlaeser said:The sides of the canopy are sandwiched between the frame and the skirt with no designed in gap (since it is designed to be fastened). Did you do anything special in that area to get more of a gap for the SikaFlex?
I've got some pics of my spacers here: http://www.rv8.ch/article.php?story=2005061620363366
sticky stuff
I glued my canopy on as well, following Mickey's lead (thanks, guy). Anyway, it went rather well. Don't forget to really scratch the painted surfaces even though it says to only clean them.
The windscreen was glued as well. No problems and real easy to adjust to main canopy with spacing.
The skirts I riveted to the frame. This is where it gets interesting. Riveted to the frame and glued to the plexi. I also ran some fiberglass over the joint (skirt/canopy) to help with adhesion and for cosmetic reasons. So far so good.
Of course I haven't flown it to Mexico yet, so I really can't say how it's going to do!
Hwood
Sure thing
I'll put something together in the next couple of days. I can come up with some improvised sketches and combine them with pictures that I took along the way. It may become too large to post, so I may have to email a PowerPoint or pdf document.
Ron,ron_nx said:I ordered the Glue and should get it soon, I am in abusiness trip now and plan to GLUE the canopy next week.
Any detailed explanation, pictures will be appreciated!
Thanks
Ron
I'll put something together in the next couple of days. I can come up with some improvised sketches and combine them with pictures that I took along the way. It may become too large to post, so I may have to email a PowerPoint or pdf document.
As Promised...
As promised, I put together some pictures and text as to how I glued the canopy. I sent a pdf file to you via email. If anyone else would like a copy of this, let me know and I will email it to you.
Ron,ericwolf said:Ron,
I'll put something together in the next couple of days. I can come up with some improvised sketches and combine them with pictures that I took along the way. It may become too large to post, so I may have to email a PowerPoint or pdf document.
As promised, I put together some pictures and text as to how I glued the canopy. I sent a pdf file to you via email. If anyone else would like a copy of this, let me know and I will email it to you.
aparchment
Well Known Member
surprising
Dan's post really surprised me for two reasons:
1) he didn't follow the plans/instructions to the letter, so why would he advocate doing so for everyone else?
2) his canopy is now cracked after employing the "tried and true" method.
The potential benefit derived from gluing the canopy is clear -- reducing the potential for cracking at the rivet attach points.
The potential downside of gluing is also clear -- failure of the canopy to frame glue joints. Whether that failure would be as catastrophic and immediate as Dan poses, none of us know.
As an aside, there are a bunch of 300 mph Lancair Legacies flying around with bonded canopies. Who knows how many hundred hours Rob Logan has on Tweety. Of course the bonding/attachment process on the Legacy canopy is different, but I imagine there are some lessons to be learned from the Lancair process. Take a look at Don Barnes' web site and see what you can pick up -- www.lancairlegacy.com
I don't mean to pick on Dan, but I don't think that we should discourage careful and deliberate innovation.
Antony
dan
Well Known Member
crack
I assume you mean this:

FYI, it has disappeared!
)_( Dan
RV-7 N714D (812 hours)
http://www.rvproject.com
aparchment said:2) his canopy is now cracked after employing the "tried and true" method.
I assume you mean this:
FYI, it has disappeared!
)_( Dan
RV-7 N714D (812 hours)
http://www.rvproject.com
aparchment
Well Known Member
strange
That's weird. What was it then?
That's weird. What was it then?
Darksider
OK, I'm a darksider.
I Sikaflexed my canopy and I'm using an alternate engine.
You can see them both on the EAA326 hyperlink in my signature.
I'm not into the showplane look. I'm a marine engineer (hence my name) and I don't see the benefit of cosmetically dominant aircraft. I don't want to spend time working on things that do not lead to tangible results.
My Sika installation is by the book, Sika's manual. I used garden hose segments for spacers and installed the bulk of the Sika 295 in the alloted time window. I removed the clamps and spacers as soon as practical and backfilled with Sika. You can see on my pictures that I left the fillets as they were dispensed by the tip, working it afterwords just makes a mess. I like the look of it as it came out and virtually no one else will notice or care.
I'm alittle tired of the naysayers. I don't see the equivalent negativity regarding razor back fuselages, aftermarket wing tips and landing lights, James cowls, Todds canopies, engine plemuns, repositioned pitot and static systems, Posa carbs, aeleron trim tabs, Grove gear, wing root fairings, and who knows what else. I think they are great too.
I'm aware that some parts are potentially life limited, like engines, tires, props, aluminum wing spars and plexiglass sitting in the sun. Perhaps a better product than SIKA will come to light. Meanwhile, it takes all of us to advance the art and share technique so the assembly of the aircraft is:
1) Better - Safer, more aerodynamic, you define
2) Quicker - Spend less shop time and calendar time
3) Easier - More likely to get a good job on the first try
4) Cheaper - Well Sika probably didn't make it with this one
5) Lighter - Nor this one.
Some people weigh in on this issue ( and alternate engines) with lots of opinions, but do not state their qualifications to make the comments, nor their justifications for telling us what their 'level of percieved risk' is or why it should be applied to us.
We are not idiots. We can inspect our work for lifecycle issues. Bonding systems have come a long way and are improving.
Heck, I've been waiting since the 1970's for Grumman Yankee wing skins to debond. Some of these planes have never been in a hanger. That, plus Chalkies article helped move me over.
Eventually the best products and installation methods will gain consensus and maintenance / repair techniques for the 'less good' installations will also come forward.
Preflights and condition inspections are performed for a reason. Even a 'stock' plane will develop problems, so don't lecture us that our different approach to building maintaining is unsafe or wrong.
Go buy a Cessna.
If you have something constructive, BRING IT ON.
Impressed
Your work is impressive. If you have been following the great sika flex debates of late on the general form, you would know that the weak link is van's powder coating. Hopefully while you are being a sika canopy test pilot your powder coat adhesion will not fail given van has no specification given to the multiple paint shops they use
Alan
Your work is impressive
. If you have been following the great sika flex debates of late on the general form, you would know that the weak link is van's powder coating. Hopefully while you are being a sika canopy test pilot your powder coat adhesion will not fail given van has no specification given to the multiple paint shops they useAlan
That's true, and I would not have thought it to be a problem until this forum brought it up.
1) I'm considering the strength of the two roller wheels, the canopy lock, and the rear slider are probably the weak point for the canopy.
2) Measuring the air loads on the windshield & canopy during flight would be enlightening. It would put the whole arguement into better perspective.
3) If the bond line is compromised, it will show movement, like scratches near the faying surface or increased clearance. These failures usually take some time after the first signs.
4) Ideas for non-destructive testing techniques are welcome.
5) Sample coupon testing has been done, and should continue.
The success record for the Sika system is good so far and time in service is increasing in A) hours per airframe B) number of airframes C) Calender time of bond on oldest application.
Some posters would deny anyone the use of this system, forcing the Catch 22 of 'no data so you cant try it' & 'no one has tried it so it there isn't any data'.
I am concerned about the fairness of the windshield to canopy fit. The airfow over this joint is a potential souce of excess drag if it is not fair.
The fiberglass windshield perimeter sticks up above the plexi alittle and contributes to drag, but what really adds up drag is the distortion of the canopy where some builders' rivets have pulled the gentle curve down, causing a flow seperation behind the roll bar. This or a poor initial fit forming an acute angle.
I went for the bond system because the canopy to frame stresses are (potentially) uniform around the frame. I hope this will work for me while I fit and install the windshield (I'm installing wire behind the panel now).
Now I know others have built beutifully fair riveted canopys. I'm all for that and admire any job well done. I bonded mine because I think it will work best for me, and what I'm trying to do. I'm happy to share what I am doing and look for any other similar applications and related information.
Sika Report
I looked at the posts and found some of mine from 2005 when I was gluing on my canopy. I now have over 200 hrs on my glued canopy in every temperature extreme from -5F to 110F and lots of acro, some huge rain showers (no ice or hail - thank goodness) and the canopy is as strong as the ever. I just finished my 200 hr inspection and I have no concerns about the bonds.
No axe to grind, just data to add to the overall picture.
FM
391FM
Rv-8 200 hrs
IO-360, WW-151, dual GRT
emesa
Member
My experience
I know this is a really old thread but I thought I'd add my experience for the record. I used SikaFlex to bond and fill the gap under the leading edge of the windshield, and standard fiberglass over that, and SikaFlex to bond the windshield and (slider) canopy to their respective bows, and backed that up with screws/rivets. Also, I did not build the overhang described in the manual. Instead, I found some double-bead self-adhesive weather stripping apparently custom-made for RV-7 slider canopies from the RV-7 section of Amazon.com. I made sure when I built up the Sikaflex, to completely fill and smooth the gap between the canopy and bow, to provide flat facing surfaces. So I stuck that weatherstripping on the Sikaflex filling on the windshield bow, and it makes it water tight when closed, even when sitting parked, and looks great. And it was way less work than building that overhang thingy would have been. Also, I figure with the adhesive backing the rivet holes, it's (theoretically) less likely I'll end up with cracks. Based on other's experience, I didn't need the rivets. But I'm new at this and wanted the insurance. Next time I'd do it the same except I'd leave out the screws/rivets.
I know this is a really old thread but I thought I'd add my experience for the record. I used SikaFlex to bond and fill the gap under the leading edge of the windshield, and standard fiberglass over that, and SikaFlex to bond the windshield and (slider) canopy to their respective bows, and backed that up with screws/rivets. Also, I did not build the overhang described in the manual. Instead, I found some double-bead self-adhesive weather stripping apparently custom-made for RV-7 slider canopies from the RV-7 section of Amazon.com. I made sure when I built up the Sikaflex, to completely fill and smooth the gap between the canopy and bow, to provide flat facing surfaces. So I stuck that weatherstripping on the Sikaflex filling on the windshield bow, and it makes it water tight when closed, even when sitting parked, and looks great. And it was way less work than building that overhang thingy would have been. Also, I figure with the adhesive backing the rivet holes, it's (theoretically) less likely I'll end up with cracks. Based on other's experience, I didn't need the rivets. But I'm new at this and wanted the insurance. Next time I'd do it the same except I'd leave out the screws/rivets.
Last edited:
PilotjohnS
Well Known Member
Pictures
I am very interested in what you did. do you have pictures?
I know this is a really old thread but I thought I'd add my experience for the record. I used SikaFlex to bond and fill the gap under the leading edge of the windshield, and standard fiberglass over that, and SikaFlex to bond the windshield and (slider) canopy to their respective bows, and backed that up with screws/rivets. Also, I did not build the overhang described in the manual. Instead, I found some double-bead self-adhesive weather stripping apparently custom-made for RV-7 slider canopies from the RV-7 section of Amazon.com. I made sure when I built up the Sikaflex, to completely fill and smooth the gap between the canopy and bow, to provide flat facing surfaces. So I stuck that weatherstripping on the Sikaflex filling on the windshield bow, and it makes it water tight when closed, even when sitting parked, and looks great. And it was way less work than building that overhang thingy would have been. Also, I figure with the adhesive backing the rivet holes, it's (theoretically) less likely I'll end up with cracks. Based on other's experience, I didn't need the rivets. But I'm new at this and wanted the insurance. Next time I'd do it the same except I'd leave out the screws/rivets.
I am very interested in what you did. do you have pictures?
wirejock
Well Known Member
Sika
It's not an 8, but maybe this will help.
https://drive.google.com/open?id=10vheE9oAnIqtTmTPVUAB2wlJ8wKjeOsM
Lots of other helpful articles on the blog under Kitplane Links
It's not an 8, but maybe this will help.
https://drive.google.com/open?id=10vheE9oAnIqtTmTPVUAB2wlJ8wKjeOsM
Lots of other helpful articles on the blog under Kitplane Links
I also have glued my canopy using the Sika-flex glue. It went on like breeze and it it is very secure. I had a gap at the base of the windscreen near the roll bar - with the glue I set the gap right where I needed it and let the glue set. I am gluing the skirts right now to the canopy and will rivet the skirts to frame below. I drilled the plexiglass for clecos to hold the skirt, but they will be filled with the Sika flex and should put no stress on the plexi bubble.
So far so good, I'll keep the group up to date.
Cheers
FM
What was the designation of the Sika product you used for canopy, there are a lot of them.
It's not an 8, but maybe this will help.
https://drive.google.com/open?id=10vheE9oAnIqtTmTPVUAB2wlJ8wKjeOsM
Lots of other helpful articles on the blog under Kitplane Links
Good article, Larry. You seem to have covered all the bases.
These are of my RV7 install.
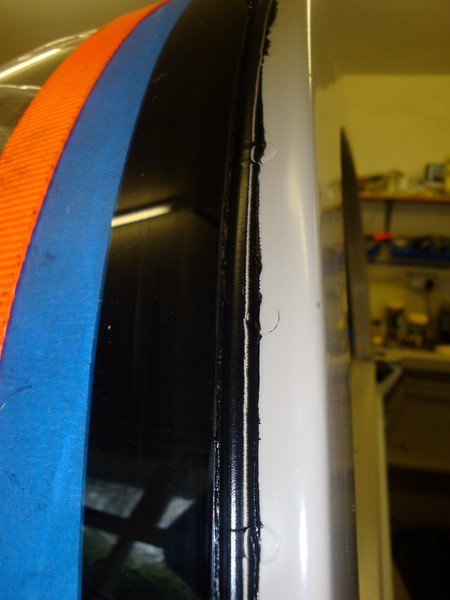
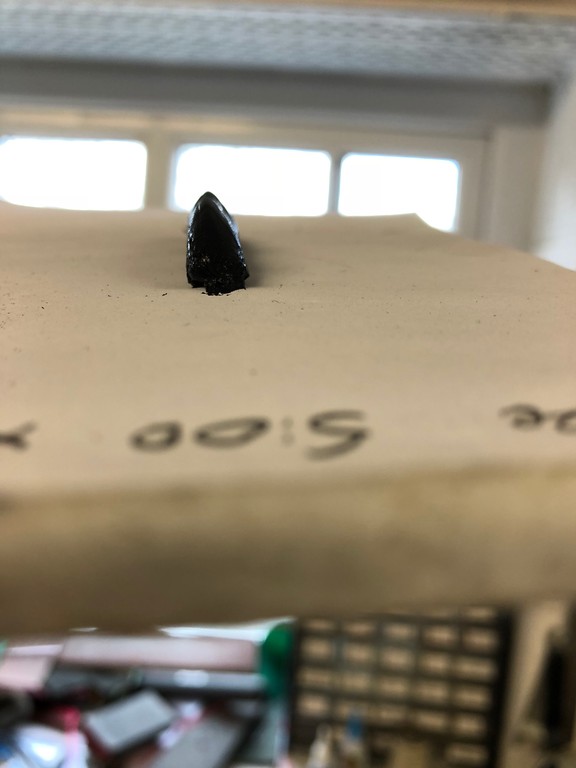
Notice the line where I used a popsicle stick to make the round fillet - when cured, the Sika rubs off to the outside of the line as it has no primer
Notice the line where I used a popsicle stick to make the round fillet - when cured, the Sika rubs off to the outside of the line as it has no primer
Last edited:
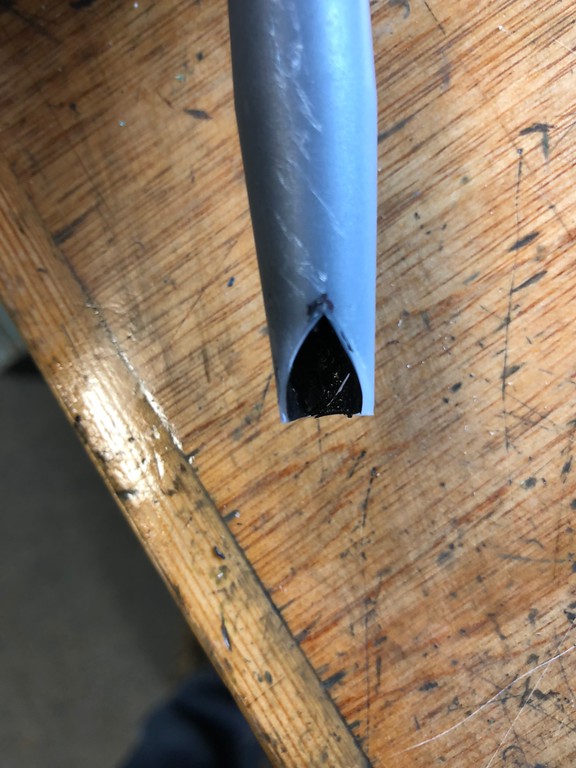
And here is how to cut the nozzle to give you a triangular bead - and no, I didn't use any spacers, waste of time and messy to finish off. Use a single smooth bead just like the car glass people use