What's new
Van's Air Force

Don't miss anything! Register now for full access to the definitive RV support community.

What did you do with your RV this weekend? (2 / 17-18 / 2024)

DeltaRomeo

doug reeves: unfluencer
Staff member
Getting this weekend's thread started. We woke up to 33°F so I'm kind of dragging my heels :)
 
Reliving the absolute JOY in removing and cleaning the oil sump suction screen, especially getting the safety wire back in............😠

I do have a method of catching the oil as it comes out: a piece of 5/8 inch copper tubing with the end modified to sit under the keeper plug.
 
Last edited:
Between work and life, I’m slowly getting it back together.
IMG_1488.jpeg
 
Reliving the absolute JOY in removing and cleaning the oil sump suction screen, especially getting the safety wire back in............😠

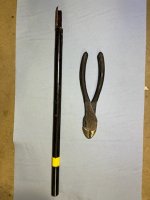
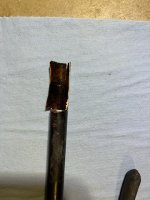
I do have a method of catching the oil as it comes out: a piece of 3/4 inch copper tubing with the end modified to sit under the keeper plug.
Ooh, ooh, ooh! Got pix? 5 mil plastic sheet, form-a-funnels, Pampers… they all work until they don’t, and oil change clean-up wins again.

Safety wiring the plug…I hear ya, bro! 😎
 
Finally got the FlyLed Combo lights installed in each leading edge. The airplane started out initially with a taxi light on one side and a landing light on the other. These were the older Halogen style with an actual bulb and let’s just say the lighting was less than adequate. I changed them to the Whelen LED lights a couple years ago but again with the taxi on one side and landing on the other at different angles it wasn’t ideal. Enter the Fly LED lights- I ordered a set Combo lights and Paul at Fly Leds (https://flyleds.com/) was very helpful throughout the process answering any questions I had. The install was a bit more involved than I expected because I wanted to do it right with a taxi AND landing light in each wing. I had to run another wire to each light and wire the extra light into the existing landing and taxi light switches. So yes that involved removing the cockpit front floors, the lower wing access panels and the wingtips. I don’t see how you could install these lights without removing the wingtips and that was an easy 15 minute job anyway. Everything eventually turned out well and the taxi lights on top of the 3 landing lights on each side seem to be angled down at the correct angle. Haven’t flown at night yet with the new lights but so far the difference in lighting is quite dramatic. So now I have independent taxi and landing lights in each wing. With only a 3 amp draw on each side with all lights on lights that extra work was not a bad trade off.

New lights:
 

Attachments

  • IMG_0087.jpeg
    IMG_0087.jpeg
    1.2 MB · Views: 53
  • IMG_0086.jpeg
    IMG_0086.jpeg
    1.4 MB · Views: 52
Last edited:
Ooh, ooh, ooh! Got pix? 5 mil plastic sheet, form-a-funnels, Pampers… they all work until they don’t, and oil change clean-up wins again.

Safety wiring the plug…I hear ya, bro! 😎
Yes please, we need pics of this better mouse trap! I pull the sump screen at every oil change and use a form-a-funnel, which works well most of the time like you said, and then it doesn’t, and I gotta clean up.

I will admit to one nice thing about a taildragger -8; it’s actually pretty roomy between the engine and firewall with easy access to the sump plug and an easy safety wire job, but the oil drip mess is hard to avoid.
Pictures forthcoming! I need to get out to the hangar, then send the pictures to a friend so she can send them to my email. For some reason, I can't send them to myself! 🤷‍♂️

In the meantime, picture this: a 16 inch or so length of 5/8" copper tubing (that is the length that works on my -4). Dremel a 1 3/4 inch cut on one end extending along the long axis of the tube. Then another cut perpendicular to the end of the first cut and extending about half way down the tube, forming a "T". Bend the sides of the "T" up to form a "U" channel, then modify it to JUST fit under the retaining plug, which is trimming down most of the forward aspect of it. Loosen the plug to where it is just about to start to drain. Slip the tubing in, fitting it under the plug, mostly under the raised flange in the sump. Mine has a support bracket for the carburetor control cables that the pipe rests on and then leans against the SCAT tubing for the heater shroud and stays in place without tying it to anything but a zip tie might make it more stable. Back the plug out until the oil starts seeping past the plug. Do NOT take the plug out completely, but enough that oil is draining. Do NOT heat the oil before draining it as, the thicker it is, the better it will stay in the drainage tube and not gush all over. The tube is long enough that it sticks out about 6 inches starboard past the heater shroud and the oil runs into an old bread pan I use for a bunch of different things. Go eat breakfast and, when you come back, the bread pan will have less than a cup of oil in it and, when I do it, nearly nothing dripping anywhere else; maybe a drop or two on the support bracket. And the sump will be (nearly) empty. Pull the plug and screen out (blue catch towel underneath as some residual oil will drip out of the screen; it's about 4 inches long) and inspect it for large chunks 😲
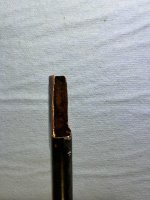
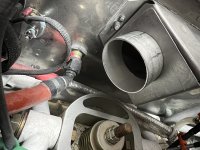
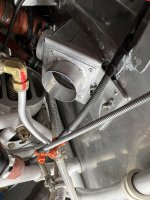
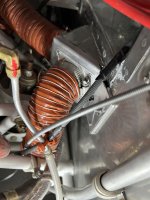
. Mine has never had anything in it except oil. Clean everything up. Slip the screen and plug back in (with a new crush washer, of course) and tighten it to the proper torque, then turn the radio way up so they can't hear you cursing as you try to replace the safety wire! Mine is tucked in to be very inaccessible. Pictures worth a thousand words: here are about 100.😂

HA! Pictures! Crude but effective tool. I would have taken a photo of it in place but didn't want to remove the SCAT from the heater muff again (PITA) and it gets pretty dark back where this is used. Hopefully this helps!

Monitors: this should probably be moved to the 'maintenance' subject header.....
 

Attachments

  • IMG_6141_1708280534819.jpg
    IMG_6141_1708280534819.jpg
    44.1 KB · Views: 59
  • IMG_6142_1708280534828.jpg
    IMG_6142_1708280534828.jpg
    62 KB · Views: 59
  • IMG_6143_1708280534836.jpg
    IMG_6143_1708280534836.jpg
    109.2 KB · Views: 61
Last edited:
BFR (BEAR FLIGHT REVIEW) in my RV-8

Spoiler alert: some very bad bear puns to follow.

Time to give the guy his BFR (bear flight review) and what better machine than my RV-8 for the task. (Okay, a BearCat would be better but those are single seaters.)


Air Bear strapped in and ready to go.

Taxiing was a bit of a bear, but steering from the back seat in an -8 isn’t easy for anyone. Takeoff was sweet, like honey. He flew pretty well including the bear-el rolls, but being February he could bear-ely stay awake.


I hope bears don’t get air-sick, that could be a major shift in CG.


Does a bear #$%^ in the air? Should have pre-flighted that.

So off we went to Talihina, OK 6F1 where he could rejoin his brother bears in hibernation.


Talihina bearing straight ahead


Back to earth in Talihina where my niece gave him a big bear hug (one for me too).
She'll take good care of him up in the mountains where he can wake up long enough to watch the eclipse in April and get ready for the bear-show season.


With apologies to punsters everywhere.

Enjoy your weekend. I sure did.

Chris
 
I am impressed with the FlyLED lighting system. I ordered the 'Quad Spotlight' for the wingtip fairing. At $169 that was about half of what an alternate LED bulb is going for these days. It was a no-brainer to put the light itself together. The main thing was not putting too much of the glue on the heat sinks! Getting the old 50w halogen bulb out, modifying the mounting bracket, and getting everything back in that what seemed like a tiny little hole, was a challenge. But I finally got it in, wired and focused (perhaps!). The lens was a PITA to get back on as it takes small washers under a lot of the screws which, on a curved surface, is a trick!

Turning it on, I was worried about the Cub sitting in front of the wing: I didn't want to melt the fabric 😂 :ROFLMAO: 😂 :ROFLMAO: 
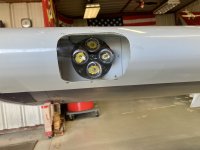
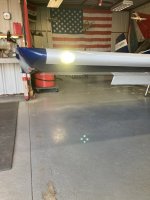
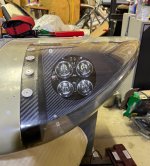
That sucker is BRIGHT! The taxi light is still the 50w and looked like a candle compared to the landing light! Can't wait to fly it! I'm sure the lens will have to come off again to get the focus right.....😐

I think they look pretty cool as well! A friend thought they looked like the laser cannon on an X-wing from Star Wars! 😜
 

Attachments

  • IMG_6129_1708280534797.jpg
    IMG_6129_1708280534797.jpg
    188.4 KB · Views: 43
A small break in the seemingly everyday snow made me jump on a flight to Roosevelt, Utah (flying past Dinosaur national park).
 

Attachments

  • IMG_20240217_131049.jpg
    IMG_20240217_131049.jpg
    1.3 MB · Views: 43
  • IMG_20240217_134257.jpg
    IMG_20240217_134257.jpg
    2.3 MB · Views: 42
I flew with my girlfriend up to 3M0 (Gaston’s) for breakfast.
 

Attachments

  • IMG_0009.jpeg
    IMG_0009.jpeg
    3.3 MB · Views: 108
  • IMG_0006.jpeg
    IMG_0006.jpeg
    9.4 MB · Views: 107
Lisa Franklin (then) was my first passenger after getting my pilots license. Lisa Hernandez (now) is my first passenger in the magic carpet I built in the garage!
 

Attachments

  • PXL_20240218_145836213.jpg
    PXL_20240218_145836213.jpg
    2.9 MB · Views: 59
  • IMG_20240218_122028.jpg
    IMG_20240218_122028.jpg
    735.7 KB · Views: 68
Work on winter squawks continued with the completion of the cabin heat diversion project. Issue, need to divert unused cabin heat from overheating the dead air area of the back side of the engine (mostly concerned with mechanical fuel pump) towards/out the bottom of the cowl. Manufactured a plate to go over the exit of the firewall mounted cabin heat valve. This will channel hot air from the when the valve is closed (cabin heat off) via a hose to the lower part of the cowl. The excess heat seems to be the culprit in causing an intermittent engine stumble below 1,100 rpm’s due most likely to fuel boiling in and around the mechanical fuel pump.

Initial cut and bend of the plate fit pretty good with only some minor trim for a good final fit. Riveted on a flange for the hose. Applied a bead of black high temp silicone to seal up gaps and slipped into place. The inlet hose flange holds in place the forward part of the new diverter assembly while a single AN3 bolt/nutplate holds it to the firewall. Cut a length of wire hose and fitted it around the nose gear and engine mount towards the lower rear exit of the cowl. Looks like it should work!
 

Attachments

  • IMG_2162.jpeg
    IMG_2162.jpeg
    1.4 MB · Views: 50
  • IMG_2166.jpeg
    IMG_2166.jpeg
    1.5 MB · Views: 46
  • IMG_2167.jpeg
    IMG_2167.jpeg
    1.5 MB · Views: 48
  • IMG_2168.jpeg
    IMG_2168.jpeg
    1.8 MB · Views: 40
4.6 hours for Pilots n Paws. Dog went Houston to near Erie, PA by plane, then car in the weather to its new home. Sweetie slept next to me the whole time, pulled the copilot seat back and leashed to the crossbar. Funny seeing her first touch snow!

She'll likely recover from the 4 legs in certified aircraft...
 

Attachments

  • 20240218_162133.jpg
    20240218_162133.jpg
    1.4 MB · Views: 53
Last edited:
Back
Top