What's new
Van's Air Force

Don't miss anything! Register now for full access to the definitive RV support community.

T-style parking brake control handle?

ELC

Member
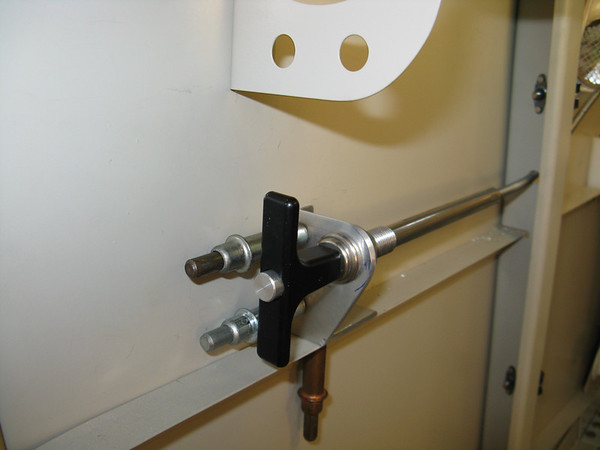
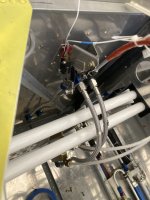
Hello collective brains of the RV community. I'm building a 7. Back in the 90's I built a -6A and recall having several occasions where I regretted not installing a parking brake valve. In an effort to not repeat history I'm considering a Matco PVPV-D parking brake valve. For weeks now I've read the debates over the pro's and cons. I'm not here to add to that. My question(s) for the community is has anyone installed a "T"-style quarter turn locking control cable to control the valve? My thoughts are that the "turned when locked on" feature provides an extra visual indication as to the valves position of open/close. Additionally the "T" configuration is easily discernible from other controls on a potentially crowded piece of real estate on the panel. The travel of the cable I'm considering is 2 1/2". Looking at a diagram of the valve on line, it provides the degrees of travel, but not the actual distance of travel. So I'm looking for any insight on both the control cable type and the travel distance of the valve arm? Thanks everyone.

Gene
RV-6A first flown Halloween '99- No tricks one BIG treat!
RV-7 Under construction
Currently flying my Bellanca Super Decathlon, because inverted is just more fun
 
I used an Aircraft Spruce A-1840 T-handle with pushbutton release in the middle of the T handle, so not a quarter turn as you describe. However, much depends on where you mount the handle. In my case, on the forward fuselage skin mid height 3/4" angle (beside my left knee). If the parking brake is applied, the handle is visually extended from the mounting bracket. Not much room in my cockpit for any other configuration. I mounted my parking brake valve on the firewall. If I were to do it again, I would mount it above the left outboard rudder pedal bearing block similar to the Beringer mount (see their website for pix).
 
I have the T-handle control you speak of. To engage the parking brake, I turn the handle to release the lock, press my feet on both brakes, pull the T-handle out to move the lever on the parking brake valve, then turn the T-handle the opposite direction to lock the cable in the out position. Mine is below the panel attached to a bracket that I fabricated from a heavy alum angle and attached to one of the fuselage stringers (can't find a photo).
 
I’m a contrarian. I mount the parking brake under the panel a few inches aft of the panel front (using the kit provided flex hoses). To engage the operating level is moved from horizontal to vertical (pointing down). Easy to reach in the plane and simple to install.

This eliminates cables and such but the only way to check position is to reach down and touch the valve.

Carl
 
I just used a Bowden cable. Think it was from spruce? But I did incorporate a micro switch into the bracket I made so that it would throw a CAS message when the brake is on. Wasn't that hard.
 
I installed a T-Handle that has a 'ratchet' like mechanism to help keep it from releasing.

Only used the parking brake about 4 times in the past 26-years / 3,500+ flying hours.
 
Thanks Terry. I like that push button idea. It would allow for more placements given you would'd have to rotate it like a quarter turn. Also, thanks for the mounting location idea as well.
I’m a contrarian. I mount the parking brake under the panel a few inches aft of the panel front (using the kit provided flex hoses). To engage the operating level is moved from horizontal to vertical (pointing down). Easy to reach in the plane and simple to install.

This eliminates cables and such but the only way to check position is to reach down and touch the valve.

Carl
Thanks Carl. Less complexity, less weight What's not to like right. After all "less is more" Thanks again.
Gene
I have the T-handle control you speak of. To engage the parking brake, I turn the handle to release the lock, press my feet on both brakes, pull the T-handle out to move the lever on the parking brake valve, then turn the T-handle the opposite direction to lock the cable in the out position. Mine is below the panel attached to a bracket that I fabricated from a heavy alum angle and attached to one of the fuselage stringers (can't find a photo).
Thanks John. Looking at it in hindsight, would you go that route again?
Gene
I just used a Bowden cable. Think it was from spruce? But I did incorporate a micro switch into the bracket I made so that it would throw a CAS message when the brake is on. Wasn't that hard.
Thanks Terry. That's a good idea with the microswitch. Years ago after seeing a guy mistakenly leave his battery on overnight at Oshkosh to find it dead the next day; I devised a microswitch set up that was dual purpose. I set it up so that anytime power was on and the canopy was open, I had a battery warning/canopy unlocked light. I built that plane with a slider so it was nice to have that extra reminder to assure the canopy was locked before take-off. The same principle would apply with a brake warning as an extra measure. The older I get the more I appreciate stuff like that.
Gene

Fortunately, my forward fuselage it pretty much open now and will allow trying out numerous locations much easier than down the road. I saw one post by "Duck" who built a beautiful -7. He has a covered center console with a brake valve mounted without a cable and controls the valve directly. I really like that idea, but it would entail a full center console which has it's pro's and cons as well.
Gene

I used an Aircraft Spruce A-1840 T-handle with pushbutton release in the middle of the T handle, so not a quarter turn as you describe. However, much depends on where you mount the handle. In my case, on the forward fuselage skin mid height 3/4" angle (beside my left knee). If the parking brake is applied, the handle is visually extended from the mounting bracket. Not much room in my cockpit for any other configuration. I mounted my parking brake valve on the firewall. If I were to do it again, I would mount it above the left outboard rudder pedal bearing block similar to the Beringer mount (see their website for pix).

I installed a T-Handle that has a 'ratchet' like mechanism to help keep it from releasing.

Only used the parking brake about 4 times in the past 26-years / 3,500+ flying hours.
Thanks Gary for your input. I know it's hit or miss on usefulness. I had a few occasions with my -6A that I sure wish had one. I figure it's a lot easier now while I'm early in the build.
 
Thanks Terry. That's a good idea with the microswitch. Years ago after seeing a guy mistakenly leave his battery on overnight at Oshkosh to find it dead the next day; I devised a microswitch set up that was dual purpose. I set it up so that anytime power was on and the canopy was open, I had a battery warning/canopy unlocked light. I built that plane with a slider so it was nice to have that extra reminder to assure the canopy was locked before take-off. The same principle would apply with a brake warning as an extra measure. The older I get the more I appreciate stuff like that.
Gene

Fortunately, my forward fuselage it pretty much open now and will allow trying out numerous locations much easier than down the road. I saw one post by "Duck" who built a beautiful -7. He has a covered center console with a brake valve mounted without a cable and controls the valve directly. I really like that idea, but it would entail a full center console which has it's pro's and cons as well.
Gene
The lines don't typically run through the tunnel for a 7, although they do for a 7A. On my 7 I put the valve on the firewall above the rudder bar. Flex lines run from pilots master cylinders up to the valve. then hard lines run back down to the per print location for firewal bulkhead fittings. The Bowden cable can go in any random out of the way place either on the panel or under it. I prettied it up by having flex lines built by TS flightlines.
 

Attachments

  • IMG_8164.jpeg
    IMG_8164.jpeg
    2.5 MB · Views: 122
I use the "pull - quarter turn - locked" version you initially referred to and as used by John Tierney. Mine is located on the lower left side of my panel. I like that its front of mind so you can see its "on" and that it can be locked in the off position so it can't migrate on accidentally. Its part of my normal BUMFPH checks prior to landing to check its "off" or fully pushed into the panel. A close friend also has the same setup on this RV-6 and that aircraft has done over 1,000 hours now with no problems at all.
 
Thank you Terry for the insight and the pic as well. Like they say "A picture is worth a thousand words" I appreciate it.
Gene
 
No problem- not a great picture, but it's the best one I could find on short notice. In case it's not clear what's going on, the valve is bolted to a hat section made out of scrap .032 aluminum that stands it off of the firewall by about an inch or so. The plate on the left side where the adel clamp is incorporates a couple of tabs that act as hard stops for the valve lever arm that limit travel so you aren't depending on cable travel/rigging to stop it in full open or closed positions. The little bracket riveted onto that arm is positioned to close the microswitch to ground when the cable pushes the lever to the full open position.

it's wired into my GAD 27 to throw a parking brake CAS message when that ground opens, i.e the lever is somewhere other than up against the full open stop. It could just as easily be wired to close a circuit and actuate a light on the panel or whatever.

I had to play with it a while to get the throws right, but it really wasn't that complicated. The braided brake lines that come from vans are too long if you go this route, so I had TS flight lines make up shorter ones for me. The micro switch was I think about $8 from Stein.
 
Thanks Terry. I appreciate the explanation. While a picture may be worth a thousand words it sure help to have some text as well. Thanks again.
Gene
 
I use the "pull - quarter turn - locked" version you initially referred to and as used by John Tierney. Mine is located on the lower left side of my panel. I like that its front of mind so you can see its "on" and that it can be locked in the off position so it can't migrate on accidentally. Its part of my normal BUMFPH checks prior to landing to check its "off" or fully pushed into the panel. A close friend also has the same setup on this RV-6 and that aircraft has done over 1,000 hours now with no problems at all.
Thank you Mike. It's good to know that folks have incorporated the quarter turn style and have been successful/ problem free with it.
Gene
 
I found a photo for you Gene... sorry its a little blurry but you can see the location I have mine. Its not in the way at all during operations and I use it during run-ups and when parking all the time.
 

Attachments

  • 20240118_101508.jpg
    20240118_101508.jpg
    192.4 KB · Views: 71
I found a photo for you Gene... sorry its a little blurry but you can see the location I have mine. Its not in the way at all during operations and I use it during run-ups and when parking all the time.
Thank you Mike. I appreciate it.
Gene
 
1/4 turn T handle to the right of the mixture control, level when locked and vertical when unlocked, easy to reach and check. Not used that many times in 15 years but when you need it you need it!!!!
Ask my buddy Joe (Caveman) to tell the story on his -7 Tip Up, no parking brake, on a very windy day, alone on the ramp, trying to get out to get fuel :)
Figs
 
IMG_2821-M.jpg


T handle with a push button lock. I have a microswitch on the arm of the parking brake unit and it is wired into my EMS so I have a warning if the brake is ON.
 
I copied Bruce's method right down to the microswitch, however one thing to note: Due to how close it is to the fuselage skin, it's kind of hard to get my left hand sausage fingers in there to grip the handle. So I have to reach over with my right hand to grab it. If I built it again, I'd probably find a different place for it, or offset it another inch inboard from the fuselage skin.
 
1/4 turn T handle to the right of the mixture control, level when locked and vertical when unlocked, easy to reach and check. Not used that many times in 15 years but when you need it you need it!!!!
Ask my buddy Joe (Caveman) to tell the story on his -7 Tip Up, no parking brake, on a very windy day, alone on the ramp, trying to get out to get fuel :)
Figs
Thanks Dave. I agree, when you need it , you NEED it. I've been there.
 
IMG_2821-M.jpg


T handle with a push button lock. I have a microswitch on the arm of the parking brake unit and it is wired into my EMS so I have a warning if the brake is ON.
Thanks Bruce. That look pretty snazzy and frees up space on the panel too.
Gene
 
I copied Bruce's method right down to the microswitch, however one thing to note: Due to how close it is to the fuselage skin, it's kind of hard to get my left hand sausage fingers in there to grip the handle. So I have to reach over with my right hand to grab it. If I built it again, I'd probably find a different place for it, or offset it another inch inboard from the fuselage skin.
Thanks Ryan. I'm plagued with those sausage fingers too. Throw in some arthritis and well life isn't the bowl of cherries it once was. Hey if you extended the mount further inboard, do you think it would interfere with your legs, especially during ingress or egress or any flight ops? Thanks.
Gene
 
1/4 turn T handle to the right of the mixture control, level when locked and vertical when unlocked, easy to reach and check. Not used that many times in 15 years but when you need it you need it!!!!
Ask my buddy Joe (Caveman) to tell the story on his -7 Tip Up, no parking brake, on a very windy day, alone on the ramp, trying to get out to get fuel :)
Figs

That event took place almost 8 years ago, Figs. Afterwards, I also copied Bruce's installation. I use it at the fuel pumps, in the wind, and it's very handy when I fly to Colorado where the airport ramps tend to slope. Here's the write up I posted about the adventure...

Long Windy Story
 
Easy to access from standing outside the aircraft.
I thought the way these things work, you have to press the brake pedals firmly while engaging/disengaging the parking brake valve. How can that be done from outside the aircraft?
 
I thought the way these things work, you have to press the brake pedals firmly while engaging/disengaging the parking brake valve. How can that be done from outside the aircraft?
The copilot/passenger can press down the brake pedals. Or I can release the parking brake from standing outside.
 
It's my understanding that while it it best for internal o-rings/packing to equalize pressure and increase overall longevity (by depressing the brakes first, it isn't necessarily required. At least for the Matco. I pulled the following from their website from the second paragraph; "The lever may be positioned prior to pressure being applied or when pressure is applied. The longest o-ring life is achieved by reapplying the brake pressure when the lever is moved to the open position but equalization is not required prior to release". Here's the link I used; https://matcoals.com/product/parking-brake-valve-dual/ It seems logical to me that by applying pressure before engaging to brake lever on it locks in a higher psi beyond the valve to the brakes increasing effectiveness of holding power. It would also seem logical that applying brake pressure before releasing would lessen the sudden shock on the valve components and everything affected in the system as well. Just my two...
Gene
 
I thought the way these things work, you have to press the brake pedals firmly while engaging/disengaging the parking brake valve. How can that be done from outside the aircraft?
From the Matco web page:

Matco Link

Excerpt:

The lever may be positioned prior to pressure being applied or when pressure is applied. The longest o-ring life is achieved by reapplying the brake pressure when the lever is moved to the open position, but equalization is not required prior to release.

I usually do step on the pedal when releasing the pressure but not always. For instance if it's windy when I pull up to the hangar. I set the brake, attach the tow bar, release the brake without getting in the plane again, and pull the plane into the hangar. Same thing when tying down. I do not crawl back in the plane, but release the brake after tying down because I don't like the RV setting long term with pressure applied. As I get older it is worth it to me not to have to crawl back in the plane. That's just me. I understand I may shorten the o-ring life a bit and accept that for the increased convenience.

Thanks,

Joe
 
Back
Top