What's new
Van's Air Force

Don't miss anything! Register now for full access to the definitive RV support community.

Sealing the Tanks...

compren

Active Member
I am closing in on sealing my tanks in the next couple of weeks and wanted to ask a few questions.

-Vans has sealant in their web store, but it isn't "ProSeal". AC Spruce has Proseal, albeit at about double the cost for the same quantity. I am leaning towards the VANS stuff because that is what the book says, but should I be getting actual Proseal from Spruce instead?

-In my Vans shopping cart, I have the pre-fab'd fuel pickup (with screen), the test kit, the "regular" old float type sending units, and (for now) the sealant.

...Is there anything else I am missing?
...Do I need bushings for the vent line, or do they come in the RV-7 kit?
...I've seen mention of a "sealed" or closed nutplate for the retaining ring / access plate. Are these needed, or can I stick with the regular old nutplates.

-The T-410 Nose Reinforcement plate, should I position that so that it matches the rib contour, or should I move it further forward and butt it up against the skin?

I've read the very awesome post from Rick re: how he seals up his tanks. I'm thinking I'll get the stiffeners, fuel cap, and drain done in one session (i.e. seal and rivet at the same time). For the ribs, I was going to coat them with sealant and install all of them with cleco's in every hole. Once all of them were cleco'd in, I was going to swing back around and rivet them rather then waiting 2-3 days. I've read about concerns that the cleco's don't squeeze out enough and to not wait, so I figured I'd cleco them all in and rivet the same day.

At this point I think we will have run out of daylight (figuratively speaking). Is it ok to run a bead along each rib and then hit the shop heads with sealant the next day or a few days after riveting the ribs in? Also, the baffle will probably have to wait until the next weekend. Any issues with that?

Does anyone see any issues with any of the above? I think I thought it through enough, but there is a lot of experience here that I'd like to tap into before I jump.


John
Houston, TX
RV-7A
Empennage (Mostly Done)
Wing (Tanks)
 
Bushings for vent line come in kit.
Vans uses the standard nutplates as have many a leak free builder.
T-410: Closer to the skin, easier it is to seal.

I clecoed to 100% and then let it sit for 8 months. Riveted fine. Heck, some manufactures glue the ribs in and never rivet. You may get a "tighter" assembly, but I think mine were very well sealed around each rivet and tight enough.

The AC Spruce ProSeal is essentially the same stuff as the Flamemaster Sealant.

Sealing the shop heads later should be fine. Just make sure they are clean from human oils/by products.

Baffle can be done long after or just after. No issues.

Hope that helps. I am just ahead of you at the moment. See log.
 
One thing to keep in mind with the nose reinforcement plates is the angle on the outer one. Sorry I'm at work without the part numbers. Make sure you position the rivets such that there is plenty of clearance to do your bucking.

Also you should decide if you are going to use the gasket. Many people here don't including myself. I just used the sealant since the gasket tends to go so it appears after some time.
 
After trying the "let it sit" method on the left main, I just buttered, clecoed, and riveted immediately for the other tanks. Made a mess either way so I figured why not knock it out and be done?

The AC Spruce ProSeal is essentially the same stuff as the Flamemaster Sealant.

"Proseal" is just a brand name; all of the products meet the MIL-S-8802 standard. I used the AC-236 B4 (4 hour cure) from Spruce, then found out that Van's sells B2 (2-hour cure) at a lower price for twice as much sealant. Yes, you read that right, Van's sells a quart (2 pints) for $39, and 1 pint of B4 from Spruce is $44 :eek: The longer working time is nice, but I would have rather saved $100...

Sealing the shop heads later should be fine. Just make sure they are clean from human oils/by products.

Might as well just do it right after riveting; you'll probably have some sealant left anyway, and there might be some wet sealant remaining around the rivets. I found that a (gloved) finger worked much better for this than trying to use a toothpick. It is also much easier to add sealant to each hole with a toothpick prior to rivet insertion than trying to dip the rivets.
 
Tank sealant

John
Looks like you got good advise already but I'll chime in on a couple things having just finished mine (tested no leaks).
1. Get two quarts of the Vans sealer. Its fine if not better than Proseal and lots cheaper. The pot life is longer too. Put one in the freezer. I used one and maybe 1/3 of the second.
2. Get two test kits unless you plan to build one at a time. See my blog under the "tanks" section on how I set up my test.
3. I'm no expert but the tip section thread by Rick Galati worked great for me. I fay sealed every part.
4. I used the floating plate nuts. Not required but they are great. No worries about leaks through the screw holes.
5. If you go with standard pickups, I would leave out the gasket and proseal the access plate. I actually used the gasket and sealed it with Titeseal because I might have to open the tanks again. Possibility of adding a return line is looming on the horizon of my build.
6. You can go back and seal shop heads and set the baffles. Just clean as others directed.
7. Read other builder logs. Lots of tips on sealing baffles. One good one is two days after setting the baffle and setting the rivets, while the proseal fillets and shop head dollops are still a little soft, put wax paper on the spar and put the tank on and leave it for a day or two. It will shape the proseal where the spar cap might touch. Then remove it and leave the tank alone for at least a week before testing.
8. I preferred waiting a couple days to set rivets. It was less messy.
 
Last edited:
I found that using acid brushes trimmed to about 1/4 to 3/8 inch worked great for initially applying sealant, as well as encapsulating the shop heads.
 
Thanks

Thanks for the advice folks. Looking forward to knocking this out over the next few weeks :)
 
I found that the "filleting spoons" you can get from Avery and others were very helpful spreading and shaping the squeeze-out after assembly. I used popsicle sticks, etc, too, but he various sizes and the contour of the spoon made it particularly easy to use for fillet shaping and spreading proseal on the shop heads. About $10 for the plastic ones.
 
Fillets

I found that the "filleting spoons" you can get from Avery and others were very helpful spreading and shaping the squeeze-out after assembly. I used popsicle sticks, etc, too, but he various sizes and the contour of the spoon made it particularly easy to use for fillet shaping and spreading proseal on the shop heads. About $10 for the plastic ones.

It's a testament to our group's ingenuity when you see all the different methods to accomplish a task. Awesome group.
I used tongue depressors and popsicle sticks. I would sand them to shape as needed on the bench sander. For fay surface spreaders, the tongue depressor was sanded to an angle at the end with a sharp edge. For fillets, both would be sanded to a curve with a sharp edge. For dollops and rivet holes, I cut the fuzzy end of q-tips and used the stick. I wrapped a piece of masking tape around the end to make them longer for my gloved fingers.

Plastic spoons sound like a good idea too!
 
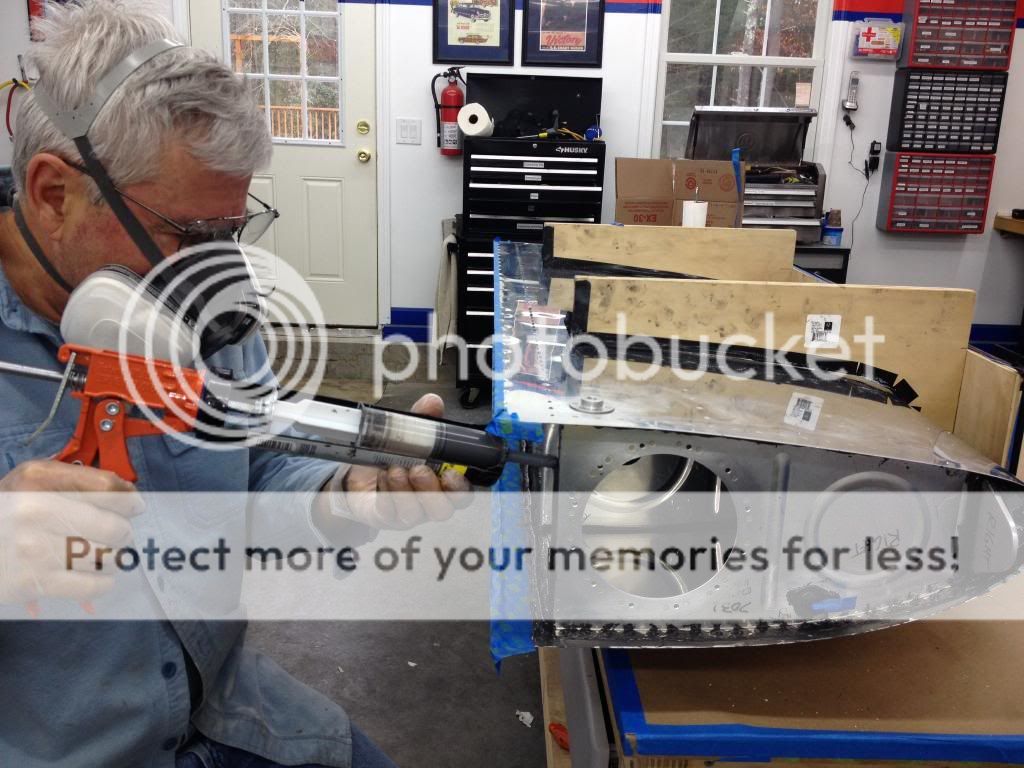
I used a large syringe with the tip drilled out, filled with Van's proseal to dap the rivets. Never had to touch the proseal and every rivet has a perfectly shaped "hat" with minimal proseal used. Kinda like putting decorative icing trim on a cake.

Bevan
 
Funny You mention icing...

Kinda like putting decorative icing trim on a cake.

Actually, I found a cake icing kit at a garage sale and used that. It had these syringe-like shooters with several tips and it only cost me $5. I used half of the kit on the left wing and threw the pieces away when I was done and used the remaining half on the right tank and then threw them away. The best 5 bucks I've spent so far...
 
Retaining Ring

The manual says that there is no need to seal the retaining ring, to just rivet it in with the rib and nut plates. Is that adequate, or would some sealant on that part be the better way to go?

-John
RV-7A
Houston (Wings, Tanks)
 
Last edited:
Ring

The manual says that there is no need to seal the retaining ring, to just rivet it in with the rib and nut plates. Is that adequate, would would some sealant on that part be the better way to go?

-John
RV-7A
Houston (Wings, Tanks)

What's the retaining ring? The ring around the access hole inside? I sealed it and the floating platenuts I used.
I can't think of any two parts I didn't seal. Any place fuel could escape. If it was inside the tank, I didn't seal it but interior screws and fittings were sealed. Now the access panel... that's another primer war!
 
Whatever you do, DO NOT clean up the proseal (or substitute) with MEK or it will leak later on.

Let it harden and sand it smooth before painting.

On the top of my left tank I cleaned off excess pro seal with MEK and that was the only place I had paint blisters.
 
Good suggestions all. I'll add one that I found useful. I used the large veterinary syringes to apply sealant, but found them very hard to squeeze by hand. maybe it was because of cool temps in my shop at the time, but eventually I found it was possible to chuck the syringe into a standard caulking gun. That made the squeezing much easier.
Tanksealing_zps31057122.jpg
 
my best tip is to mix 1oz at a time, use large popsicle sticks (purchased at a craft store) to mix, etc... and scoop it into the corner of a baggie. Twist and tape off the excess baggie and then cut the corner. You can then hold and squeeze out just what you need, where you need it. Just like an icing bag.

I also use the acid brushes cut to about 1/4-1/2" so they're stiff to spread the sealant where I want it.

Use lots of sealant to cover and fillet between ribs and skin!

I would NOT seal the cover with proseal. (tried it... was extremely hard to remove) I also didn't have good luck with cork gasket (even with proseal on each side) It leaked repeatedly. I'm doing a tank repair now and will use the "access panel" version of proseal found at skygeek this time around. Supposed to be less sticky.
 
A lot of good suggestions.
My wife and I put on the old clothes and I already had the ribs fluted and the stands made. Old clothes because that pro seal stuff will jump out and attack you and everything else in sight. ;)
I did the initial. With the filler tank install and the sump drain, and vent line.
We buttered up one rib and clecoed them in place then applied pro seal to each rivet and then riveted it in place and continued until we got them all in. Then we put used a Popsicle stick and edged the ribs. We initially did every other rivet on each rib and then came back and put in the missing rivets before moving on to the next rib Then we put a dab of pro seal around each bucked rivet using bamboo skews and then cleaned up all the excess pro seal on one tank and then started the other.
The next day we did the back plate and the sealed up the rest of the tank it took more time to clean the cleco's and tools and the ribs up than it did to rivet them.

We used the cork seals and even though our latex balloons did not deflate even after 4 months. As soon as I filled them up with fuel one leaked at the cover plate and sending unit.

I removed the cover and the cork and just used pro seal to seal the cover. No more leaks. I did both tanks .
Jack
 
Rick's method

Walt, can you elaborate why?

Has anyone had problems using Rick's method of delayed riveting with the newer FlameMaster brand sold by Van's? (I'm inherently messy, so any technique to reduce sealant slop is welcomed. :p )

That's exactly how I did mine with Vans proseal. They sat for two days before setting rivets. Pressure tested good. No fuel yet so the fingers remain crossed.
 
The sealant spoons might be the right tool for the job for fileting the sealant. I found that popsicle sticks that I got from a craft store were a little too big for the rib filets. At work we have wooded coffee stirs and those worked much better. :D

This stuff is a mess and there is just no getting around that part. I did it all wet and survived. Buy lots of disposable gloves so you can keep changing them. I got the hint of wearing two pair on top of each other.
 
Thanks

Hey folks, just want to thank everyone for all the suggestions and experiences. I started sealing the tanks yesterday and decided to take it slow and just proseal on the retaining ring on the inboard rib. After that exercise I came away with even more questions and am again seeking forum assistance :eek:

I ran into some issues with squeezing the rivets. For the life of me I could not avoid cleating over way too many rivets. Anyone else have this difficulty? Anything I need to know when it comes to bucking slickery rivets?

At what point can I apply more proseal on top of the existing stuff? I see a couple spots that I'd like to see more proseal in, but should I wait 3-5 days for the stuff to cure fully, or is it ok to add more at any time? I also need to put some over the new rivets I drilled out and replaced this morning and don;t want to add more proseal prematurely.

Thanks again...

-John
Spring, TX
RV-7 (Wings)
 
I ran into some issues with squeezing the rivets. For the life of me I could not avoid cleating over way too many rivets. Anyone else have this difficulty? Anything I need to know when it comes to bucking slickery rivets?

I've noticed I tend to bend rivets much more often when squeezing instead of bucking. I'd just buck them. Also, you need not seal the retaining ring; all possible leak paths will be covered when you put the access cover on.

At what point can I apply more proseal on top of the existing stuff? I see a couple spots that I'd like to see more proseal in, but should I wait 3-5 days for the stuff to cure fully, or is it ok to add more at any time? I also need to put some over the new rivets I drilled out and replaced this morning and don;t want to add more proseal prematurely.

I'm pretty sure you can just add more at any time. I tried to do it all at once--if I riveted something in and it needed more sealing, I mixed up a bit more sealant and applied it right then.
 
I received the access door sealant in the mail from Skygeek. $19.89 shipped to my door. The product number again is CS 3330 B-2. I cut the tube in 1/2 and mixed it 100 to 10 as instructed. I don't have the other tank ready to close up yet so I put the rest in the fridge. This stuff mixes like the vans tank sealant but sets up rather quickly. After buttering up the opening, I put the access door in place and dipped each screw in the sealant and screwed it down. The next morning it had a hard rubbery feel and had obviously set up. I then proceeded to test the tank for 24HRS in the house at 74deg F. This morning I woke up and the needle on my low pressure gauge had not moved off 1.3 PSI. The interesting difference between this product and standard tank sealant is how easily it is able to strip off a scrap of sheet metal. It dries like a rubber gasket that is perfectly formed to the two mating surfaces. There would only be about 10 minutes to completely strip this product and move on to fixing the issue that caused you to have to open up the tank in the first place.

Worth 20 bucks? Absolutely in my honest opinion.

From a prior post of mine when I closed the door on my tanks.

Good luck!
 
Back
Top