What's new
Van's Air Force

Don't miss anything! Register now for full access to the definitive RV support community.

SB-00043 Report your findings

Bavafa

Well Known Member
Since we have not heard how many RV14/RV10 are effected before they published this SB, I thought maybe we can report our own findings, especially if we do find cracks.

Two RV14A, one with 300 hours and one with 148 hours and no crack was found. No Acro or soft field landings.
 
Great idea doing this

Since harmonics is involved and with a 4 cylinder engine a 2 blade vs a 3 blade prop and engine size (A 390 produces stronger harmonics than a 360) might also be needed to understand the issue.

Mine is:
Engine - 390
Prop - 3 blade
Hrs - 450
Acro: Occasional roll (Seems I alway seem to be carrying (stuff) in the baggage area)
Condition: No cracks.
 
I was thinking there is more to the story. Not sure I want to break open my elevators for something that may affect the 14 fleet more than the 10. I've added this to my preflight inspection before every flight.

180 hours, no cracks (thinking this won't happen for a LONG time...)

IO-540
Three blade Hartzell

OP, any chance you can add a survey to this thread?
 
14A 190 TSN 2 blade Hartzell (balanced to < 0.05”) mostly hard surface and no aerobatics. No cracks
 
14A 226 hours TSN. Hartzell 2 blade prop, balanced. No aerobatics, landings on hard surfaces only. No cracks.
 
RV-10, 2-bladed Whirlwind composite prop, 805 hours Hobbs time, all paved strips since I bought it, no cracks.

I have a question re the significance of grass strips - is this because the extreme up-elevator position in a soft field landing or takeoff can make it more likely for the cracks to be manifested?

Even though I have only flown from paved strips, I typically use a soft-field takeoff technique to get the front wheel off the ground ASAP (which is apparently the one advocated by the Van's instructors). Should I consider avoiding this technique due to the SB-43 issue?

Thanks.
 
Pic

RV-10, 425hrs, MT 3 blade

one crack in left side

Scott, any chance you could post a pic? I think you might be the first to report a crack in a 10 elevator.

I know the Vans 14 demonstrator had a crack was it the 360 or the 390 powered airframe? How about the Vans 10 demonstrator?

Thanks
 
Last edited:
Scott, any chance you could post a pic? I think you might be the first to report a crack in a 10 elevator.

I know the Vans 14 demonstrator had a crack was it the 360 or the 390 powered airframe? How about the Vans 10 demonstrator?

Thanks

It seems, as reported so far, that only four cylinder engine airplanes are developing cracks and I've only landed on grass three times. My prop is balanced to .03ips, but I am working on a 2nd order vibration issue right now. I would suspect that the 2nd/4th order vibrations have a bigger influence on this problem than other factors.
i-gMqxzZm-X3.jpg
 
Last edited:
RV-10, 2300 hours, MT 3-blade prop (always balanced to .02 IPS or less), no cracks, grass strip.

Vic
 
Slightly off topic, but is anyone opening up their perfectly good RV-10 elevators to do this SB on a preemptive basis?

I'm not going to, primarily because my airplane is at paint. Lacking any real quantitative data from Van's, I'm struggling to understand how necessary and/or helpful a bunch of haphazardly placed pro-seal will actually be.

If I ever get cracks, I'm just going to build new elevators, allowing me to tightly control how much pro-seal gets added.

Again, wish Van's had shared this info over a year ago when they knew about it :mad:

I’m not. My plan is to simply add it to the other SBs I inspect at each condition inspection and only deal with the fix if I actually find a crack.
 
I added the proseal

My RV-10 has 150 hours and no cracks.

Since my plane was in the paint shop, which happens to be on my home field, and my elevators were already removed and not yet painted (by a few days) I decided to perform the SB. It took me about 5 hours to complete the work and that included building two sets of stands to hold the elevators. I'd say the proseal was applied pretty close to van's pictures... on the 2nd elevator :). The first would be considered more haphazardly applied. Will it dampen things and help prevent cracks who knows?

A few isssues...

There is just enough proseal to complete the SB if you are very careful to not overdue any of the sections.

Make sure you have some extra AD-41-ABS and LP4-3 pull rivets.

If you drill all of the leading-edge rivets out per step 6 the SB kit does not contain enough AD-41-ABS rivets for RV-10's . You can easily perform the SB leaving the 3 most inboard rivets in the leading-edge skins. This only requires qty 52 to close up the leading edge skins. I did not have any extras but fortunately the bag of 50 actually contained 52.

There are only qty 4 LP4-3 rivets supplied in the kit. In order to remove the elevators from an RV-10 you have to drill out the LP4-3 rivets holding the WD-415-1 trim cable attachment brackets to the E-616 cover plate. I did not have any extra LP4-3's so had to order some additional rivets to hang the elevators.

Elevator removal and re-installation is no small task. Especially when you are installing newly painted elevators!!
 
So, very few cracks reported.

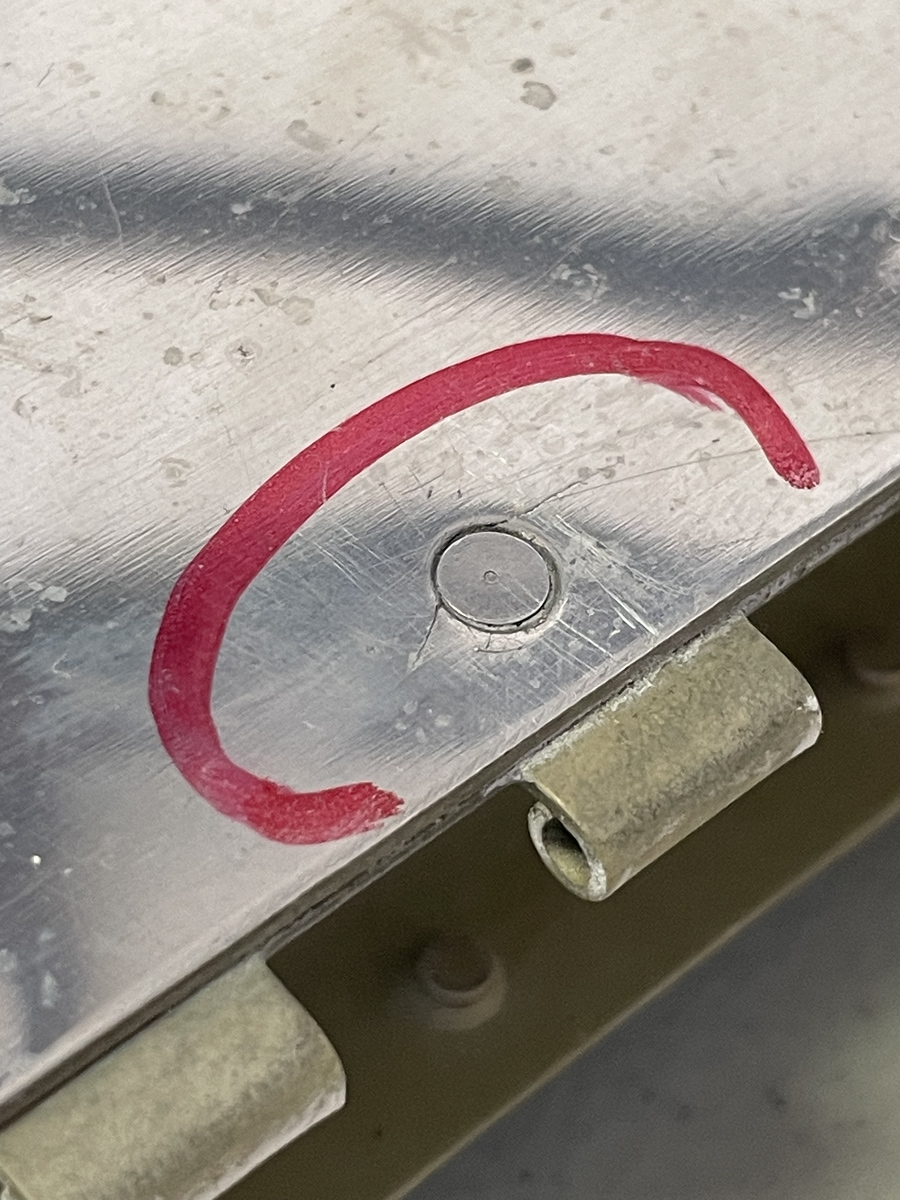
I'd love to know the location of any cracks, specifically if all of them are along the hinge line for the trim tab. I know with my -10, I use full nose up trim on most landings, which puts a fair amount of force (and twist and flex) along that hinge line. The -10's trim tabs are pretty big and one row of rivets on the hinge line ain't a great way to react all of the force the tab can impart.
 
One Crack

RV-10
1150Hrs
2 Blade Hartzell

R/H Elevator, 8th rivet from inboard on trim tab hinge line.
ADCreHeQHk_FvTfGO0LnylhVti6Fzjcg6isIFwVpthWwsnphfh9K0PhKiPdSgbPoPxK7hwe0NSNuzbpnpSDObHsje1N9ky52HQ1lmUw1Ph3seuoNQPmqdx8oVTaPcUhGOaPdgDBqdtvusACRVhucQ30v_Jo1Eg=w1300-h800


ADCreHfDQE71gmjx_V2_K55e5JMLzAvBS735TCOVUs1-8FtNtrvlya_px9VHmNGOKNvdTWTNUBf7MKkPlznC6kAQzlLRYUqt1F0UOcEGfdLRn5J7wMmW6oUGD5vqu6kRxZHKtocACOlau_3X9_wADb1RLvXZjA=w1300-h800
 
Slightly off topic, but is anyone opening up their perfectly good RV-10 elevators to do this SB on a preemptive basis?

I'm not going to, primarily because my airplane is at paint. Lacking any real quantitative data from Van's, I'm struggling to understand how necessary and/or helpful a bunch of haphazardly placed pro-seal will actually be.

If I ever get cracks, I'm just going to build new elevators, allowing me to tightly control how much pro-seal gets added.

Again, wish Van's had shared this info over a year ago when they knew about it :mad:

I opened up my RV-14 elevators and did the preemptive work, but only because it was going to the paint shop the next week. They BARELY give you enough fuel tank sealant to do the job. It was a major PITA forcing the sealant down the metal tube, but I'd do it again. You just never know...
 
N810RK. 475 hours with no cracks. Flying since 2020 and hangered when not on a road trip. I always put the gust lock in when outside, even just for lunch. I got the empennage in 2008. I match drilled with a reamer and debured carefully. I wonder if building technique had anything to do with this, or the time period the kit was delivered in.
I plan to watch for this closely for now. I will do the SB if I find one tiny crack.
 
Cracks

So, very few cracks reported.

I'd love to know the location of any cracks, specifically if all of them are along the hinge line for the trim tab. I know with my -10, I use full nose up trim on most landings, which puts a fair amount of force (and twist and flex) along that hinge line. The -10's trim tabs are pretty big and one row of rivets on the hinge line ain't a great way to react all of the force the tab can impart.

I have the exact same question: I would be really good to know if anybody has found cracks NOT adjacent to the trim tab hinge.

I am asking because during my 2 visits to Van's Aircraft (), and my test flight at N57, I inspected the elevator of every RV-14A and RV14 I came across (N914VA, N214VA and N144VA). All of them had cracks, but all of them ONLY had cracks next to the trim tab hinge.

That actually made sense to me, since those are also the only rivets that sit in a countersunk spar (as opposed to a dimpled spar). They are also the only rivets at the edge of the skin.

Thus, when we built our elevator, we applied a thin layer of tank sealant across that top flange of left elevator spar (essentially what the SB-00043 sais, except we sandwiched the tank sealant before riveting). But we only did the top flange of left elevator spar.

So, if there are no reports of cracks NOT adjacent to the trim tab hinge, I am inclined to just stick with inspecting. On the other hand, if someone shows me a single photo of a crack NOT adjacent to the trim tab hinge, it's time to put the sealant everywhere, following SB-00043.
 
Back
Top