
Van's Air Force
You are using an out of date browser. It may not display this or other websites correctly.
You should upgrade or use an alternative browser.
You should upgrade or use an alternative browser.
RV6A Strut
- Thread starter FT3
- Start date

Stevea
Well Known Member
OK, got it. The nose wheel steering stop....as I expected. Attached is the 6A/7A/8A/9A nose wheel drawing.
Unless things REALLY were heavily damaged on the landing, you might be able to replace only the WD-631 stop, and probably the bolt holding it to the gear leg.
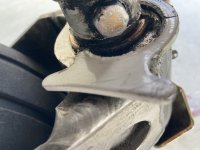
One thing to check on this part is the orientation with respect to the gear leg. This part has a "tenancy" to be installed backward by some. Note on the drawing, the actual stop contact areas are on the forward side of the gear leg......NOT the aft side. It the part is installed incorrectly (with the stops on the aft side of the gear leg), the nose wheel doesn't have a large enough turning angle.
Unless things REALLY were heavily damaged on the landing, you might be able to replace only the WD-631 stop, and probably the bolt holding it to the gear leg.
One thing to check on this part is the orientation with respect to the gear leg. This part has a "tenancy" to be installed backward by some. Note on the drawing, the actual stop contact areas are on the forward side of the gear leg......NOT the aft side. It the part is installed incorrectly (with the stops on the aft side of the gear leg), the nose wheel doesn't have a large enough turning angle.
Attachments
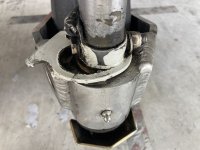
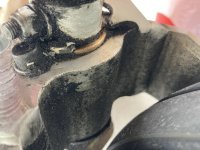
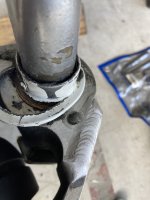
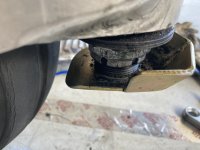
Attached are photos of the damage to the stop. It sheared off the left side stop bolt. There does not appear to be any damage to the where it connects to the engine mount. But there is a brass foot with the threaded portion which the has the castle nut and cotter key hole. There does not appear to be any way to remove it. Suggestions?
Thank you for your help.
Steve, the drawings were helpful.
Thank you for your help.
Steve, the drawings were helpful.
Attachments
blaplante
Well Known Member
The 'foot'
 antisplataero.com
The Lip Skid – AntiSplatAero
climberrn
Well Known Member
See SB 14-12-22. Looks like it was installed backwards. Since that one was missed you may want to take some extra time and see if any other SB’s were missed.Attached are photos of the damage to the stop. It sheared off the left side stop bolt. There does not appear to be any damage to the where it connects to the engine mount. But there is a brass foot with the threaded portion which the has the castle nut and cotter key hole. There does not appear to be any way to remove it. Suggestions?
Thank you for your help.
Steve, the drawings were helpful.
Stevea
Well Known Member
The pictures help. Assuming the gear leg didn't get bent and there is no damage to the engine mount, this should be relatively easy to repair.
You'll need to raise the nose wheel off the ground to get access and to remove the nose wheel yoke.
The "brass foot" mentioned is actually a plated steel part. As blaplante pointed to above, it is a "Lip Skid" from AntiSplatAero (not a Van's designed part). From their website, there looks to be a bolt or screw that holds it to the gear leg from the bottom....kind of guessing on this. This part has to come off first.
Next, remove the large nut from the gear leg along with the two bellville (spring) washers and the nose gear yoke itself.
At that point you should be able to remove the bolt holding the damaged WD-631, and the WD-631 itself. i have to agree with Joel...it looks like the part may have been installed backwards.
With the nose wheel yoke off, the remains of the sheared off cap screw needs to come out. You might have to find someone who has done this before and has the tools required. Hint: you don't want to mess up the screw hole in the yoke while removing the sheared end......kind of an pricey oops, and the yoke should be repairable.
Assuming no other damage, reassembly is the reverse...using a new WD-631 of course. Make SURE it is oriented as shown on Drawing C1, and SB 14-12-22. Also, replace the previously sheared off cap screw in the yoke. As for reinstalling the "Lip Skid", I'll leave that one to you. I do not have one installed on mine.
I was going to an uncontrolled airport to gas up and the pattern was very busy with flying school students. I announced my intentions to overfly at midfield, join the left downwind. I did so and announced when I joined the downwind, extended the downwind and announced it also. I watched two planes land when I turned onto the base leg, announced that. There was no one on the ADS-B in front of me when I turned onto the base leg, When I turned final and announced it a fellow came on the radio and said that I had jumped the line in front of him. I told him that I would go around and my mistake was in not doing so. He said to go ahead and land and I did but came in hot and high when I flared. When I bounced, a plane on the ground cautioned me to check the nose wheel when I stopped. I felt shimmy as I slowed, pulled back on the yoke and it it stopped. I taxied to the fuel pump.
The pilot who cautioned me to check the nose wheel was at the fuel pump, and he said the fairing was at an odd angle. There was some damage to the fairing.
I taxied out with no problem, flew it home and landed with no problem.
When I returned to the hangar, I pulled the fairing and saw the damage. Today, I removed the cowling to check for any damage where the strut attaches to the engine mount. I could see no cracks or stress.
The lip skid appeared to me to be welded to the threaded strut, but after watching the video, I can see that that is not the case.
Thank you for the help.
The pictures help. Assuming the gear leg didn't get bent and there is no damage to the engine mount, this should be relatively easy to repair.
You'll need to raise the nose wheel off the ground to get access and to remove the nose wheel yoke.
The "brass foot" mentioned is actually a plated steel part. As blaplante pointed to above, it is a "Lip Skid" from AntiSplatAero (not a Van's designed part). From their website, there looks to be a bolt or screw that holds it to the gear leg from the bottom....kind of guessing on this. This part has to come off first.
Next, remove the large nut from the gear leg along with the two bellville (spring) washers and the nose gear yoke itself.
At that point you should be able to remove the bolt holding the damaged WD-631, and the WD-631 itself. i have to agree with Joel...it looks like the part may have been installed backwards.
With the nose wheel yoke off, the remains of the sheared off cap screw needs to come out. You might have to find someone who has done this before and has the tools required. Hint: you don't want to mess up the screw hole in the yoke while removing the sheared end......kind of an pricey oops, and the yoke should be repairable.
Assuming no other damage, reassembly is the reverse...using a new WD-631 of course. Make SURE it is oriented as shown on Drawing C1, and SB 14-12-22. Also, replace the previously sheared off cap screw in the yoke. As for reinstalling the "Lip Skid", I'll leave that one to you. I do not have one installed on mine.

