What's new
Van's Air Force

Don't miss anything! Register now for full access to the definitive RV support community.

RV-14 lower intersection fairing gap (page 46B-13 step 14)

iamtheari

Well Known Member
Page 46B-13 step 14 says to sand off any excess material that prevents the lower intersection fairing from laying flush. This makes sense near the leading edge of the fairing, but as it tapers to the trailing edge I have a gap and I'm not sure if I am supposed to trim the flange away or fill the gap later. I'll attach a picture to show the gap. It measures about 3/32" at the widest point. It looks like I'd have to remove a substantial part of the flange to make this lie flat on the wheel fairing.

IMG_1668.JPEG
 
Page 46B-13 step 14 says to sand off any excess material that prevents the lower intersection fairing from laying flush. This makes sense near the leading edge of the fairing, but as it tapers to the trailing edge I have a gap and I'm not sure if I am supposed to trim the flange away or fill the gap later. I'll attach a picture to show the gap. It measures about 3/32" at the widest point. It looks like I'd have to remove a substantial part of the flange to make this lie flat on the wheel fairing.

View attachment 64405
Epoxy it in place. Then, separate the front and rear fairings by cutting them into 2 pieces. Much less hassle when you want to remove the wheel pants. 🤗
 

Attachments

  • IMG_0478.jpeg
    IMG_0478.jpeg
    1.7 MB · Views: 58
Epoxy it in place. Then, separate the front and rear fairings by cutting them into 2 pieces. Much less hassle when you want to remove the wheel pants. 🤗
Thanks for the tip and picture. Someone else suggested the same and I'm very tempted to do it that way. But I have some questions, of course.

Did you do anything as far as a flange between the fore and aft halves of the intersection fairings? Did you do anything to make up for the fore/aft wheel pant screws that aren't usable because of the intersection fairing permanently covering them? And did you actually epoxy them in place and then cut them? I'm not a surgeon so I don't know how comfortable I am taking a Dremel with a cutting disc to the fairings when they're on the plane.
No flange between the fore and aft pieces, although as you can see in the photo, the paint shop (Glo) did add a little flap on top to cover the intersection. With the fairing firmly attached to the wheel pant and the wheel pants to the bracket beneath, the missing screws are unnecessary. I did not cut the fairing in place, but you could easily mark the location of the fairing and the cut in place, then remove everything to epoxy and make the cut.
 
For those who epoxied the lower intersection fairings to the wheel pants, are any of your planes taildaggers? I’m almost ready to glue and cut but I’m nervous that I will lose access to the two inboard screws attaching the forward wheel pant to the bracket on the landing gear. Is there some magical angle to cut the lower intersection fairing to provide access to those screws?

Here are a couple pictures showing the screw holes through the lower intersection fairing and the gear leg fairing stuck into it.
 

Attachments

  • IMG_1705.jpeg
    IMG_1705.jpeg
    2.1 MB · Views: 20
  • IMG_1704.jpeg
    IMG_1704.jpeg
    2.2 MB · Views: 19
Yes, that's the rub (or at least one of the rubs). I have a taildragger and I was going to be brilliant and make the wheel pants a total of 2 pieces (for each wheel). Yes, it came out great and looks wonderful, everybody comments on it. However, I would not do it again. The labor and time to get it right is not worth it (IMO). The way Van's has us put the "spats" on the wheel pants is just fine, aerodynamic, and looks good. It's also easy.

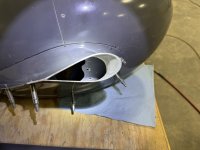
Since you asked, yes...you'll need to have access to the screws that hold on the pant to the bracket. To do this, you need to make something that will guide and hold the screw between the outside of the spat, and the bracket that holds the wheel pant on.
  • I made a fiberglass mold (tube), 3D printed a device that would hold a piece of waxed piano wire in the middle of the tube, and filled it with epoxy/flox. When cured, I removed the piano wire and drilled out to the proper size. The tube allows the screw to hit the hole in the wheel pant. It also must be robust enough to hold the pant in place.
  • I then drilled the spat in the proper place (tough to get it right), epoxied the tube in place at the wheel pant and the spat.
  • Sanded off the tube even with the spat. Made a nice
  • Counter sunk the tube so that the screws would be flush/hidden (note: the top screw must be very long and is hard to find).
Sadly, that was the easy part.

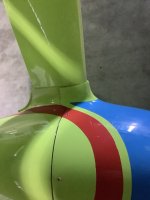
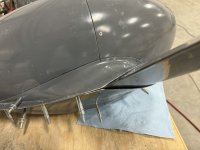
To really do this properly, you'll need to put a tab on the back half of the spat that will fit under the front half of the spat. If not, then they will not likely line up when put together or catch the wind and/or create drag (it also doesn't look good). If you're going to go to this much trouble, you want the two halves (of the spats) to fit flush where they meet.

It was tough to get everything to fit properly and when I take the wheel pants off, the spats try to drag across the gear leg faring. It's not that much of an issue, but I'm afraid it could scratch the paint even though anti-scuff tape is to be used there.

Not sure this all makes sense. Below are a few pictures that I had on my phone that may better explain what I did. I'll try and make time to post some pictures this evening. Or, you can PM me and we'll discuss.

Best of luck,

Fred

Pic 1.jpg

Pic 2.jpg

Pic 3.jpg
 
Best of luck,
Thank you for your detailed post. I wonder how different the tricycle gear version angles are to allow for the spats to be glued to the wheel pants without making it impossible to get to those two mounting screws. I think your explanation may have talked me out of that option. I'm also thinking about the ease of maintenance side of the equation. The taildragger has advantages there. Sure, you have to unscrew those 5 screws to remove the spat before you can remove either part of the wheel pant, but you have plenty of space to sit under the cowl when the tail is on the ground and you only have to deal with two wheels.
 
Wow, much more complicated than the nose wheel 14. I did not realize they would be so different.
 
Back
Top