What's new
Van's Air Force

Don't miss anything! Register now for full access to the definitive RV support community.

Repair Leading Edge Wing Perforation?

Kojo

Member
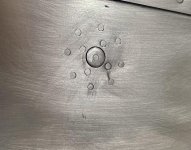
While closing the last bay of of the bottom skin of the wing while in its cradle the bucking bar fell (fatigue) through the holes in the spar and perforated the leading edge as seen in the pictures.

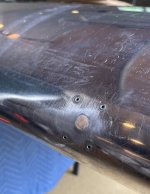
Defect was "drilled out" finally with a unit to 3/4 inch diameter. After exploring repair options I have come up with the doubler shown however I battling with a filler.

No response from vans support despite two attempts. Friend has subsisted "Bondo" I thought some fiberglass resin. Does anyone have a reliable suggestion or resource that addresses this specific problem. A 3/4" diameter aluminum 2024-T3 filler will buckle if attempting to rivet to this doubler. Any suggestions would be appreciated.

L Wing Perfoarion 2.jpg

Repair Patch.jpg
 
I'd drill out the hole (looks like you already have), mount the doubler, and proseal the filler plug in place. Then do whatever sand/fill exercise you need to make the repair disappear from a cosmetic perspective.
 
Roll a section the same size as your backing plate to fit the contour then cut the section out to use as a filler. Bond with some appropriate adhesive with the backing plate cleco'd in place. Don't forget to lube the area a little to act as a release agent. Pop the patch out, clean everything up and then use a pattern of AN507 screws with AN365 nuts to reinfoce the adhesion. Use 4-40 screws. Probably too hard to find a small quantity of locknuts for 2-56 screws.
 
One thing I learned when installing access panels on the foreskin of my 9 is you can not use the flange going under the skin to mark the holes you drill on the top. They will be slightly off. Im sure you know that but I didnt think the thin aluminum would make that much of a difference but I was wrong.

As for patching the hole after the plate is mounted, I would try jb weld original or Marine. It is harder than bondo. You could mix some epoxy to mostly fill it and top off with bondo or other filler.

This assumes you will install the patch on the inside of the wing.

Good luck on the fix.
 
Last edited:
I can’t quite follow post #3 but I think my suggestion is similar:

Form two smaller pieces that can be slipped into your hole to form a backing plate so that you can then fill the remaining indent with a filler to make it flush. Your hole may be small enough that proseal alone may be enough to attach the two halves of the backing plate, but best to check with Vans on that. They may want rivets to minimize the chance of subsequent tearing of the skin depending on the size of the hole
 
Any chance this doubler could be attached to the back of the leading edge, inside the wing and a filler piece installed in the existing 3/4" hole? .. bonded in like an inlay?

That patch is going to be pretty unsightly. Maybe step back and think thru it all before you press on with armor plating!

You might also refer to AC43 for specifications on doubler riveting callouts.

Good luck
 
Your doubler (backup) is way too big. The rivet spacing is too wide, and the shape is wrong for a round patch....

Please reference AC 43.13-1B for round repairs when stress direction is unknown or neutral.....

This is really a question for Van's, for proper repair.
 
Yes, refer to AC43-13 for sheet metal repairs. However, in this case, I would seriously consider a new skin since you are under construction.
 
Easy fix.

My opinion is replacing the skin will cause more issues than what you currently have. I filled a hole where a transponder antenna was located with a backing doubler and a filler plug made from the same thickness aluminum as the skin. AC 43.13 is a great reference for how to do this. You would need to slightly curve the filler plug to match the wing curve. I used a single NAS 1097 rivet to secure the plug to the doubler. You could over dimple just a tad and sand the filler plate down a couple 1/1000 ths so everything is just below surface level. After that a trace of micro, bondo ect will make it disappear after priming.

Don Broussard
RV9 Rebuild in Progress
57 Pacer
 

Attachments

  • IMG_8884.jpg
    IMG_8884.jpg
    526.8 KB · Views: 63
My big question is, Can you get to the back side of the dent/hole? If you can clean and prep the area for the patch. (on the inside) Then just glue it in place with some epoxy. let it cure and then fill the outside of the hole.
No rivets at all.
I can't imagine how it could break loose.
If just gluing the patch in doesn't seem to solve it to your satisfaction then put a piece glass over it and more epoxy.
To be honest. If it were my problem? I would just put a piece of glass with epoxy on the back and fill the front with epoxy and filler material and move on.
I personally do not think an aluminum patch would be required.
My luck varies Fixit
 
Thanks for all the suggestions.

The piece to the side of the hole (which has been drilled out in the second picture) is to placed behind the skin as a doubler. Will be riveted to the skin from within the wing. I have access from the wing tip. I did make a circular version (per AC43-13) however found the rectangular version easier to conform to the leading edge. The question becomes, what is the best filler to place in the defect once the doubler is placed behind the skin. I have fashioned a circular piece but fixing(riveting) would warp the piece given the small seize.Thought there might be an established filler approach. AC43 does not discuss this.

To answer some questions, the pictures may not be that clear but AC circular doubler is 2.5 " in diameter suggesting 8 rivets angled a t 45 degrees. There are 8 on this doubler which is not larger the 2.5 " and the rivet/drill distances are within "code" of 4-6D. Already have a pitot/AOA Garmin mounted to wing. Already have the Premier Z-tip landing lights ready for installation. JD weld sounds like a good idea. Would consider new skin as the very last resort. :(

Would any consider patching with West System Epoxy Resin and sanding this down to conform with the remaining wing?

Hoping Vans has something soon and will share with the group when I hear of something.

Thanks again.
 
Drop the bucking bar a few more times and install some .50 cal guns in there!!
 

Attachments

  • C871D9AB-3D3C-4D23-B86C-EE715F8D8903.jpeg
    C871D9AB-3D3C-4D23-B86C-EE715F8D8903.jpeg
    14.4 KB · Views: 31
  • 4041BE61-9575-4EAA-A564-4BE7CBA3402F.jpeg
    4041BE61-9575-4EAA-A564-4BE7CBA3402F.jpeg
    85.6 KB · Views: 36
If the hole is in the last bay then I think it is not necessary to fit a structural patch. The stresses are low, which is why bigger cutouts for landing lights go in the last bay.

I would attach a 1.5 inch square curved patch on the inside with JB Weld. It sticks very well if the surface is roughened and cleaned.

The cosmetic depression can be filled wth epoxy micro filler at the time of working on the other fibreglass parts in the finishing kit. Bondo type polyester filler could also be used but it may shrink slightly.

Vans support is slow at the moment.
 
If you can get to the backside, I would make a new doubler that matched the curve. Push it against the skin and drill match. Countersink the skin.

Make a 3/4” round filler with same curve and rivet it in on the doubler. Rivet the inside doubler. You will have a very small ring to fill. Mix epoxy with balloons and fill ring. Sand it. When painted, the patch is invisible.

An exterior patch works but is ugly. An interior patch will be invisible once filled and sanded.
 
Epoxy with microbeads will fill it easily. Personally I wouldn't even rivet the backplate on, just some black rtv or proseal it in place. That part of the wing isn't carrying heavy stresses so it doesn't need to be a structural repair (verify with vans). I used a small back plate and micro to fill in my QB stall warner hole and after paint you can't tell it was ever there.
 
Last edited:
Terrific suggestions all around.

Tom (Las Vegas) was the most entertaining and brought a lot of chuckles.
 
Since bucking rivets in the leading edge will be a challenge, consider CS4-4 flush pull rivets along with the adhesive of choice. They will provide a desired clamping force while the adhesive sets.
Please, photos of your finished fix.
Good Luck!
 
Forget the rivets, use this stuff. 3M Scotch-Weld Epoxy Adhesive DP420, Black, Two-Part Epoxy Structural Adhesive, High Impact and Fatigue Resistant, Maintains Bond Strength, 50 mL (1.69 fl oz) Duo-Pak https://a.co/d/fvWKVFG

If you can find a local water jet guy, have him cut you a plug to match the hole and bond that in place as well. Very little filling will be needed.

See this thread: https://vansairforce.net/community/showthread.php?t=209987
 
I don’t like hiding repairs on skins. I want to know it’s there down the line.
There are a lot of good suggestions here. First, verify it isn’t a structural concern. If it isn’t, you’re free to do whatever you want, which you are anyway in EAB but….
I would do the backer adhered with Proseal or? And insert a formed aluminum “plug” to match skin thickness. You will still see the plugged hole, but after paint, you will probably be the only one that ever notices. It will simply look like a small round circle in your paint. You could even paint the plug red or something and put a small black dot in the center and folks will wonder what that special sensor is.

If you decide to make it disappear, I have had great luck with Superfil. It’s expensive but doesn’t shrink and sticks very well long term.
 
Last edited:
Oval doubler on inside reasonably contoured, proseal the edges stick on the inside and pull a vacume through the trimmed hole. Keep the vacume on it. I think it would be benefical to make sure the edges of hole are polished and then plug in manner that allows you to monitor the edges of the hole.
 
Thanks for all the input. Vans support suggested aluminum doubler and a filler using epoxy. They did not like the idea of rivets in over the leading edge but accepted one in each corner. That is what I did reinforcing interior with some fiberglass layers. Pictures attached for those with interest. Will sand the leading edge and leave the rest to the painting experts who hopefully will agree to do the work once the project is done. Pictures attached.
 

Attachments

  • R6.jpg
    R6.jpg
    317.1 KB · Views: 57
  • R5.jpg
    R5.jpg
    245.3 KB · Views: 53
  • R2.jpg
    R2.jpg
    303.5 KB · Views: 44
Back
Top