What's new
Van's Air Force

Don't miss anything! Register now for full access to the definitive RV support community.

Removing Rivet Dents

GoN4Broke

Member
Friend
In my youth (when I worked on the tail cone) I had not yet mastered the art of using the pneumatic rivet puller and hence created several aerodynamic anomalies (dents). Since I am now ready to attach said tail cone to the completed fuselage I look back on the inexperience of my earlier work and would like to improve the results before completion and paint. There are a number of locations where I (or my son whom I choose to blame since he not present to defend himself:D) pushed too hard when pulling the rivet. My question is . . . how can I neatly and without further damage get those dents out.
qnplhu.jpg
 
Your not alone

Your definitely not alone in this, and I too like to blame children that aren't here to defend themselves.. :)

I hope to see the answer to this question because I have a few where I didn't run the #30 drill bit through, I just tried to deburr and push the rivet through and eventually the rivet goes through but you end up denting the skin.
 
I toured the Cessna Independance plant (where the piston single are made) several years ago and they had a position on the assembly line where they had a technicians removing similar dents with a length of wood and an hammer. They would identify the area from the inside where they would put the piece of wood either on the rivet butt or it had a hole in it to go over the rivet butt where they would then carefully tap with the hammer until the dent was pushed back out. I had two spots on my fuselage where I had a slight indentation where I used this procedure with excellent results. This may not fix really bad dents, but may lessen them.
 
Last edited:
Top ones: I believe that is along the longeron? It looks like they were drilled and riveted with out having enough clecos in that area to align the skins properly prior to drilling the longeron. Try drilling out the rivets in that line and in the surrounding area and cleco every hole to see if the waves are still there. You might need to "relieve" the holes a little.


Bottom ones: Drill out the lower two marked rivets and slip a 1"x1" shim in between using a piece of scrap skin with an 1/8" hole in the center and line it up. Put a cleco in and see if you need another. If you like what you see rivet it again.
 
Last edited:
Drill out the rivet. Put in a new one, one squeeze. Pull the stem of the rivet with a plier and with that pull the dent out. Set the rivet fully.
 
For the ones along the ribs, make yourself a little tool out of a piece of broom handle. Taper the nose of this tool to fit around the pulled end of the rivet. Dremel out a depression to allow the pulled end of the rivet to fit inside of the depression.

Lay inside your airframe and lightly tap the area around the rivet using this tool. Have someone outside watching and using a metal straightedge. It doesn't take much to return the metal skin to a flat surface. It wants to go back anyway.

This may sound like a lot of work, but I did this procedure to each rivet in my tailcone. It works.
emp39.jpg
 
I toured the Cessna Independance plant (where the piston single are made) several years ago and they had a position on the assembly line where they had a technicians removing similar dents with a length of wood and an hammer. They would identify the area from the inside where they would put the piece of wood either on the rivet butt or it had a hole in it to go over the rivet butt where they would then carefully tap with the hammer until the dent was pushed back out. I had two spots on my fuselage where I had a slight indentation where I used this procedure with excellent results. This may not fix really bad dents, but may lessen them.

++1 with Curtis... we do this all the time and it works very well. :)
 
For the ones along the ribs, make yourself a little tool out of a piece of broom handle. Taper the nose of this tool to fit around the pulled end of the rivet. Dremel out a depression to allow the pulled end of the rivet to fit inside of the depression.

Lay inside your airframe and lightly tap the area around the rivet using this tool. Have someone outside watching and using a metal straightedge. It doesn't take much to return the metal skin to a flat surface. It wants to go back anyway.

This may sound like a lot of work, but I did this procedure to each rivet in my tailcone. It works.
emp39.jpg

Randy,
That's just sexy right there. Nice work.
 
Randy,
Please post a 1600x1200 of that photo. I want to make it my desktop background and look at it for hours. That's the most beautiful work of art I've ever seen. Amazing.
 
Randy,
Please post a 1600x1200 of that photo. I want to make it my desktop background and look at it for hours. That's the most beautiful work of art I've ever seen. Amazing.

Thank you for the comments. You can find the picture here.
 
Thank you all for your expertise. You are most wise ;) I think I'm going to try Randy's modified broom handle method to begin with. If that doesn't quite do the trick I'll give Gagarin737's approach a try.
 
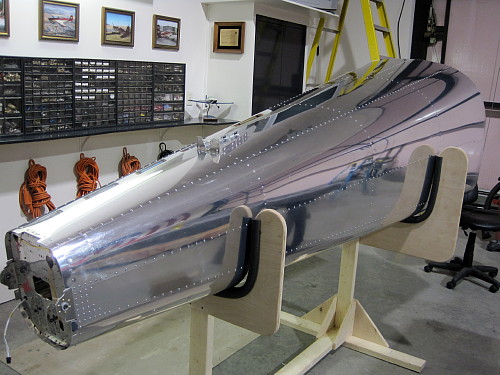
Tail cone Stand

Randy, do you have any hints or plans for constructing the tail cone stand?

I'm about ready to start working on the tail cone and really like the stand in your picture.
 
I used some plans from this site, from another -12 builder. I wish I could remember his name because I would give him credit. I would give you some measurements but I already disassembled the jig and turned it to ash.

Before you start assembling, trace the outline of the fuselage ribs on some plywood. You can see the rib stations in the picture. I used some pipe insulation to protect the skin. Initially I made the jig lower to the ground to support assembly, but later, I made new uprights and used it to support the tail until the engine was installed.

I'd love to be more specific, but I usually just throw these things together and I don't think that much about it.
 
Back
Top