What's new
Van's Air Force

Don't miss anything! Register now for full access to the definitive RV support community.

Putting skin on ribs

BrianP

Active Member
Sponsor
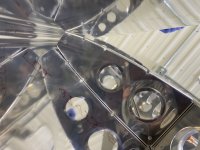
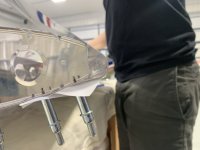
Been trying to put the vstab skin on the ribs to cleco it in place. To me it seems like the radius of the bend in the skin is too tight. Can’t seem to get the holes to line up. I did radius the front of the ribs a bit. Is there a trick to getting it on or should I un-bend the leading edge a bit?
 
You can bend the skin outwards a little to help open up the nose section. Taking care not to over bend it. I used ratchet straps to pull my skins on with stringers by the ribs and spars. You may have to add some backing near the trailing edges so you don't bend the skins when the strap pulls tight. You want to be ginger about pulling that all together so you don't pull the skeleton out of alignment. Some nose ribs may be massaged into place by taking out the bottom nose rib and pushing it with a stick of wood. Or if you need to push from the top, you can get a small length of steel rod and push through the tooling hole in the top VS rib.
 
I clecoed one side, then tried to wrap it around the other side. Dented the skin. Here are some photos.
 

Attachments

  • IMG_7540.jpeg
    IMG_7540.jpeg
    1.9 MB · Views: 68
  • IMG_7541.jpeg
    IMG_7541.jpeg
    1.9 MB · Views: 67
  • IMG_7542.jpeg
    IMG_7542.jpeg
    1.2 MB · Views: 67
I clecoed one side, then tried to wrap it around the other side. Dented the skin. Here are some photos.
Hey Brian,
Did you smooth over the nose rib as in the attached page from section 5? I would try to put the fwd most cleco in each rib on one side, then one cleco in each rib on the opposite side. Slowly work your way aft, back and forth. In your second picture you have a gap on the bottom. Take out all the clecos except the fwd most one, on each rib, and then transfer that gap to the other side. Slow and steady. Sometimes you have to push the rib fwd to get that first cleco in. I’ve also used a scratch owl to Gently persuade the rib hole into alignment with the skin hole. You may have to do that a little on each rib before you can get a cleco in.
As far as the dent goes, I use a teaspoon with tape on it and a little lubricant. Massage it back in. Get it close, painter will fix the rest.
IMG_0290.jpeg
 
Hey Brian,
Did you smooth over the nose rib as in the attached page from section 5? I would try to put the fwd most cleco in each rib on one side, then one cleco in each rib on the opposite side. Slowly work your way aft, back and forth. In your second picture you have a gap on the bottom. Take out all the clecos except the fwd most one, on each rib, and then transfer that gap to the other side. Slow and steady. Sometimes you have to push the rib fwd to get that first cleco in. I’ve also used a scratch owl to Gently persuade the rib hole into alignment with the skin hole. You may have to do that a little on each rib before you can get a cleco in.
As far as the dent goes, I use a teaspoon with tape on it and a little lubricant. Massage it back in. Get it close, painter will fix the rest.
View attachment 68904
Thanks

I did take some material off while radiusing the nose ribs but I’m guessing probably not enough. The rivet hole in the photo is a lot closer to the forward end of the rib than mine are.
 
Back
Top