What's new
Van's Air Force

Don't miss anything! Register now for full access to the definitive RV support community.

Process for riveting RV-14A rudder trailing edge using aluminum angle?

DonMcKee

Member
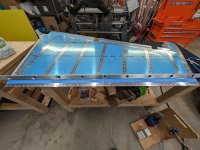
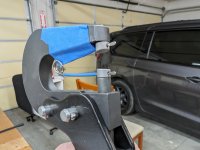
I'll soon be working on my RV-14A's rudder trailing edge. I intend to use the double-sided tape method, and would like to use an aluminum angle as an aid to keeping the TE straight during riveting. I plan to squeeze the rivets using Cleveland's AEX TE flat set.

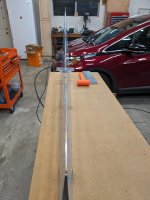
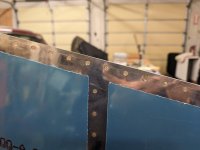
While building my practice kit, I used the aluminum angle to cleco to while applying the double sided tape, resulting in a nice, straight, trailing edge. However, I then removed the angle to squeeze the rivets, and ended up with a probably OK, but less-than-perfect, result. (Note: I did NOT let the tape cure overnight. Should I have?)

I'd like to keep the angle in place while squeezing the rivets, but it's not clear to me what the best strategy is to make it happen. To me, the obvious plan after installing the tape with all TE holes clecoed to the angle, would be to:

  • Identify next batch of holes in which to install rivets.
  • Un-cleco rudder from angle.
  • Use a step drill to enlarge the batch of holes in the angle large enough to accommodate the the flat set.
  • Re-cleco the rudder to the angle.
  • Partially squeeze (per the plans) the batch of rivets.
  • Lather, rinse, repeat until all rivets are partially set.
After all rivets are partially set, go back and finish the squeeze (in the same order, I guess).

Is there a better way to do this? Any suggestions, or pointers to threads/build logs where this process has been well documented, would be appreciated!
 
Myself after doing four RV’s , I prefer using Proseal. I only tried the double sided tape once and didn’t like it. Found it served no purpose. I use the angle and Proseal clecoing every hole. I let it set up overnight then remove all clevis and angle. Clean all the dimples from Proseal. Then start riveting as per the plans. I don’t use a ton of Proseal , just a very thin smear. I find my trailing edges nice and straight and tight fit.
It’s what works for me. When I say the change over to double sided tape, I thought woohoo, no more Proseal but I’m back to using it.

I used the doubled sided tape on my rudder TE.
Shop may have been too cold for a good seal, even overnight.
Came out ok but I now plan to use the ProSeal technique on the elevators, as I have some for the SB-00043 remediation for skin cracks.
 
I’ve done two, I use two angles, top and bottom, and i leave them cleco’d and clamped while doing initial set.

To clarify, you only had the angles attached for the partial set of a few rivets (e.g. center, one somewhere to the right, one somewhere to the left), then removed the angles the next day and carried on. Do I understand correctly?
 
To clarify, you only had the angles attached for the partial set of a few rivets (e.g. center, one somewhere to the right, one somewhere to the left), then removed the angles the next day and carried on. Do I understand correctly?

Yes I have one of every 5 holes cut out on the angles, only waited overnight for double sided tape, but not sure if that makes a difference though. Then I’d move the angles halfway over to rivet the next holes, and again, etc until all initial set riveted. I do have a pneumatic cleco gun, which makes it pretty fast to do all the clecos. Then used the edge tool to finish, always starting in the middle and working outward to top/btm.
 
Just a note on using two angles, top and bottom. I saw enough flex in one, that I doubled up. I think it’s an improvement and makes for a solid clamping force across the entire edge.
 
Rudder

Mine is a 7A but similar. I match drilled a 6' section of 2x2 aluminum angle. Prosealed the trailing edge making sure to add the dollops where specified in the manual
Cleko. Fully cure. Remove the angle. Set rivets in random order. Nice and straight.
 
Follow up...

Thanks for all of the tips! I riveted my rudder trailing edge yesterday, and wanted to post a follow up. This is what I did:
  • I used double-sided tape to stick the trailing edge (TE) wedge to the skins. and clecoed the sandwich to an aluminum angle. The tape had about a week to cure by the time I got to the riveting task.
  • I used a step drill on the angle to enlarge the center hole, and then every 6th hole outward, big enough for my squeezer's flat set. This resulted in 9 holes that I could squeeze rivets through. The rudder TE has 49 rivets.
  • I used my Numatx squeezer set at half-pressure (about 25psi), along with a flat set, and did a 1/2 squeeze on all of the rivets to get them started. I followed the recommended sequence, starting from the center, then every 12th rivet, then half way between those, then half way between those, etc. This resulted in 5 "batches" of rivets.
  • Batches 1 and 2 were set with the initial placement of the angle. Then I shifted the angle, and set batch 3. I removed the angle entirely for batches 4 and 5.
  • After the partial set, I switched to Cleveland Tool's angled TE set in my Numatx squeezer, bumped the pressure to my "normal" 50-ish psi, and finished setting the rivets following the same sequence.
  • I had a hard time getting the set to align exactly with the angle of the rudder, and it felt like the forward edge of many of the shop heads were sitting slightly proud of the skin. I decided to do a gentle back-riveting using a mushroom set, with the shop heads against the plate, to finish everything off.

I think this worked out okay. Definately better than my pracitce kits. ;)

Thanks, again, and Happy New Year!

Pics: Rudder and drilled-out angle; angled squeezer set; sighting down the finished TE, top to bottom; representative manufactured heads; representative shop heads.
 

Attachments

  • PXL_20231227_230031589.jpg
    PXL_20231227_230031589.jpg
    419.5 KB · Views: 137
  • PXL_20231228_021327035.jpg
    PXL_20231228_021327035.jpg
    257.1 KB · Views: 137
  • PXL_20231228_020335693.jpg
    PXL_20231228_020335693.jpg
    348.2 KB · Views: 153
  • PXL_20231228_020454690.jpg
    PXL_20231228_020454690.jpg
    187.3 KB · Views: 141
  • PXL_20231228_020512841.jpg
    PXL_20231228_020512841.jpg
    261.4 KB · Views: 147
Last edited:
FWIW, I used single angle to proseal the TE, and slightly enlarged holes in the angle to allow for any drilling drift or misalignment that could transfer into stretch or compression with the TE parts. Turned out fine.
 
Back
Top