What's new
Van's Air Force

Don't miss anything! Register now for full access to the definitive RV support community.

One-Man Lower Cowl Install

rockitdoc

Well Known Member
Sponsor
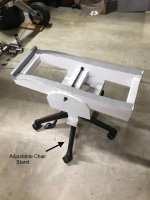
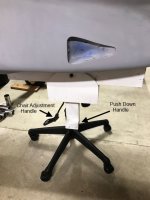
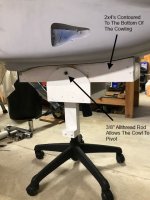
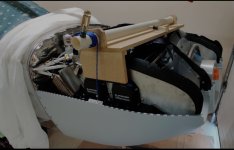
It's clumsy, at best. So, I have fabricated a cradle to hold the rear in place while I attempt to jockey the front into position. This still leaves a dilemma. The rubber flaps on the lower cowl that fit above the air intake flanges need to be held up while the lower cowl is raised into position. This either requires six arms or an ingenious contraption. I have neither. What have you guys come up with? My cradle that resembles a carpenter's worse dream is shown with the scissors jack that raises the cowl in the front. This works, but keeping the rubber flaps up and out of the way while raising the cowl is problematic. Sticky tape, perhaps?Lower Cowl Cradle.jpg
 

I use masking tape to fold the front baffle rubber tuck away. This is a one man setup and I can mount the lower cowl in less than 10 minutes
 
Last edited:
I use a foldable body shop panel holder. You can adjust the height by shortening or lengthening each chain on each side. I have a taildragger so don't have the additional issue of having to traverse a nose gear strut. These can be had cheap from China stores or more expensive (and sturdy) from auto parts suppliers.

4538_2.png
 
George,
Do you have photos of this “system” in practice? How do you use this for solo mounting of the lower cowl?
No photos sorry, but I place this roller (with the upper guard removed) under the trailing edge of the cowl, between the muffler blisters. From there it isn't too bad to lift it into position and support it from the front while you work the cowl behind the spinner and over the baffles.
 
This is what I came up with. Lots of 2 x 4 lumber ($35) and some scrap carpet along with a small scissors jack I wasn't using. Works good. The cradle holds the cowl in place while the jack screws the cowl up into position. I used packing tape to fold the rubber flanges up and out of the way as the cowl was jacked into place. Not terribly elegant, but it works and takes about 10 minutes. Thanks for all the ideas. They helped a lot.

Cowl Lower Cradle Front View.jpg

Cowl Lower Cradle 3:4 Front View.jpg

Cowl Lower Cradle 3:4 Side View.jpg

Cowl Lower Cradle Side View.jpg
 
I use 1-inch heavy duty angle cardboard to protect the nose fairing and slide it up the fairing with the bottom cowl tipped down slightly then once it clears the 3-blade prop level it and continue sliding up. Then lift up and ladder up the cowling 3 hinge eyelets at a time. Very easy. Slotting the lower cowling longer and installing a "filler plate helps". Painters tape around the spinner helps also.
 
I made this setup for my taildragger. It's made from an adjustable chair. I removed the chair and made a cradle out of 2x4's and plywood. I used a short piece of 3/8" all thread to hold the cradle to the mounting frame. This allows the cradle to rock fore and aft as I lift the cowl. To lift the cowling, I hold the push down handle down, and slowly release the hydraulic pressure to let the cowling rise.
 

Attachments

  • Cowl Cradle 1.jpg
    Cowl Cradle 1.jpg
    81.1 KB · Views: 53
  • Cowl Cradle 2.jpg
    Cowl Cradle 2.jpg
    67.8 KB · Views: 52
  • Cowl Cradle 3.jpg
    Cowl Cradle 3.jpg
    78.8 KB · Views: 52
I made this setup for my taildragger. It's made from an adjustable chair. I removed the chair and made a cradle out of 2x4's and plywood. I used a short piece of 3/8" all thread to hold the cradle to the mounting frame. This allows the cradle to rock fore and aft as I lift the cowl. To lift the cowling, I hold the push down handle down, and slowly release the hydraulic pressure to let the cowling rise.
There's a NACA vent in your cowling?
 
Back
Top