What's new
Van's Air Force

Don't miss anything! Register now for full access to the definitive RV support community.

Newbie and the inevitable questions.. :)

jmilton

Active Member
Hi All,

Im new to the forums and have been lurking about reading posts till recently. I just wanted to say hello and of course pose a couple of questions.

First off I have purchased my lovely Empenage kit for the 9A and found that clecos... are quite fun! :D It's quite satisfying to see a couple pieces cleco'd together. Cant wait to see it riveted together! I expect to order the wing kit within the next 2 months, perhaps a little sooner. My wife and I have agreed that this needs to happen to make our goals of completing the plane in 2 years a reality. I'm really excited as she isnt very mechanically inclined, but is eager to learn to work with me on it! I cant have asked for more... I grew up in planes. My dad had a 1956 C172 my entire life up till about 5 years back. He used to fly the plane to work! He was a camera operator on Baa Baa Black Sheep and used to fly it over from Camarillo, CA to the airstrip they had for the show. My mom also had a 1961 150 that unfortunately her husband at the time turned into a soda can. He landed it off field on a highway in Northern California and after getting it on the ground caught the wingtip on a small tree and spun the plane off the a small cliff to the gully below. He walked away without a scratch but he learned the valuable lesson about how much fuel to carry in reserves... he ran out 5 miles from the airport at night. With all this exposure to flight it was inevitable that I would be hooked. The dream to build a plane came about 10 years back but I didnt have the space, time or money to take it beyond that till now. OK... enough... dont want to bore anyone to death.

Back to the project at hand...

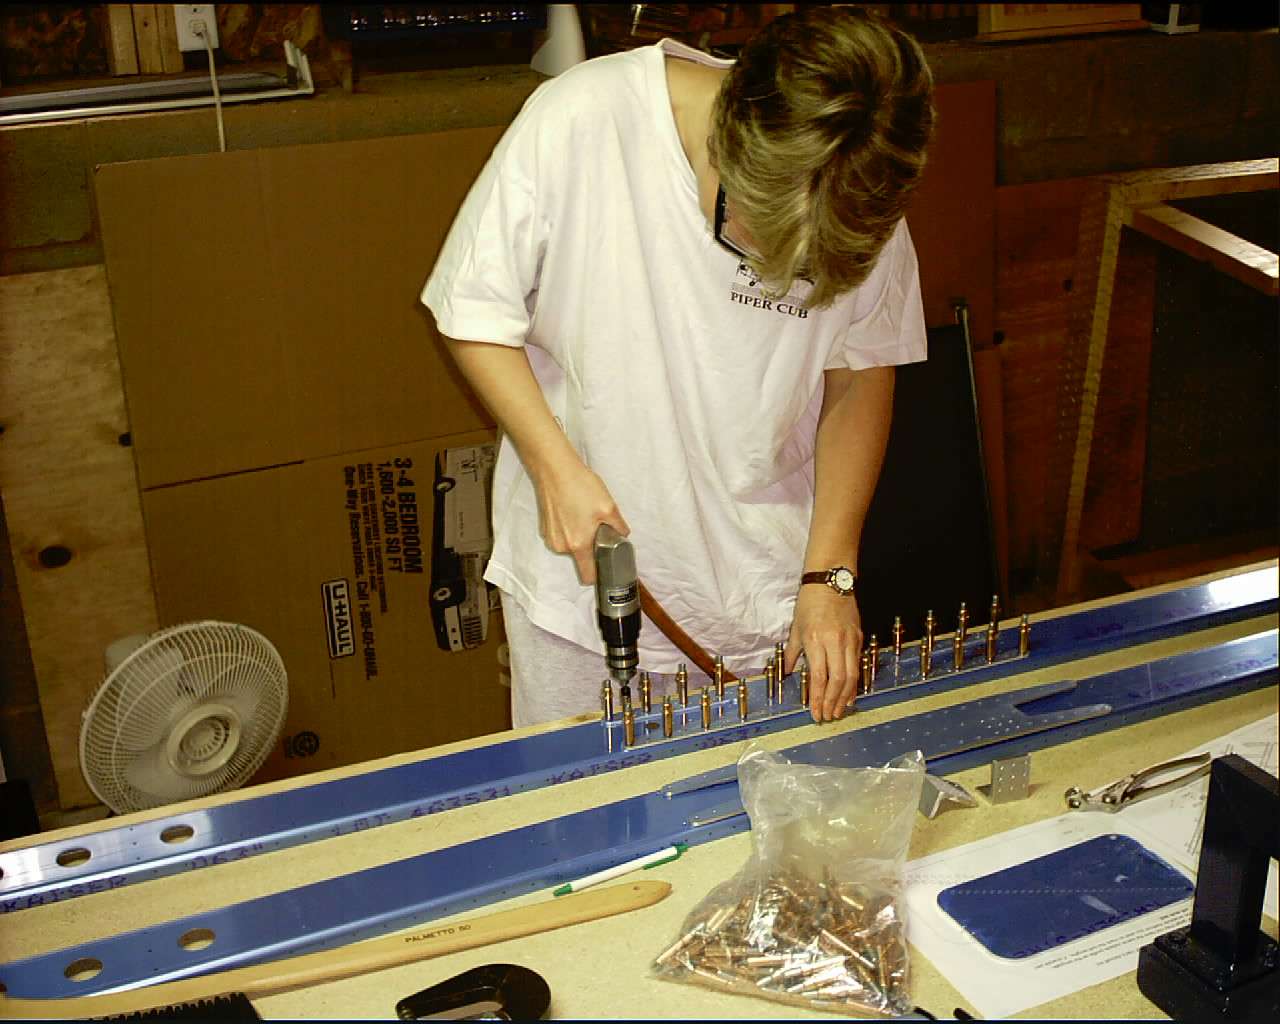
I've picked up a bunch of tools and figure I will find the items I missed as I go.. Im still picking up a dimpler and today decided that I need to pick up a bench grinder sooner than later. I have begun the work on the spars for the HS & VS. I started on the HS but after more reading on here decided that I wanted to do the VS first. That said, I have match drilled the spars and doublers of both. The doublers are bowed a bit, but Im sure this is normal from the manufacturing process. Im going through learning to clean up the edges and deburr everything. I knew this was coming but didnt really grasp the amount of preperation till now. Im ready for it though. I just need a few more tools. :) Are there any suggestions on how people got into this part?

I'm heading out today to pick up some primer in anticpation of getting the parts prepped well. I will as mentioned grab a bench grinder while out, along with a scothbrite wheel. The wheel is more than a grinder!

One question I do have is with match drilling. When a hole has been done how snug should the rivet fit into the hole? I have a nice new dewalt electric Im running slow with the right drill bit so it all fits nice but I have a couple that seem sloppier. I realize that without a drill press doing this it wont be consistently the same across the board but what kind of variance is acceptable when dropping a rivet in the hole?

For a first post I guess I'm a bit long winded but I wanted to get that out. As Im working into it I know I will have many more questions and I look forward to being a part of this great community!

Cheers,
Josh
 
Excellent decision. Congratulations on joining the ranks of the RV builders.

Regarding your drill question... I think you will find that aluminum loves a fast drill speed. Steel on the other hand likes a slower drill with lots of pressure. Consequently, many guys get a quality air drill to do the majority of their building. If you can afford it, I'd look into getting one (I have a 3600 RPM Sioux and love it). Sharp drill bits are another necessity... be sure to order lots of them, especially #40 and #30.

Another option for getting very nice holes when match drilling to final size is use a reamer. Check Avery Tools or Cleveland Tools...

rsf_lg.jpg


Have fun building!

 
Last edited:
Think ahead

Josh:

You will find clecos to be your best friend. I still marvel at this incredibly simple but extremely useful tool.

Every time you think it's ok to assemble and rivet, don't cause the plans lack a definite sequence of events. Cleco everything till the bloody end.

Project management skills seem to be as important as mechanical skills. If you plan to complete in 2 years, you will start many projects which will halt cause you need part x or assistance with y.

If you haven't taken a ride in a 9, do so cause there will be soooooo many frustrating moments it's wise to know that the goal is worth the grief.

Yes, you will need lots and lots of tools but make sure you have lots & lots of space for partially assembled parts.

FYI: Spruce has a SHOPPING LIST feature that's real handy. As I realize parts needed I add them to the SHOPPING LIST each day so when my weekly order time arrives, everything is ready and researched.

The forums are very helpful and make a FAVORITES of all of the builders websites such as Jeff's, Dan's and many others. Collect phone numbers and speak to people BEFORE jumping into a job you've never done before.

The key to getting this done is avoiding doing EVERYTHING three times. Two times is expected, three times is one time too many. My logbook says 650 hours so far but there's prob another 200 I didn't record.

Barry
RV9A - 7 months in, two more to go.
 
tools

Josh,

I found the drill press and the combo belt/disk sander to be infinitely more useful than the bench grinder. Well, I did use the bench grinder to alter a female dimple die for use on nutplates and to flatten the forward side of my pop rivet tool for use on fuel tank Z brackets. Save your $$$.

Steve
 
Steve said:
Josh,

I found the drill press and the combo belt/disk sander to be infinitely more useful than the bench grinder. Well, I did use the bench grinder to alter a female dimple die for use on nutplates and to flatten the forward side of my pop rivet tool for use on fuel tank Z brackets. Save your $$$.

Steve

A cheap bench grinder with a scotchbright wheel installed in place of one of the grinding wheels is my number one tool for deburring parts.
 
Steve said:
Josh,

I found the drill press and the combo belt/disk sander to be infinitely more useful than the bench grinder. Well, I did use the bench grinder to alter a female dimple die for use on nutplates and to flatten the forward side of my pop rivet tool for use on fuel tank Z brackets. Save your $$$.

Steve
Josh,

This is the best way to go. As you probably know, you cannot use a bench grinder on aluminum. (Search this forum for details).

Also look at all the tips posted on this forum. (Change the date at the bottom so the old stuff shows up.) There is a LOT there!

Get your wife involved, mine loved playing with the power tools!

 
Last edited:
Newbie

Definately get the drill press and the combo belt/disk sander.

I found the bench grinder with the scotchbrite wheel on one end to be extreemly usefull. Mount the bench grinder on a free standing pedistal so you can clean/debur the edges of the larger sheets of aluminum easily. The pedistal will free up a lot of bench top area. You can use the regular grinding wheel on the other end to sharpen tools, etc.

Ditto on the advice of asking questions before jumping in head first into unknown territory.

I would start building following vans construction manual. He put a lot of thought into the construction sequence. You will learn as you go, so start out with "baby steps" and continue your lifetime of learning.

Mannan Thomason
RV-8 N161RL (No One Girl)
 
excited??

the enthusiasm is great. your wife being on board is a BIG PLUS. the two of you working together should knock this out easily in two years. the learning curve is steep, so fear not about your skills. the bowed doublers are normal. the punch process causes this.remember steady as she goes. think twice drill once. as corny as it sounds it will become painfully obvious. :eek: you are gonna wreck some parts just make it the cheap ones. ;) have fun. the 9 is an awesome plane. i wish at times i would have built one. oh yea the plans get a little less hand holding once you are done with the emp. so know that they (VANS) expext you to pick up the basic order of things . one more thing buy way more clecoes unless you have loaners near.

good luck
 
Josh,

I wasn't clear, put the drill press on the slowest setting and put the scotch bright wheel in it. This is much better than using a bench grinder, IMHO, it turns slower, AND has better access than the bench grinder.

Either tool will let you debur the aluminum.
 
FWIW, a local couple started their -9A in July of '04 and flew it in July of '06, just a couple weeks under 2 years, so you are not being unrealistic. This was with no QB kits. But, he did work on it about 17 or 18 hrs. per week and she was an enthusiastic partner. I don't know how much work she did but it is my understanding that whenever he needed help, she was there.
 
Hi Josh,
I got started with a full tool kit from Plane Tools...Shaun is very helpful...About $2500 or so...What i have really liked the best is the pnuematic squeezer and the DRDT2 dimpler (both quiet and work well)......
I took the RV class with Ken from VANS and we did not use any reamers at all. I think if you just use sharp drills that you will have no problem meeting the tolerances that were posted above.
As was stated above...Aluminum likes to be drilled at faster RPM's (nicer hole) and the Sioux that came with the kit works wonderful also...(smooth and teasing trigger)
Hope this helped.
Jim
7A HS/VS
 
Sioux are nice but not necessary

If you're a fan of quality tools, and don't mind spending the cash, go for the Sioux. But, if you're on a budget, the job can be done for a lot less. I picked up a little blue Campbell Housfeld drill at Wal-Mart a couple of years ago for about $20. It turns 2000 RPM, and is nice and light. The down side... It's obnoxiously loud, and the exhaust comes out the top. At $20 a pop, you can keep one with a #40 chucked, and one with a #30. I would avoid slower pneumatic drills found at Harbor Freight.

If I were to do it again, I'd use reamers. I think the main advantage is smaller burrs / less deburring. Speaking of deburring, you can save some time if you're planning on priming, by using 320 grit sandpaper and a random orbit sander on the insides of large sheets. I started out with the full chemical etch, alodine, and epoxy primer; by the time I was done with the empennage I decided mechanical prep and some good epoxy primer should do the trick with a lot less pain (YMMV). I definitely would recommend AKZO for primer. There are as many opinions on priming as there are builders, check the never ending debates section.

If you decide to purchase a combo belt/disc sander, you will definitely get your money's worth.

Another neat little device I discovered was the 3M rolloc disc. You can find them at your local body shop or Harbor Freight. The blue ones are perfect for deburring in tight spaces. I mount them on a small right angle die grinder.

Finally, make sure you spend some money on personal protective equipment. Some things like eyes and lung tissue just don't grow back. Don't forget to wear your earplugs, there's nothing more annoying than a loud mouthed, deaf pilot :D

And now the fun begins...

Paige Hoffart
RV-8A (finish kit)
 
Last edited:
RV-9A how to....

Josh,

I finished my slow-build RV-9A and had the first flight on June 9, 2005. I have flown it to Oshkosh twice, to the Great Lakes, New England, New Mexico (LOE5), Denver on business, Texas, and Florida several times. I am based near Chattanooga, TN. You will find those trips and a few more documented in the travel section of my web site.

As for how to do things, the guys with web sites have all documented their projects in chronological order with text and photos. I followed that path with my 2 years, seven months of construction. My empennage section was not photographed with a digital camera, so coverage on it is sparse. The rest of the project has plenty of digital photos and text.

As for tools, I chose Cleaveland for their "Main Squeeze" rivet squeezer and the rest of the RV tool kit they offer, including the Sioux air drill. I have not regretted that choice. Those tools are now building an RV-8 quickbuild with the guy who provides me with hangar space. I coach him on his project.

The Scotchbrite wheel will be your best friend at deburring. The small 1-inch and 2-inch wheels work well in the drill press when it is time to deburr the lightening holes on the empennage and wing ribs. The flat vixen file in my kit from Cleaveland works fine along the edges of pieces that have the periodic "burrs" sticking up. They are what result from the shear knife in the punching process along the edges of parts. You should have found them on the spar doublers for the horizontal stabilizer. By using the file to knock off those burrs, the Scotchbrite wheel will last longer since it is only doing the fine work to smooth the edges to the touch with a bare finger.

I took the advice of other builders who went before me, and found some areas to improve upon that advice. I built commercial aluminum satellite antennas back in the 1977, but I still had to learn the fine points of fabricating the parts for my RV-9A when I began that project in October 2002.

Feel free to call or email me if you have any questions from reviewing my project on my web site at www.n2prise.org. If you have high-speed internet access, you can also get me via Skype for free voice communications.

Jerry K. Thorne
East Ridge, TN
RV-9A N2PZ
Hobbs = 212.5 hours
Skype name: n2prise
 
It depends. . .

What you as a builder will use most, or like best, is up to you. Whether deburring with a drill press or bench grinder is a matter or what is most comfortable for you. Either works well. Personally, I hardly used the drill press for anything, yet it still was a necessity for some things. I also liked using long (12") drill bits, even when shorter ones would do. I don't know of anyone else who felt that way, and maybe it was because I had a bunch of 'em.

Be forewarned; life happens. It took me three years on a two year goal. Two serious illnesses in the family added many months, being far too picky added more.

I saved considerable money by looking for "deals" right when I started. A new set of belts/harness for $40 is one example. Find out lead time on things you know you will need. Catto props, for example, take about a year. Don't order avionics until you need them. The price will come down, or the bells & whistles wil go up. And most importantly, keep pounding them rivets!

Bob Kelly
 
I note that you are in the Seattle area. Although you can build with an electric drill, air drills spin up faster, stop quicker, and are lighter to hold onto which you'll appreciate when drilling hundreds of holes at a time. Since you are in Seattle, I suggest you visit Boeing Sales in Kent. You can pick up a good air drill in good working condition--be sure to check it out carefully, however--for about $50 and they are often on a sale for less. Watch for the little Rockwells and Dotcos, they are pretty good drills. You can get drill bits and other misc. stuff.

Re: the reamers vs. drill debate. I was pleasantly surprised to find that half way thru the airframe construction, I have worn out only one reamer (3/32", which you will use more often). They give you nice, consistently round holes. At about $7 or $8 apiece, I think they are worth the $$.
 
Band saw!

While grinders, drill presses and air drills are good, I bought a 9" band saw at lowes for around $100 and use it all the time! Like said before, don't worry about things that don't come out right the first time, I've got lots of pieces on the airplane that didn't come with the kit! :eek: I started building my -4 Jan. 2nd of '05, two years ago this week and should be done in a couple more months. (I spent four months in the hospital and rehab with a hand injury too, so two years is realistic) With Vans "wait time" for sub kits, I ordered my tail and wing together and when my tail was finished, my wing kit was ready at Vans. Kept things moving.
 
Wow! Thanks for all the great advice everyone!

I have modified my thinking a bit and spent some time playing with a scrap or two and have decided to wait on the bench grinder & drill press for the moment. I can always pick them up for cheap locally if the need becomes too great.

I did realize that I had my dremel kit still stashed away and it has some nice sanding bits that do a clean job in hard to reach places like the lightening holes and inside on the spar doublers. I think before beefing up too much on tools I'm going to work with what I have so far. I originally purchased a modified tool kit from Cleaveland Tool. I swapped out the c-frame dimpler for the Main Squeeze and dropped the rivet gun. I picked up a nice used Jiffy 3x from the Yard Store for a 3rd the price of a new one. I also dropped the dimple dies as I found those on eBay for a bit less. The one tool I dont have right now is going to become very important quickly is a c-frame or DRDT-2. I have a dimple set with the main squeeze as well as the pop rivet dimple set, I just dont have what I really need for the skins. Im a bit hyper sensitive to the noise levels I am going to be generating so I am leaning towards spending the money on the DRDT-2, Im not entirely sure. I also already have an air drill it just falls into that "too loud for continual use" category for me. Luckily after turning up the speed on the trusty Dewalt cordless drill Im getting some really nice, clean holes in the match drilling process. With the exception of some larger needs I think the Dewalt will do the trick for a majority of the match drilling necessary.

All that said Im seeing the possible need for a 12" drill bit now, or having to get an angle adapter for the drill. Geez!!! I spent a few years away from tools and now Im back in the throws of tool-itis. I just found a CP214 style squeezer I could pick up with dies for $210 shipped!! I guess at least I dont owe my sould to the Snap On tool truck man!

Thanks again all. I really appreciate the advice and ideas! Im heading to the basement now to make myself a little paint booth. It's getting nasty again here in Seattle. Rain & snow predicted tonight and tomorrow with lotsa wind. fun times...

Cheers,
Josh
 
If you are on the fast track..

Be sure to get two or more drill motors. There is a lot of time switching between #30 and #40 bits. I would suggest also have a couple of cordless drills to. You can leave you counter sink cage in one and the other could be used for other bits.

Kent
 
Back
Top