What's new
Van's Air Force

Don't miss anything! Register now for full access to the definitive RV support community.

Matco parking brake valve

Weefle

Well Known Member
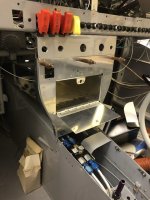
I’m trying to wrap my brain around setting up the Matco PVDV parking brake valve. I’ve looked at the drawings they provide and have the valve mounted on the air ward bracket. Does anyone have a photo of their installation? Id hate to have to crawl in under the panel and rejig things after I’m closed up. I would like to get it right first time.

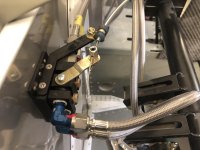
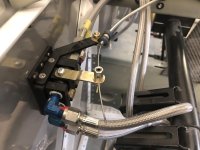
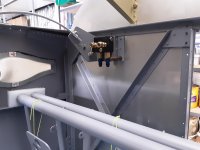
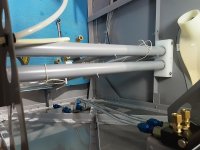
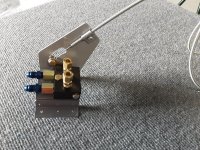
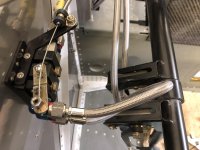
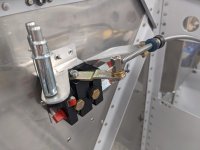
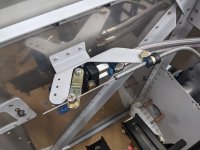
Here’s a couple photos of my install. I’m beginning to think I’ll need to flip the bracket and use a longer Bowden cable and come from the other way. I’ve hit analysis paralysis

Any advice appreciated.

Keith
 

Attachments

  • 98880539-00EB-4D91-BFD9-02B57BBFCF1B.jpg
    98880539-00EB-4D91-BFD9-02B57BBFCF1B.jpg
    311.1 KB · Views: 192
  • 4BAC8E37-96B1-451B-8596-97253250953B.jpg
    4BAC8E37-96B1-451B-8596-97253250953B.jpg
    307.1 KB · Views: 177
Looks like you need another 27.5 degrees to close (open) the valve. Cable full travel should be around 1.5 inches.
valvepark.JPG
 
^^^

Agreed. That's how I installed mine but I looked and no pics, sorry.

The lever should travel 45 degrees with the midpoint being straight up and down. (Perpendicular to the valve body)
 
I had to drill another hole in the arm (closer in) to get that much throw - without the cable coming apart at the actuator side.
 
Me too

I had to drill another hole in the arm (closer in) to get that much throw - without the cable coming apart at the actuator side.
I also had to do a little work to make the arm move the full range.
I drilled a new hole closer in and made a custom mount for the micro switch to let the panel have a alarm when the brake is not off.
 
Last edited:
https://vansairforce.net/community/attachment.php?attachmentid=36586&stc=1&d=1673415343

https://vansairforce.net/community/attachment.php?attachmentid=36587&stc=1&d=1673415406

Here’s how my friends is setup.

The way yours is at the moment is “pull brakes off” you need to be well clear of the transition zone to ensure brakes are fully off or on. I had to adjust this particular aircraft after it landed with a locked brake because the off position was still in the transition zone originally.

Photos show after adjusting

Regards

Peter
 

Attachments

  • 5D01A3EB-5E55-4B7B-97DC-89C668307BFD.jpeg
    5D01A3EB-5E55-4B7B-97DC-89C668307BFD.jpeg
    71 KB · Views: 181
  • 2BEDE6F2-7434-4002-B658-7DFD77C40898.jpeg
    2BEDE6F2-7434-4002-B658-7DFD77C40898.jpeg
    67 KB · Views: 122
Last edited:
That is quite a distance for that type of cable to push. I wouldn't trust it.
I would consider installing a spring over the cable to default the valve to
the open position, and use a twist lock cable to hold the valve closed. And
the handle located in the panel where it is in your way and can't be ignored.

I never did like this valve based on the assumption that if the cable failed in
any way, and the valve was to vibrate to the closed position, you would have no brakes.
valve b.JPG
 
Here's how it's installed in my -6A, the bracket is DIY.
 

Attachments

  • 20220901_091418.jpg
    20220901_091418.jpg
    217.8 KB · Views: 120
  • 20220913_170108.jpg
    20220913_170108.jpg
    323.3 KB · Views: 88
  • 20220901_085935.jpg
    20220901_085935.jpg
    734.8 KB · Views: 109
It would appear you do not have enough arm rotation with that setup. Drill a new hole in the arm closer to the pivot point. This will give more rotation per linear travel amount.
 
So here is my slightly revised set up. What you can’t see is that when you remove the lever there is a dot stamped to show orientation. If you rotate the shaft 180 degrees the open becomes closed and so on. I now have pull to activate brake and push to release brakes. The lever does not have to travel 180 degrees just be within the arc of activation as shown on the Matco drawings.
It still seems to be a very fragile system so don’t plan to use it very often.

Keith
 

Attachments

  • 0A408225-D55D-41A9-84B8-F06187172D73.jpg
    0A408225-D55D-41A9-84B8-F06187172D73.jpg
    324.9 KB · Views: 95
What I do (updated after I went back to look at the photos). Please ignore the firewall insulation from 11 years ago. I'm now a loyal follower of Dan Horton's school of insulating only on the engine side of the firewall.

The valve actuator arm is easy to reach from the pilot seat. No control cable used.

Carl
DSC00938.jpg
 
Last edited:
What I do (updated after I went back to look at the photos). Please ignore the firewall insulation from 11 years ago. I'm now a loyal follower of Dan Horton's school of insulating only on the engine side of the firewall.

The valve actuator arm is easy to reach from the pilot seat. No control cable used.

Carl
DSC00938.jpg

Visible too? That would be a good thing. Or at least, include it as an item on your checklist.
 
I now have pull to activate brake and push to release brakes. It still seems to be a very fragile system so don’t plan to use it very often.
Keith

This is as it should be. That is the standard, pull to engage, push to release.

I've included the parking brake as an item on my landing checklist. I do plan on using mine to keep it exercised and my muscle memory familiar with it but wouldn't want it accidentally engaged upon landing in a TW airplane.
 
Limit switch

I designed a bracket for the valve that allows me to mount a limit switch. That will be wired as a discrete input to the EFIS to alert me if the brake isn't fully open. I also re-oriented the handle such that the valve is in the open position when the handle is moved to the left.

I had no problems with the amount of travel needed when using this cable. Note that I am using the cable sheath as the stop when the valve is engaged. The idea with the limit switch is that I will be notified if the valve is slightly closed (or if either the "B" nut or adel clamp slip somehow).

Details here: https://airplane.allanglen.com/2021/12/03/parking-brake-bracket/
 

Attachments

  • pxl_20211204_0254557464230821689120053076.jpg
    pxl_20211204_0254557464230821689120053076.jpg
    348.8 KB · Views: 116
  • pxl_20220806_0308318624987370172500981512.jpg
    pxl_20220806_0308318624987370172500981512.jpg
    392.3 KB · Views: 106
Last edited:
Beautiful. A picture-perfect installation IMO. (the only thing I would add is a sm kink in the cable after the set screw so it can't slip through) Well done.
 
Back
Top