What's new
Van's Air Force

Don't miss anything! Register now for full access to the definitive RV support community.

Main Power Toggle Switch Problems

pwprice

I'm New Here
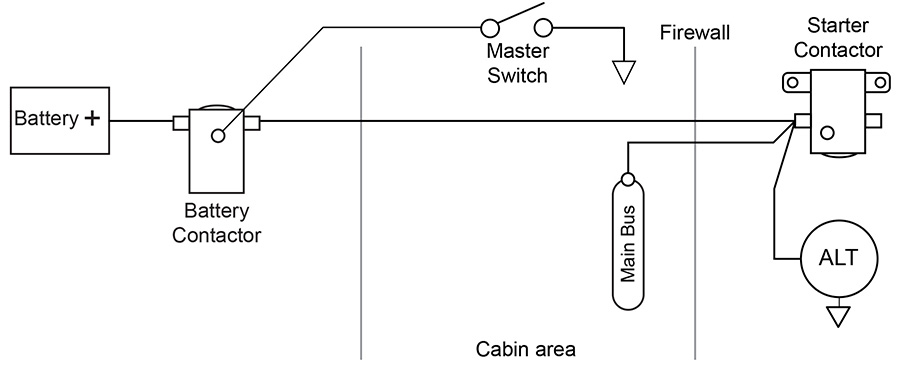
My main power toggle switch occasionally fails and does nothing. I try it a second or third time and it closes the main power relay and all is good. This happens about once in 20 start-ups. I cannot repeat the problem and cannot make the relay fail if I bypass the switch and just touch the wires together. So far I have replaced the main power relay, the toggle switch, and the battery. It appears to pose no problem once the relay closes but it still gives one a terrible feeling when you flip the switch and NOTHING happens!

Your thoughts please.
 
Assuming your master switch wiring looks something like this, a couple of things I'd check would be

1) the ground side of the master switch for loose ground or corrosion
2) the contacter side of the master switch for loose connection or corrosion.

Those PIDG ring terminals can fool you too. Make sure they are properly crimped.

aircraft_wiring_005.jpg


5196e7aafe394a691152fbad113739b668d5f775d7bf.jpg
 
Last edited:
Ken,

It looks like you're using low-quality ring terminals. You want to use the translucent kind like Stein sells here: https://www.steinair.com/product-category/terminals-tape/ring-terminals/. You can also get them at Aircraft Spruce, etc.

Also, it looks like you are not using Tefzel wire, which has finer strands than the wire in your picture as well as better insulation.

I can't tell what type of crimper you are using, but you want to use a ratcheting one like this with the correct inserts: https://www.steinair.com/product/ratcheting-crimper-frame-only/

I've seen problems with crimping as well as the switch itself. If the wiring is secure, then replace the switch. 😃
 
^^^^
this

Ken- I know you were just using this as an example for the original poster, but those are not PIDG terminals. They appear to be simple automotive ring terminals. Also, based on the shape of the indentations in the insulation they were likely crimped with one of the cheap crimpers you can buy at the automotive or big box stores. That's why you got the result you mentioned.

Real PIDG terminals won't do that. If they are crimped appropriately you can put a screwdriver through the ring and heave on it and the ring will likely deform before the crimp lets go.


OP- The standard way to wire up a master switch is to have it on the ground side of the master solenoid just like Ken showed in the schematic above. The logic to this is that it doesn't have to be fused because it's just completing the path back to ground.

Based on your symptoms and what you've already replaced, I would check for a loose or corroded ground wherever that switch terminates back to the airframe.
 
Last edited:
Since all of the major parts have been replaced, the only remaining possible
problem is the wiring. Wires themselves are unlikely to fail. The most likely
problem is a loose or corroded wire termination.
 
Why guess? Since it's a repeatable problem, put a meter on it. Then you can trace the voltage (or ground) to see where it gets interrupted.
 
Last edited:
Ken,

It looks like you're using low-quality ring terminals... ��
^^^^
this

Ken- I know you were just using this as an example for the original poster, but those are not PIDG terminals...

I knew that pic would generate some discussion. You guys'r preach'n to the choir! I stole both of those pics off the internet. Cheap automotive electrical hardware and improper tooling are 2 of my pet peeves.
 
Last edited:
I knew that pic would generate some discussion. You guys'r preach'n to the choir! I stole both of those pics off the internet. Cheap automotive electrical hardware and improper tooling are 2 of my pet peeves.

It also looks like a pet rat was trained at stripping wire.

Funny story, automotive wire insulation can be soy based. Had a couple crew return back to the employee parking lot in MDW only to find rats had ate a bunch of the wiring in their vehicle
 
Thanks

You guys are great! Thanks for the many thoughtful and helpful replies. I will pursue all your good ideas. Thanks again, OP.
 
If you don't have a protection diode connected across the switch or the coil of the contactor, the voltage spikes can damage the switch so it becomes intermittent.
 
If you don't have a protection diode connected across the switch or the coil of the contactor, the voltage spikes can damage the switch so it becomes intermittent.

+1

Just about to type that very same advice. That contactor has a full amp draw and will create a pretty nasty spike across the contacts every time that switch is opened. Eventually it will cause pitting and create intermittent failure to "make." MUST have a snubber diode in place for a solenoid of this size.
 
I knew that pic would generate some discussion. You guys'r preach'n to the choir! I stole both of those pics off the internet. Cheap automotive electrical hardware and improper tooling are 2 of my pet peeves.

You got me. I looked at your profile and see you were an avionics tech :)

So as to not hijack this thread I started another one with a picture of a 25 lb dumbbell hanging from a red ring terminal. Visual evidence that these don't just let go as long as people cough up a few bucks for actual aviation parts and tools when they're fabricating their harnesses.
 
I think “aviation” terminals or “aviation” parts is a little too specific. Unless we are following NASA specs, and we’re sending an RV into space, using a quality “commercial” ratcheting crimper, and lugs that are Mil spec, and possibly SAE, we insure a level of quality. These specs cover a very wide range of equipment.
Is there a separate Mil spec called out for aircraft? I honestly don’t know, but I don’t think so.
I mention this as I used PIDG connectors purchased at a local commercial electrical wholesaler along with a Paladin ratcheting crimper. The terminals are the same ones being mentioned as “aircraft” grade terminals. Same brand, and I believe same Mil spec. The crimper was expensive, but not ungodly, under $100, and has interchangeable dies for different terminal types, which can come in handy.

You can buy them in bulk packages of 100 and save some $$, and get the same connectors being sold as “aircraft” quality.

Unless I am all wet, nobody makes a special terminal for aircraft unless it’s something very specific to an aircraft manufacturer and not widely available.
 
Sorry, you are obviously correct. When I used that term I guess it can bring into mind all the late night informercials selling flashlights made from aviation grade aluminum :)

What I meant was that in this case theres a difference between mil-spec or equivalent stuff that approved for use in certificated aircraft plus a quality tool vs. the kind of thing you'd run down to autozone and buy in a blister pack for hooking up the lights on your jet-ski trailer
 
Ken, Those crimps, pictures and rings probably are not even good for an automobile. For the rings shown , the crimp pliers used, appear to be some type of "longitudinal to the wire" crimper. Even in auto application and for those rings the crimp should be an indentation directly into the center of the joint or at least perpendicular to the wire. Not sure I see any indication of this on those rings.

As the above post said, get you some terminals and tools from Stein for those AV wires or solder the wires into the terminals. you should be able to pull quite hard on the ring and it not separate.

PS. we did use thousands of those rings as pictured and the correct crimper for about all of the Power Plant maintenance work although the electricians would test pull to be sure it was crimped well.
 
Sorry, you are obviously correct. When I used that term I guess it can bring into mind all the late night informercials selling flashlights made from aviation grade aluminum :)

What I meant was that in this case theres a difference between mil-spec or equivalent stuff that approved for use in certificated aircraft plus a quality tool vs. the kind of thing you'd run down to autozone and buy in a blister pack for hooking up the lights on your jet-ski trailer

No worries. Your points are well taken. Folks can’t go wrong buying from Stien and our other small aviation oriented companies to insure they get a suitable part for their airplane.

As far as the cheap “auto” store stuff goes, you might be surprised how well they can perform when properly crimped. However, you won’t find them in my airplane. The biggest issue I have seen is exactly what the OP is chasing, not a wire that pulled out of a lug, that’s easy to find, but a bad crimp that manifests itself in an intermittent problem over time. These are much more difficult to diagnose. (Making an assumption that it is what is causing the issue).

The better quality terminals and crimpers, while not fool proof, tend to be easier to make a good joint.

I am against soldering terminals unless you are an expert. Way too easy to wick and make a fragile joint that can break with vibration. However, I do have a few in my airplane where it was the best solution for a splice, but I didn’t use any kind of terminal, and the solder splice is handy, and designed to protect the joint. Some of the larger power terminals are designed to be soldered if necessary, but all of the smaller stuff rely on the mechanical connection of the wire to the barrel.
 
....Your thoughts please.

When I bought my "flying" new-to-me -6, I had electrical gremlins on the way home. Fixed five bad crimps, along with a horrible ground, and thought I was successful. After a few weeks, it became obvious that the electrical system needed a complete re-hab. Good luck.
 
Last edited:
Better connections

OK, I’ll probably get flamed but this has been bothering me since my first build. Look at the terminal below. It’s a #8 but I do the same with smaller gauge too. This just photographed well.
Solid crimp with the correct tool, solder just the exposed end, not letting the solder wick back past the terminal body. Which would create a brittle zone. Then, finish off with heavy walled shrink with glue inside extending several insulation diameters aft.
What could be wrong with this technique? For all the quality processes developed by EIB builders how do we endorse a process proven to be weak and fail prone like the OP photo?

My terminal won’t look like the picture in the OP.

Rant over, Nomex suit on.
 

Attachments

  • 86A1C08C-2CE3-4BC2-88BA-3A646E1E6D2F.jpg
    86A1C08C-2CE3-4BC2-88BA-3A646E1E6D2F.jpg
    91.3 KB · Views: 41
OK, I’ll probably get flamed but this has been bothering me since my first build. Look at the terminal below. It’s a #8 but I do the same with smaller gauge too. This just photographed well.
Solid crimp with the correct tool, solder just the exposed end, not letting the solder wick back past the terminal body. Which would create a brittle zone. Then, finish off with heavy walled shrink with glue inside extending several insulation diameters aft.
What could be wrong with this technique? For all the quality processes developed by EIB builders how do we endorse a process proven to be weak and fail prone like the OP photo?

My terminal won’t look like the picture in the OP.

Rant over, Nomex suit on.

The solder isn't need with a properly crimped terminal.

Capture.JPG
 
The solder isn't need with a properly crimped terminal.

View attachment 52027

Agreed.

Blaine, in addition to the solder wicking, compare your soldered terminal to the pic posted by RV7A Flyer. You can readily see the solder has extended past the wires and onto the terminal. A nut or washer may not lay flat.

This can be overcome with a longer barrel terminal, but is just another reason why i am not a solder the terminal fan.
 
Solder wick

OK, I’ll probably get flamed but this has been bothering me since my first build. Look at the terminal below. It’s a #8 but I do the same with smaller gauge too. This just photographed well.
Solid crimp with the correct tool, solder just the exposed end, not letting the solder wick back past the terminal body. Which would create a brittle zone. Then, finish off with heavy walled shrink with glue inside extending several insulation diameters aft.
What could be wrong with this technique? For all the quality processes developed by EIB builders how do we endorse a process proven to be weak and fail prone like the OP photo?

My terminal won’t look like the picture in the OP.

Rant over, Nomex suit on.

I would bet the solder did indeed wick into the wire. It will be very hard to control the inner heat zone to keep it out of the flex area. JMHO
 
Although solder is not needed on properly crimped terminals, many of the
electrical problems discussed on this forum are due to faulty crimps. Faulty
crimps could be due to the wrong choice of terminal, the wrong crimping tool
or poor technique. A little dab of solder as used by Blain is good insurance.
This is a case where more is not better. As pointed out, solder can wick past
the terminal. The builder could cut a terminal off to inspect the wire to make
sure there is no solder wicking into the wire. The vast majority of electrical
problems are due to poor connections, not faulty parts.
 
I would bet the solder did indeed wick into the wire. It will be very hard to control the inner heat zone to keep it out of the flex area. JMHO

If it did wick past the body it is mitigated by heavy wall shrink. And copious wire ties.
 
Back
Top