What's new
Van's Air Force

Don't miss anything! Register now for full access to the definitive RV support community.

Layering Tank Sealant

Stuart Grant

Active Member
I am working on my RV-12 service bulletins for the fuel tank. My tank was factory built and I am putting in doublers (required later) as well as an optional vent and inspection port. It is very difficult to see and work inside and the tank that is basically a closed box with a round access hole. To help reduce the chance of leaks I am thinking of coating the corners and some of the seams and pull rivets with another layer of tank sealant over cured sealant before I seal the tank again. I have to do this by feel as I cannot see what I am doing inside the tank. Is this a bad idea? Is the second layer likely to detach and perhaps cause clogs or does new sealant stick well to cured sealant? I know slosh stuff is a no-no. The tank has never had fuel in it.
 
New sealant will stick well to clean old sealant.
As to whether it is a good idea to put on another layer? Not necessarily, if the original sealant was applied properly. In order for the new sealant to be effective it would need to cover any potential pin holes and that may be difficult ensure if the area is not visible.
If you can inspect the seams with a mirror after applying the new sealant then it may be worthwhile. A good way to apply the sealant by feel is to wear some heavy tight gloves and smear it in. If the gloves are too thin then they will just stretch and tear.
 
You might want to look into using an A2 top coat instead of a B2.
Prep is very important always when applying sealant.
 
Tank sealing

After trying to stop a seeping leak in the corner above the fuel strainer a few times by feel I cut a round inspection opening above that area not quite as big as the end sending units opening, but a lot bigger that the one that Van’s came up with last year. Then you can have two opening to see through and work in properly. Worked great. I built a reinforcing ring like the sender unit opening has with rivet nuts. Sealed it close last with pro seal just like the sender unit has on it. I did have t mount the mechanical float sender to the to lid of that opening. If I could figure out how to include a picture I would. If you need , pm me and I can message a picture to you.
 
Gloves and Type A Viscocity

Thanks for all the replies!

I am just in from cleaning up some of the many areas of the tank that weren't supposed to get sealant but got hit poking around with a dirty glove and popsicle stick.

I am able to look at all the areas with an inspection mirror but not at the same time I also have my arm in the access hole. In other words I can see questionable areas before application but I can't see the gloved hand or popsicle stick or syringe that is actually applying sealant so I have to do it by feel. I may try a spatula to spread the sealant like cake frosting. It really is just a couple of spots that are really hard to reach and hidden by baffles.

Everything inside the tank is super clean. I think using the Type A (lower viscosity) sealant will help. Thank you for that suggestion! I didn't realize there were three different viscosities of sealant available.

I am really worried about sealant coming loose and clogging the screen but think I have a way to make sure that isn't happening before I install the tank in the airplane. Maybe someday a roto-molded HDPE tank will be available for the 12.
 
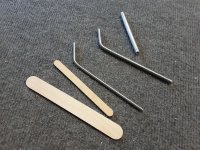
There's a couple of tools in the attached pic that may help. They are simply bent from rod and I found that the 3/16" dia worked best to apply sealant through the tank access holes. There is a little bit more control and feel than there is with a popstick and syringe. It's slow going messy work, no debate there!
 

Attachments

  • 20230305_175802.jpg
    20230305_175802.jpg
    622.8 KB · Views: 43
Back
Top