What's new
Van's Air Force

Don't miss anything! Register now for full access to the definitive RV support community.

Landing light lens fit!

Brantel

Well Known Member
OK,

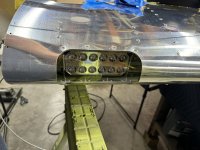
I give up. What is the secret to getting the landing light into place after it is trimmed per the plans and the landing light and brackets are installed?

Oh, and I would like for it to not be cracked and scratched after it is installed.

I have tried for 2 hours to get this thing in. I have retrimmed to the point I am afraid to trim any more!

What gives?
 
You do have to flex the lens to get it through the opening. And I recall using dental floss threaded through the nut plates to pull the lens against the leading edge to get the screws started.
 
I have an RV-7 with the Duckworks leading edge kit, so it's not exactly the same, but I think they're somewhat similar. I found it helpful to have a slight gap under the light mounting plate between it and the wing. The edge of the lens would just barely tuck into that gap when you're angling the lens into place. Once it's in the void, it's easy to pull back into the proper location.
 
I installed my landing light before I did the wing tip closeout because I found the a lot easier and haven’t taken it out since. But getting scratches into the W-00036 was also one of my concerns. I used some paper tape on the outside in a way that I could still pull it off from the outside after installation.
 
I have an RV-7 with the Duckworks leading edge kit, so it's not exactly the same, but I think they're somewhat similar. I found it helpful to have a slight gap under the light mounting plate between it and the wing. The edge of the lens would just barely tuck into that gap when you're angling the lens into place. Once it's in the void, it's easy to pull back into the proper location.
My 7’s lenses were a breeze compared to these demons!
 
I would be cautious about installing the lens from the inside. I’ve had to remove mine to address a lose a termination that developed in the lighting harness, so you want to be sure it can be removed from the outside.
 
I would be cautious about installing the lens from the inside. I’ve had to remove mine to address a lose a termination that developed in the lighting harness, so you want to be sure it can be removed from the outside.
Yep, I refuse to go that route for that very reason. My tips are still open but I want to be able to get in there in the future without drilling out rivets or cutting new holes.
 
Yep, I refuse to go that route for that very reason. My tips are still open but I want to be able to get in there in the future without drilling out rivets or cutting new holes.
I gave up trying and just passed them in through the wingtip. The KAI says they can be installed from the lens opening and I hope that's true if it's ever necessary.
 
Well after sleeping on it, reading all the trials and tribulations on here and other forums about it, I was successful in getting it in safe and sound after putting some heat on it and inserting the outboard side first while squeezing it…. The heat made all the difference in the world about how much it took to squeeze it!IMG_6009.jpeg
 
Happy to report that the right left wing lens went in with little fuss using the same heat and squeeze method.
 
Well after sleeping on it, reading all the trials and tribulations on here and other forums about it, I was successful in getting it in safe and sound after putting some heat on it and inserting the outboard side first while squeezing it…. The heat made all the difference in the world about how much it took to squeeze it!
What did you use as the heat source? Hair dryer? Heat gun? Sunlight? I'll be installing mine in a couple of weeks, and don't want to heat it so much that it permanently changes the shape.
 
What did you use as the heat source? Hair dryer? Heat gun? Sunlight? I'll be installing mine in a couple of weeks, and don't want to heat it so much that it permanently changes the shape.
I used an old heat gun sold for the purpose of shrinking monokote film on model airplanes. It is basically an all metal hair drier with a bit more power. Do be careful to heat the whole lens evenly and keep the gun moving as well as no closer than 12" to the part. It starts to be more flexible before any deformation occurs. Just be careful and all will be fine.
 
Would heating it a little first help? I had to build a big one from scratch for my plane and that was the only way to do it.
 
The lens can be installed without heating it first.
My concern about that recommendation is there is no way for anyone to know how much they are actually heating it.
If you do, choose to do this, I recommend you not heating beyond a point that it is still totally comfortable to hold in your bare hand.

I agree that the amount of heat needed to make this much easier and less risky is minimal. No where near hot to the touch!

Scott, you are one of my heroes! Maybe you can get these in without heat but I just couldn’t do it without fear of it exploding in my hands. I’m not worthy!!!!!🤪
 
Back
Top