What's new
Van's Air Force

Don't miss anything! Register now for full access to the definitive RV support community.

Is this rivet OK?

bertschb

Well Known Member
Friend
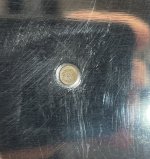
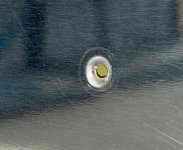
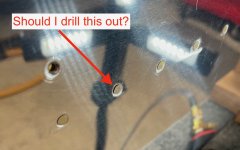
Brand new builder here. I just started on the horizontal stabilizer and I'm bucking my first rivets into something other than a practice kit. The rivet shown below is sticking up more than I'd like. I can catch my fingernail on it. The shop head looks fine. Should I drill this rivet out so it sits flush in the dimple? Like everyone else, I want my airplane to be perfect but my concern is making things worse by drilling it out. I have good luck drilling out universal rivets with my rivet removal tool. Flush rivets? Not so much. Not bad, just not as clean as removing universal rivets.

Thoughts?
 

Attachments

  • Bad rivet?.jpg
    Bad rivet?.jpg
    353.4 KB · Views: 343
Last edited:
Proud rivet

I would. It's not seated in the dimple.
Lots of methods but here's mine.
Punch the rivet head dimple.
Use a bit 10 smaller. #50 for a #3 rivet.
Drill. If it moves off center, walk it back by tilting then back up perpendicular. Drill about 2/3 way through. If you go through, it's fine. The hole is so small, it shouldn't hit an edge.
Use a #40 with a drill stop set so the bit can't go deeper than the rivet head.
Drill. Often the head will come off.
Of not, flip the bit and use it to snap off the head.
Punch the tail or use a pair of side cutters to grab the tail and rotate it. It will usually pop off.
 
Last edited:
Thanks Larry

I went ahead and drilled it out. It went much better than I expected. I'm not sure why I'm so paranoid about removing rivets as I have a pretty good technique and it was good practice. I know I'll be removing many more rivets in the future.

Here is the new rivet:
 

Attachments

  • IMG_6097.jpg
    IMG_6097.jpg
    309.8 KB · Views: 168
Rivet

Thanks Larry

I went ahead and drilled it out. It went much better than I expected. I'm not sure why I'm so paranoid about removing rivets as I have a pretty good technique and it was good practice. I know I'll be removing many more rivets in the future.

Here is the new rivet:

Build on! :D
 
Quite honestly - it is very hard to determine from the photograph - it looks like your dimples need to be hit harder. They don’t look crisp to me, it looks like there’s a shoulder and the rivets are lower??
 
it looks like your dimples need to be hit harder.

I'm using the factory recommended setting for the DRDT2. 1/4 turn past when the dies touch.

Based on all the research I've done, they look OK to me. No distorted reflections as you'd see with under-dimpling.
 

Attachments

  • Dimple.jpg
    Dimple.jpg
    126.1 KB · Views: 213
Dimples look good!

...here's a trick or tip, it's not recommended anywhere that I could find, and all the usual caveats apply...

A single twist (360°+) of a 1-hole debur tool in the dimple after you set it, will let the rivet sit a little lower in the hole.

Build On!
 
This can happen if you’re not applying enough pressure with the rivet gun. The rivet set will bounce enough to allow the pressure of the bucking bar to lift the rivet slightly while it’s being set and will result in the head not being set against the skin. I’ve had to drill out plenty of rivets like this when I was teaching my son how to help me rivet.
 
I was getting more comfortable as the day went by. I think I bucked around 100 rivets today. The tough ones are the ones I have to do left handed next to a rib. My left hand is pretty worthless.

I figure after I buck a few thousand rivets I'll get the hang of it and be more consistent. The great news is I didn't create any smilies in the skin. That was my biggest fear by far. I also feel really good about drilling out flush rivets now. I drilled out three and worked at it like a surgeon. No damage to the holes at all.

Baby steps for this first time builder....
 
You will be driving what will eventually seem like a million rivets, so one imperfect one like this will not mean a thing in the end - there will be many more bad ones along the way. That said, if you don't like it, drill it out. This idea that drilling out rivets is going to cause all kinds of new damage is ridiculous. I drilled out and replaced many rivets.. and my airplane is as solid as it was brand new 23 years ago, having just rolled over 1300 hours on the Hobbs today.
 
Ambidextrous

I was getting more comfortable as the day went by. I think I bucked around 100 rivets today. The tough ones are the ones I have to do left handed next to a rib. My left hand is pretty worthless.

I figure after I buck a few thousand rivets I'll get the hang of it and be more consistent. The great news is I didn't create any smilies in the skin. That was my biggest fear by far. I also feel really good about drilling out flush rivets now. I drilled out three and worked at it like a surgeon. No damage to the holes at all.

Baby steps for this first time builder....

Left and right are required operations. Sometimes without seeing the work. Yes, you will become ambidextrous. I can't write lefty, but I can pretty much use both equally. Sometimes the non dominate side yields better results.

A tip if I may. I'm no expert but this works for me.
Practice this on scrap first.
Get all set up and comfortable. Just before pulling the trigger, close your eyes and see with your hands. Gun hand should be oriented with the index pointed at the work. Second finger runs the trigger. Bar is held with thumb and index touching the work so you can feel the orientation and gap. I usually set the bar against a blank area to get a muscle memory picture of perpendicular then slide it over to the tail while holding the orientation with fingers touching the surface.
It takes practice.
 
When i’m setting flush rivets I got in the habit of putting a small piece of clear packaging tape over the rivet before pounding it. Keeps the rivet fully in the dimple and gets rid of any marring from the gun. Especially helpful when working solo.
 
When i’m setting flush rivets I got in the habit of putting a small piece of clear packaging tape over the rivet before pounding it.

Funny you mention that. I was using rivet tape to hold the rivets in the holes before bucking them for the first couple dozen rivets. After that rivet stuck out of the hole slightly, I stopped using the tape thinking the rivet was getting sucked out of the dimple by the tape while it was bouncing around. Who knows? I'm certainly no engineer. I've never seen anybody else use tape to hold rivets in while bucking - only back riveting.
 
Tape

Funny you mention that. I was using rivet tape to hold the rivets in the holes before bucking them for the first couple dozen rivets. After that rivet stuck out of the hole slightly, I stopped using the tape thinking the rivet was getting sucked out of the dimple by the tape while it was bouncing around. Who knows? I'm certainly no engineer. I've never seen anybody else use tape to hold rivets in while bucking - only back riveting.

I do. 3M Heavy Packing tape on flush rivets.
Gorilla tape over 470 rivets.
 
I do. 3M Heavy Packing tape on flush rivets.
Gorilla tape over 470 rivets.

Interesting! I've watched a gazillion videos from at least a dozen different builders plus I follow a couple dozen build blogs and I've never seen anybody use tape. I thought I was the oddball.
 
At times I put a piece of masking tape on the flush rivet set. It helped when riveting alone. The mushroom set would not slide around the rivet quite as easily. Also offered a bit of protection on the skins.
 
Back
Top