Van's Air Force
You are using an out of date browser. It may not display this or other websites correctly.
You should upgrade or use an alternative browser.
You should upgrade or use an alternative browser.
How to build fuselage rotisserie for quick build RV-8?
- Thread starter larry48
- Start date

Mike S
Senior Curmudgeon
Welcome to VAF!!!!
Larry, welcome aboard the good ship VAF.
One thing to watch out for using the engine stands, the axis of the rotating assembly needs to be perfectly horizontal, most have a slight up tilt toward the engine side.
You can span the engine mount holes with angle stock, and bolt that to the engine stand spider arms, rig up a simple round tube off the rear bulkhead, and use a sawhorse with a "V" notch n the top to hold the tube.
Good luck,
William Slaughter
Well Known Member
Rotisserie
How I did it:
1) Buy inexpensive engine stand (mine came from Harbor Freight also). I left off the wheels.
2) Fabricate an x shaped structure from 2x4s.
3) Match drill to engine stand flange in the middle.
4) Match drill to firewall.
5) Assemble with appropriate nuts, bolts and washers (stacks of washers used to space it out clear of the firewall flange).
6) Aft end sits on a well padded stack of two milk crates.
Not the fanciest ever seen, but completely functional. Nothing about it I'd do differently if I had to do it over.
Welded up angle iron will work fine in place of the 2x4s if you have those materials handy.
Mike S
Senior Curmudgeon

Rick6a
Well Known Member
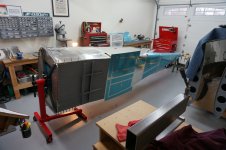
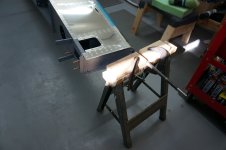
Nothing to it. I'm not a welder so out of practical necessity, I cut the HF engine stand in two and then bolted angle iron onto it. I sized it so the landing gear would clear the floor. The extentions on the "spider" that reach the four corners of the firewall use the same angle stock. It took less than 2 hours to fab up the whole thing up. It was bolted together using AN4 bolts. In practice, I could easily rotate and lock the fuselage into any preferred angle. Doing so, I just had to make certain I did not accidentally "walk" the tailcone off its padded sawhorse!anyone have details of how to build fuselage rotisserie for quick build rv8 on way to harbor freight for engine stand..what about tail

Made it in the morning
Kept it simple, also bought the angle iron from Home Depot.
Used a small hardwood block as a standoff between the firewall and angle iron.

Used a padded adjustable roller-bar to support the tail.
This made it a lot more comfortable and easier to work on the interior!

Kept it simple, also bought the angle iron from Home Depot.
Used a small hardwood block as a standoff between the firewall and angle iron.
Used a padded adjustable roller-bar to support the tail.
This made it a lot more comfortable and easier to work on the interior!
RVRC
Well Known Member
What about the tail?
Here's how we did the tail. If you are building a conventional tail this works well.
http://websites.expercraft.com/rvrc/index.php?q=log_entry&log_id=31025
Hope this helps.
Here's how we did the tail. If you are building a conventional tail this works well.
http://websites.expercraft.com/rvrc/index.php?q=log_entry&log_id=31025
Hope this helps.
Mike S
Senior Curmudgeon
Mark S.
I'm New Here
RV-8 fuselage rotisserie - firewall engine mount drilling
After a couple of years building, this is my first question for the VAF network. I'm at the point in my standard (aka slow) build fuselage that I need to construct a rotisserie - it will make building so much easier. This thread is terrific, but I am concerned about not having the engine mount in-hand and drilling holes in the upper and lower engine mount brackets. The pre-punched opening in the firewall appear to be 3/16 inch. Should I drill a 3/16th hole, insert a AN3 bolt and then when it's time for hanging the engine, expand to 3/8"? I'm attempting to avoid the "law of unintended consequences" that can crop up at the worst times in building.
After a couple of years building, this is my first question for the VAF network. I'm at the point in my standard (aka slow) build fuselage that I need to construct a rotisserie - it will make building so much easier. This thread is terrific, but I am concerned about not having the engine mount in-hand and drilling holes in the upper and lower engine mount brackets. The pre-punched opening in the firewall appear to be 3/16 inch. Should I drill a 3/16th hole, insert a AN3 bolt and then when it's time for hanging the engine, expand to 3/8"? I'm attempting to avoid the "law of unintended consequences" that can crop up at the worst times in building.
RVRC
Well Known Member
Take a look at the link from post #10
Mark, look at the link from my post on this thread. I think the same thing will work on an 8. No need to drill for the engine mounts until you need to. This worked wonderfully for me and now another builder on the field is borrowing it.
Mark, look at the link from my post on this thread. I think the same thing will work on an 8. No need to drill for the engine mounts until you need to. This worked wonderfully for me and now another builder on the field is borrowing it.
Mark S.
I'm New Here
RV-8 fuselage rotisserie - firewall engine mount drilling
Thanks Robert for the quick response and link. The 8 doesn't have the cut-out in the center of the firewall like the 7. I can see no option but to drill into the engine mounts. I just don't like removing any material until absolutely necessary.
Thanks Robert for the quick response and link. The 8 doesn't have the cut-out in the center of the firewall like the 7. I can see no option but to drill into the engine mounts. I just don't like removing any material until absolutely necessary.
Sorry to bring back an old thread, but this has a lot of great info, so I think it's worth it. My question is - the holes shown above being used make sense - but there is material behind them on my QB fuse. They would need to be drilled to clear them for use on the rotisserie. Should I drill the four holes in the corners?
It would be pretty easy to drill from inside the fuselage out or the other way - I would assume that these holes should line up with holes in WD-802 and WD-803 on the other side. It's just troubling to me that my QB fuse has stuff behind them... so I wanted to ask since I don't have any drawings or anything yet for the engine mount to ensure it's correct to drill these holes. I can't find any specific reference to these holes, though I'm pretty sure it's where the engine mount attaches once I'm to that point.


It would be pretty easy to drill from inside the fuselage out or the other way - I would assume that these holes should line up with holes in WD-802 and WD-803 on the other side. It's just troubling to me that my QB fuse has stuff behind them... so I wanted to ask since I don't have any drawings or anything yet for the engine mount to ensure it's correct to drill these holes. I can't find any specific reference to these holes, though I'm pretty sure it's where the engine mount attaches once I'm to that point.
2theskyy
Well Known Member
Standard build ends up the same. Do not final size drill until you get the engine mount and use it per plans. I drilled from firewall aft matching hole locations of mount only using an3 or 4. Once I removed rotisserie and final drilled with engine mount, it lined up perfect. One item I feared but worked out probably better than most tasks. The rotisserie is totally worth the effort.Sorry to bump an old thread, but this has a lot of great info, so I think it's worth it. My question is - the holes shown above being used make sense - but there is material behind them on my QB fuse. They would need to be drilled to clear them for use on the rotisserie. Should I drill the four holes in the corners?
It would be pretty easy to drill from inside the fuselage out or the other way - I would assume that these holes should line up with holes in WD-802 and WD-803 on the other side. It's just troubling to me that my QB fuse has stuff behind them... so I wanted to ask since I don't have any drawings or anything yet for the engine mount to ensure it's correct to drill these holes. I can't find any specific reference to these holes, though I'm pretty sure it's where the engine mount attaches once I'm to that point.
View attachment 65877
View attachment 65878View attachment 65879
View attachment 65880
Good luck
wirejock
Well Known Member
Whatever the design, make absolutely sure the forward and aft cradles cannot possibly spread apart or teeter/totter. Talk about a bad day. No it didn't happen, but I saw it possible.Got it! Thank you for the confirmation. I'll use smaller AN3 bolts just to give extra space to upsize for the final holes when the engine mount is ready to go on.
Flyin'Bryan
Well Known Member
Guess I can throw my hat in the ring on this as well. During my research I was having trouble finding the photos and details I was seeking, so I made a point to address those in my posts to my blog. It is still in progress, but hope it helps a little.
RV-8 rotisserie
RV-8 rotisserie
Glad that this thread has been revived..I am learning alot from this endeavor.
I like the pictures and idea of building a steel framework and bolting the flat plate of the HF stand to the plywood cross piece and not using the arms. If you decide to use Bryan's idea and drill 5/8 Dowell, you can chuck it in a lathe and use a Brad point woodworkers drill bit or an Irwin Speedbore drill bit.
I like the pictures and idea of building a steel framework and bolting the flat plate of the HF stand to the plywood cross piece and not using the arms. If you decide to use Bryan's idea and drill 5/8 Dowell, you can chuck it in a lathe and use a Brad point woodworkers drill bit or an Irwin Speedbore drill bit.
A lathe would be ideal for this, but I don't have one.
Thank you for the confirmation that these holes need to be drilled. I did not want to do it without someone confirming! I'll be using AN3 bolts as it seems like works for people and keeps the hole small for upsizing in the future.
I am going to use the idea of some 1" hardwood plywood standoffs, then steel angle iron to a plywood plate where the stand is then bolted. This seems like the next best option, without a lathe which would be perfect for getting the wooden dowels drilled.


 on your nice new firewall.
I have the same exact Harbor Freight engine stand. Did you do anything to put it at a 90degree level with the ground? Or is it close enough? I don’t see anything in the photos that would level it?Here's some pictures of my rotisserie made from a HF engine stand and two flat steel bars. Attached them to the engine mount holes with I believe AN4 bolts. Tail stinger on a padded sawhorse made it the perfect height to rotate.View attachment 65936View attachment 65937
A padded sawhorse worked for me. If I needed to rotate it I'd just slide the sawhorse aft and rotate on the tail spring steel gear. Mine was a slow build fuselage but the pictures you see are at about the QB stage. The fuselage is relatively light at this stage so you can easily adjust the tail for different heights. Perfect example is when the LG gets aligned.I have the same exact Harbor Freight engine stand. Did you do anything to put it at a 90degree level with the ground? Or is it close enough? I don’t see anything in the photos that would level it?


Last edited:
Lkitson
Well Known Member
Did you do anything to put it at a 90degree level with the ground? Or is it close enough? I don’t see anything in the photos that would level it?
I left off the two engine stand wheels farthest from the upright which pretty much made the upright perpendicular to the ground. I supported the tail with a sawhorse under the stinger.
Attachments