What's new
Van's Air Force

Don't miss anything! Register now for full access to the definitive RV support community.

How did you choose your paint scheme

humptybump

Well Known Member
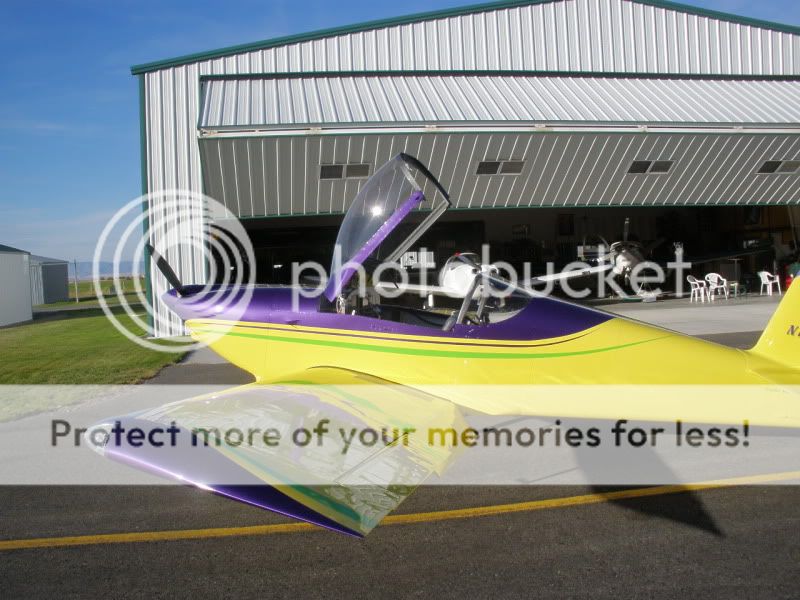
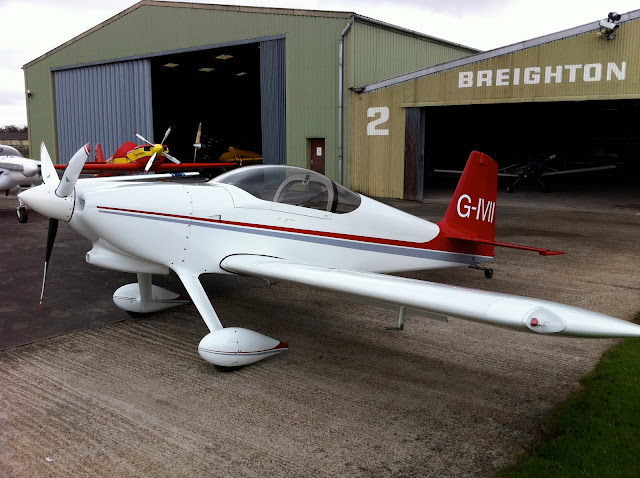
There are a lot of great RV's out there and shown here on VAF. How did you choose ? Military vs Civilian ? Wild vs traditional ? Nose/tail art painted vs decal'd ?

Tell us what motivated you. How you chose your colors. Tools you used to design your paint scheme.

Let's hear about your inspiration ... there are a lot of members coming up through the build process anguishing over how to "dress for the dance" !
 
I leafed through hundreds of old issues of Sport Aviation. Found elements of various paint schemes I liked and worked with several schemes and color combinations to come up with what I liked.
 
I think you need to be original!

I worked on ours for around seven years up until it was time to paint. I think it is the most critical thing you can do to make your plane special. I hand sketched layouts first - hundreds of them - then made many copies of the ones we liked best. My wife and I used crayons and colored pencils to get the right combination of colors. Then we went throught Imron color chips to get the precise colors to be used. Next we made full size patterns for the colors and taped them on the plane to make sure they looked right. Then I used power point to establish the contractual requirements for the several thousand dollar paint job. Every thing came out perfectly and it is worth the work. You should not try to slide through this most critical task. It doesn't have to be done fast - just take your time and develop something special.

Bob Axsom
 
I leafed through hundreds of old issues of Sport Aviation. Found elements of various paint schemes I liked and worked with several schemes and color combinations to come up with what I liked.

Like Kyle, I looked at every RV photo I could find; then made a stack of outline drawings and started coloring them. Actually spent months coloring drawings and asking my wife for her comments when I had something that I liked. After we picked the winning entry I taped it out on the plane. We then spent a couple of weeks moving tape around until we ended up with our final design.
dsc01751.jpg
 
Easy...I spent 35 years looking at airplanes and remembered what I liked and didn't like. Then I did like many - made a bunch of copies of the outline drawings, got out the colored pencils (in the colors I liked), and ended up with something completely different than what I thought I was going to do, but loved it. Don't rush it - allow yourself a bunch of creative time.

Paul
 
lots of time to think when you're building. Looked at lots of pictures on the computer and saved the ones I liked. Shot hundreds of pics at airshows.

But mostly the vision came to me in the shop. My grandkids helped with yelling out their favorite colors and said make it bright. I then made a VERY very bad paint shop pic. Chad J took my drawing and my colors and made a dozen or so sketches until we got it close. When it came time to paint, the striping found itself as I laid out the lines.
 
A few factors

When I first got involved in the wonderful world of RV's, I looked at all of them I could. Oshkosh, LOE, Sun n Fun, Copperstate etc.. I had three main objectives. 1) Make it look longer, 2) Make it look like it had a bigger span, 3) Make the colors flow with clean transitions between components.

One of the things I noticed is that many of the RV's did not have schemes that flowed. Some looked like the fuselage from one plane and the wings from another and yet a tail from another. Even though the colors were the same the components didn't blend. Right angle lines running on the wings running into the solid color of the fuselage. No flow!!!!

The long lines on the fuselage give it a perception of being longer. Same with the wings. Span wise stripes make the wings look like they have greater span.

Although the colors can make a difference, it is the flow that, in my opinion, really set things apart. Take another look and you'll see what I mean.

Another consideration, is how you design the front end. On the 3 views they are all "flat plate." It is easy to do it on paper. Not as easy laying out a curve on a cowl.:eek:

Make it flow!!!!
 
I had three main objectives. 1) Make it look longer, 2) Make it look like it had a bigger span, 3) Make the colors flow with clean transitions between components.

Exactly the three things I wanted as well although I would modify number 2 to include make the wing look less square (has taper).

lots of time to think when you're building. Looked at lots of pictures on the computer and saved the ones I liked. Shot hundreds of pics at airshows.
After taking pictures I picked several families/features of designs I liked and started sketching from there.

I worked on ours for around seven years up until it was time to paint. I think it is the most critical thing you can do to make your plane special. I hand sketched layouts first - hundreds of them - then made many copies of the ones we liked best.

I did the same but then went to powerpoint and made slight changes and could toggle back and forth between two designs to decide which looked better.
In the end I did not get as much "flow" as I wanted from the fuselage to the wing but I love the paint scheme and would not change it a bit if I did it over.
 
Last edited:
when my plane............

was built the builder had no idea how to paint it until he saw a king air on the ramp. that was what he used. end of story.
img0565yz8.jpg
 
I've got so much money in the 10 I'm finishing I won't be able to keep it. I'll keep the next one. Anyway, since I didn't want to saddle a buyer with "my" paint scheme, I've just gone with a bulletproof white poly-u base. I put on vinyl numbers with a shadow that match the interior. I've found color matching flames for the rest. If a buyer thinks they're ugly, or gets tired of them, adios. Plus, I don't have the skill/facility for a show job, so I'd have to farm it to a pro.
 
what are the down-sides to delaying painting ?

Is there any downside to flying for the first year+ without paint ?
 
I came up with a paint scheme and colors that I thought would look great. The scheme was decided on well before I decided to paint. The first run was free hand colored with pencil crayons on the RV10 drawings.

Then I noticed many aircraft with similar design and color. I scratched that and started over. I then used autocad and started making fresh lines. Trying different designs to come up with what I liked again. I then pasted it in Paint and added color. I hope it is fairly unique, but I guess all paint jobs have similarities.

I sure hope it looks good when Grady is done as there is no turning back now. I think it is important to always let your idea digest for a while before committing. That is my excuse for waiting so long.;)
 
Not if you're going to make someone else paint it. It is easier before everything gets used and oily/grungy. Oil on raw fiberglass is hard to eliminate. Soaks into pinholes & edges. Gets under nutplates, etc.
 
Shamlessly...

....copied the one(s) I and mrs. liked best then tweaked a bit. One BIG consideration was that I knew it would eventually be for sale so wanted a scheme that would be attractive to others as well...

Take a look at Barnstormers' RV ads and there are always some that make one wonder "what were they thinking?"
 
I flew for a year before painting - good thing!

Is there any downside to flying for the first year+ without paint ?

I did fill the fill the fiberglass and sealed it with 50% thinned (with acetone) Epoxy resin. After a year we had it painted and it came out great. Now 6 years later it still looks like new. I had problems during the test period that would have destroyed the paint job.

Bob Axsom
 
One of the things I noticed is that many of the RV's did not have schemes that flowed. Some looked like the fuselage from one plane and the wings from another and yet a tail from another. Even though the colors were the same the components didn't blend. Right angle lines running on the wings running into the solid color of the fuselage. No flow!!!!

AMEN!


Make it flow!!!!

Reminds me of a Christmas carol..."make it flow, make it flow, make it flow!!!
 
I didn't have a clue on what to do so I went to www.aircraftcolor.com and looked at over 100 RV schemes they had in their database. I then narrowed that down to about a dozen and then finally down to the one I went with. They will work with you to give you drawings of several colors of your choice and make changes to scheme as required. I found another RV with colors I liked and gave them the paint codes to put on my scheme. Of course you have to pay something for their service but it was worth it to me.
 
Nice paint!

Hi Mark,

I like your paint and looks like you were the chief painter! Did you happen to track your hours painting? Just curious, I had a husband/wife team from Red Bluff, CA do mine and I figure they had about 160 man (person?) hours into it.
Of course they had been doing this for 30+ years.
 
Lots of time

Jerry,

I did all of the prep, primer and sanding then had an experienced friend shoot the color and clear. It took a full three months after work and weekends and probably twice the time you mentioned.

I used epoxy primer with build primer over that. Would probably use wash primer instead of epoxy primer next time to reduce the weight. The build primer helps fill around the rivets. You still see the rivets but looks much nicer. Also epxoy primer tends to have a texture which can be leveled out with the build primer. You end up sanding half of the build primer off to get a nice flat finish. I also sanded the white base coat to smooth it out prior to adding colors and clear.

I used PPG single stage white and base coat/clear coat for the metalic colors. That adds a lot of time because we had to paint each color and lightly clear each color as we went. You have to clear the base within 24 hours and there's no way we were fast enough to paint it all at once. Then a clear was put over everything when we were all done. Tons of work and still want to do some buffing. There's a lot to be said about simply doing single stage paint and calling it good. Although if you want metalic you have to do the whole deal. We also found that you have to run higher than normal gun pressure with the HVLP when shooting clear to eliminate orange peel. We learned a lot about painting an airplane and a pro may go about doing it different.
 
It was very helpful that some of the posts had a pic to illustrate the comments. For those who didn't post a pic, please consider editing/adding a pic so we can 'see' what you are saying. :)

And especially you, JD. 'Extension' and 'flow' would be my primary goals and I'd welcome seeing a 'real' pic of your plane (vs. that icon). Went to your biz website but no joy...

Jack
 
Flowing paint job is only one approach

Some more thoughts:

I personally do not believe those swoopy shapes look good on an RV. They look artsy and do not reflect the straight clean lines of an RV. Think for yourself and try different layouts and settle on what you like. A second color to trim the base color and a third color on the edge of the trim looks robust and rich in color terms.

Wing - Twin bands near the wingtips, the full leading edge, diagonal stripes or sunburst work well on the wings and these designs have stood the test of time. This is the primary driver of the overall scheme.

Fuselage - Solid or some form of stripe down the side are good. The fuselage should pick up a color from the wing as its base color. Once you have the wing and fuselage worked out the theme is set for the whole plane.

Tail - Solid or picking up the wing design is good. This is and easy area to play with to work out what is pleasing to your eye when the whole plane is considered. The vertical stabilizer and rudder can be considered as part of the fuselage continuation and remain solid to avoid the busy fan look at the back instead of a pleasing accent to the wing and fuselage.

Landing gear fairings - Solid or striped to match the colors and design of the fuselage scheme.

Some have said that color is not important but I think the precise color choice is critical to the appearance of the airplane. Choose carefully based on some appearance objective. INCLUDING TEMPERATURE AND MAINTENANCE.

Bob Axsom
 
Paint colors

For me it was colors first. I saw some colors that I really liked and had to have. Had no idea how to use them but they were love at first site.

Once I had the colors, I looked at hundred of photos I had taken from SNF and Kosh. I sorted all of them out by features I liked and featured I didn't like. The ones I didn't like were more important than the ones I did like in that it was easier to eliminate styles than to choose what I did like.

Then, I took everything I likes about all of the photos I likes and tried to come up with a combination that worked. One thing I realized right away was that some paint schemes make a RV look like it is really going fast, even sitting on the ground. Others made it look like a pollywog out of water. Not fast at all!

Lots of drawings and finally computer renditions.

I start painting any day now and can't wait to see what it looks like. Thats right, I don't really know what it is going to look like until it's done. I hope I like it!
 
I did not choose it, my wife did.

And, I like think of myself as being smart enough to not argue:D
 
Flowing paint job is only one approach.......Some more thoughts:
........personally.......Think for yourself and try different layouts and settle on what you like.

I like what Bob says above. you are the builder, so make it yours. RV's are different, so are the owners. Straight lines, flowing lines, bold colors, wild paint layouts, solids. We all like something different.

I have seen some solid or straight line two tone scheme that look really good, but went with the "stretch it and bright color" theme. I thought some RV's look stubby with a too big tail. So I used a prop extension with the James long cowl, then painted to lengthen the fuselage. Add the darker color on top of the tail to give it a smaller looking profile, same with the wing tips gives the wings a swept look. Also I went with solid color pants and HS as I plan on hitting some grass and dirt strips. This will make paint repair easier.

IMG_20110116_154754.jpg


When I chose the colors...Yellow, Purple and Lime green...many of my friends looked like the were going to puke. Hey, I Don't care... I like it and many of those same friends do to now that they've seen it.
PA200539.jpg


Go For it, it's a blank canvas.
 
Turbo, that is such a boring paint job..........

What you need is a blatant copy of someone else's, hence ours.

IMG_0231_2.JPG


I did email Randy, however, he got it from someone else so nothing is new - Eh ?

We were going to go with the stock RV yellow over white but it was going to cost more..... :eek:

Yeah he got it from me (noted on his web site)

sfgsuu.jpg


But then again, when it came time to paint the -8A, I copied myself....

2zs8i6f.jpg
 
Kind of comes back to the same argument we have over tailwheel/nosewheel, tipper/slider, etc... Paint it the way you want to see it when you open the hangar door. Crud, if we all painted with straight lines, there'd be 7000 airplanes out there all looking the same. Personally, I'm a fan of the swoopy lines! Do what makes you happy!
 
my skill level

Same as all the others have said. I looked at lots of pictures and focused in on a general style.

But the thing that really made the biggest difference for me in choosing a layout actually started with choosing a paint that was easy to work with, no metal flake, or tricky color contrast. I also tried to create a layout that was easy to mask while not following the sheet metal edges as much as possible.

Next time I might do something a little fancier, but this first time I tried to work in skill level.

good luck,
Lynn
 
My 2 bob's worth

I am in the throes of deciding this myself.

I agree with Bob on the sparse straight lines of rivets and sheet of metal planes. To me that is the whole of the appeal and I wouldn't want to go busting it up. I like to be able to see the rivets - some blokes will try to cover them over.

For mine flowing lines works brilliantly on glass planes but IMHO sheet metal is more old school. But , as hydroguy says - others love it.

By the time we get round to painting it one will have a fair idea of the "personality" of the plane.

Probably here is the bit we get to show our artistic sides rather than the purely technical side.

Here are my ideas so far.

scheme3view.jpg
 
Last edited:
I chose mine...

the old fashioned way: I stole it from Jamie Painter and changed the colors, with his permission, of course.

Bill Near
 
Back
Top