
Van's Air Force
You are using an out of date browser. It may not display this or other websites correctly.
You should upgrade or use an alternative browser.
You should upgrade or use an alternative browser.
Holder for drawings
- Thread starter flytoboat
- Start date

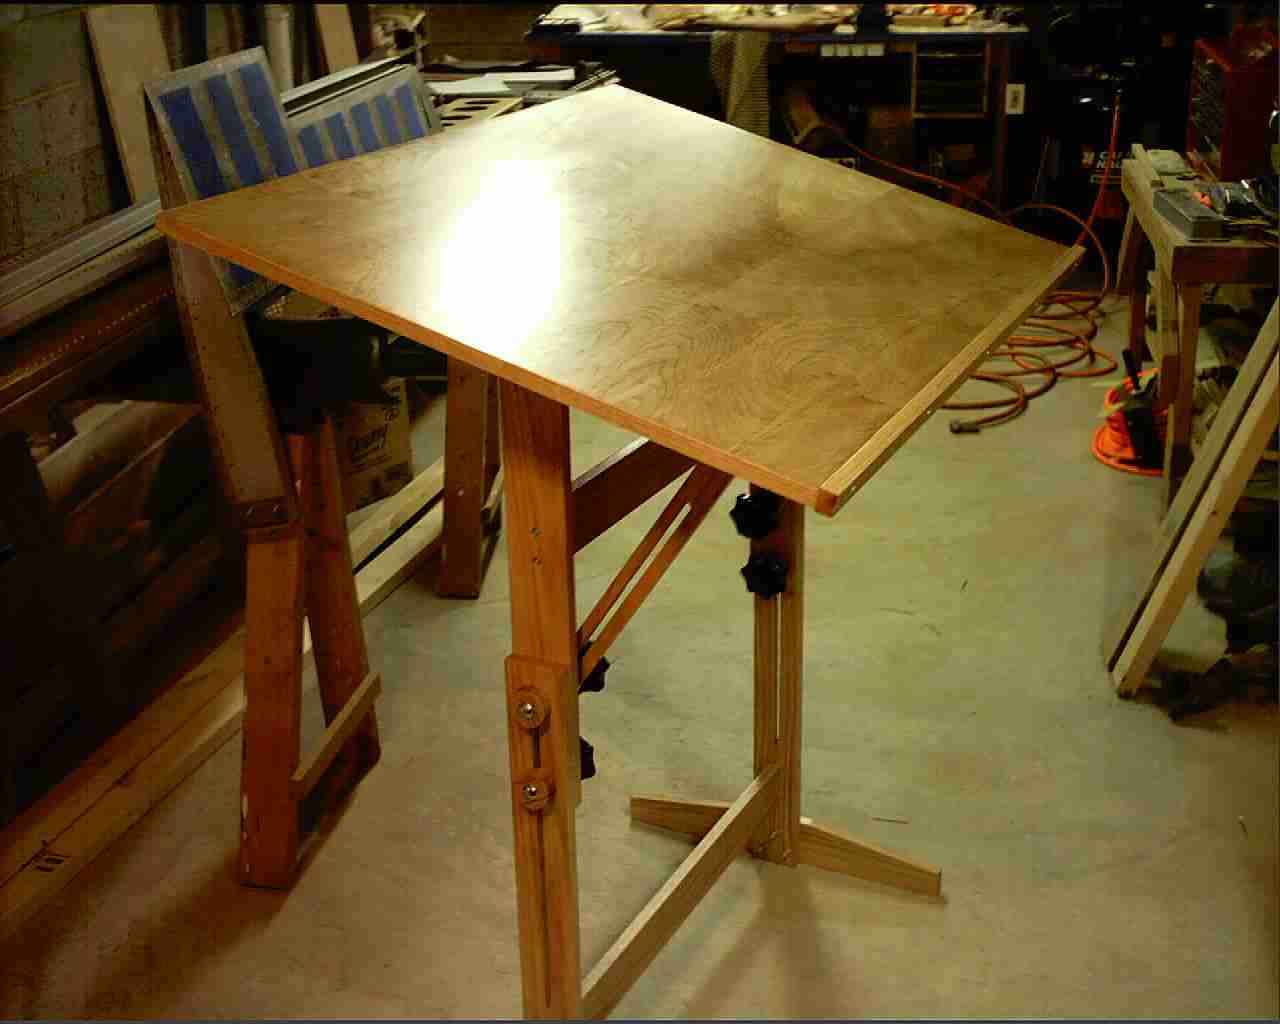
Table and chair
I had a small table just the right size for the drawings, so I set that up in my shop. I added two small spring clamps on the left and right edges to clamp down the drawings.
Having a chair in your shop gives you a place to take a break and study the plans with a refreshing beverage (or two) in between tasks.
I'm considering buying/making a small drafting table (with tilting top) so I don't have to lean over the drawing as much, but the table works and its paid for...
David_Nelson
Well Known Member
Painter's Easel
Run down to Hobby Lobby (or similar) and get yourself a good sturdy painter's easel. My Wife found an all metal one that has worked out great.
Cut a sheet of plywood a little bigger than the plans (I don't understand why Van's can supply a consistently sized sheet) and use some heavy duty binder clips to hold the plans on the plywood. Put the plywood in the easel.
The setup is portable, compact, doesn't take up any valuable working surface, and it's easy to flip pages forward and backwards.
Regards,
kentb
Well Known Member
I started out with an easel...
I build it out of 3 1x2s and some bolts and screw hardware. It was easy and I held everything on with clamps to a 1/4 inch piece of plywood.
By the time I got the fuse I just put the sheets I needed on my table close to where I was working. It was to much trouble to keep walking over to my plan station for a double check.
You do double check don't you?
Kent
Rick6a
Well Known Member
Personally, I like to walk up and view DWG's from eye level. I just clip a stack of them to a piece of plywood that is hanging on the wall, suspended with safety wire and chain hooks. There are probably 15 drawings behind the one shown. To retrieve a preferred drawing that is deep within the pile, while tugging on it I just remove and replace one clip at a time until it is free, then clip the drawing of choice to the front. Trust me...I can do it faster than trying to explaining it.....What has worked for you for holding the drawings in your shop? Pictures?.....

gbrasch
Well Known Member
I used an easel too, and saved big boxes and cut them to size, then held the drawings on with little spring clamps. This way, I could have several stacked behind one another if I was working on multiple things. Also, Aircraft Components and Equipment (Ace Hardware) sells sheets of plastic the very same size as the plans for about 15 bucks. I have a table big enough that I keep a current plan, protected under that on the table. Hope this helps.
Run down to Hobby Lobby (or similar) and get yourself a good sturdy painter's easel. My Wife found an all metal one that has worked out great.
Cut a sheet of plywood a little bigger than the plans (I don't understand why Van's can supply a consistently sized sheet) and use some heavy duty binder clips to hold the plans on the plywood. Put the plywood in the easel.
The setup is portable, compact, doesn't take up any valuable working surface, and it's easy to flip pages forward and backwards.
Regards,
RickWoodall
Well Known Member
student drafting table
i found a cheap walymart type students drafting table works great. Under $100, and then you can adjust the angle depending on what you are working on. There is some extra room that the plans dont fill, so the screw chart, rivet charts and other ref material is all on it. I tried making one, and it blows. The cheap drafting table is by far the best imho, ymmv. Happy building.
i found a cheap walymart type students drafting table works great. Under $100, and then you can adjust the angle depending on what you are working on. There is some extra room that the plans dont fill, so the screw chart, rivet charts and other ref material is all on it. I tried making one, and it blows. The cheap drafting table is by far the best imho, ymmv. Happy building.
Kevin Horton
Well Known Member
The best answer depends on your personality, and the amount of shop space you have available.
I put the plans on a card table for most of the project, but I have a tendency to put stuff on any flat surface, so I constantly ended up with stuff on top of the plans. And, it was a bit of a PITA whenever I needed to refer to another plans page. But, if you have a card table, and the room for it, this is a quick, cheap approach.
Once I moved to the hangar, I decided it was time for another solution. I grabbed an unused easel that my wife had stashed in the basement. I cut a piece of plywood to size, propped the lower edge on the moveable supports, put a few strategically located holes in it, and used safety wire to fasten it to the easel legs. I used a one-hole paper punch to put two holes near the top edge of the plans, and used a piece of 1 x 2, carriage bolts, washers and wing nuts to fasten the plans sheets to the plywood. The holes in the 1 x 2 need to be very close to the lower edge, or the wood will cover info at the top of the plans sheets.
The easel is better than the card table for me, as I won't collect stuff on top of the plans, it is easy to move next to where I am working, and it is simple to flip to another plans sheet.
RV7Factory
Chief Obfuscation Officer
I like mobility
We had one of these cheapo garment racks in a closet in our old house (probably got it at Target). When we moved to our new house we didn't need it for clothes, so rather than throw it away I modified it slightly and redeployed it as a mobile plans holder. I have 1/8" piece of fiber board that the plans are clipped to, and then the whole thing is hung (from the ends) on the rack. I can move the plans wherever I need them, or remove them and lay then flat on the table. It also makes it real easy to flip between pages. It is kinda-sorta like Rick's, but mobile.
You can see it in the background in this pic from my log. That's my father-in-law hard at work deburring.") More detailed pictures are available on request (of the plans holder, not my father-in-law).
More detailed pictures are available on request (of the plans holder, not my father-in-law).

We had one of these cheapo garment racks in a closet in our old house (probably got it at Target). When we moved to our new house we didn't need it for clothes, so rather than throw it away I modified it slightly and redeployed it as a mobile plans holder. I have 1/8" piece of fiber board that the plans are clipped to, and then the whole thing is hung (from the ends) on the rack. I can move the plans wherever I need them, or remove them and lay then flat on the table. It also makes it real easy to flip between pages. It is kinda-sorta like Rick's, but mobile.
You can see it in the background in this pic from my log. That's my father-in-law hard at work deburring.
More detailed pictures are available on request (of the plans holder, not my father-in-law).
Last edited:
Greg Arehart
Well Known Member
I mostly use a painter's easel with spring clips and a piece of cardboard, but another option on my wall is a piece of steel strapping (about 1.5 inches wide) screwed to the wall. I use several magnets to hold the plans in place, and it is fairly easy to move the most-used one to the front of the group by removing and replacing the magnets one at a time (I use three or four of the little round neodymium magnets -very strong - they look like little donuts so I superglued a cut off push pin into the hole and use that as a handle, otherwise they can be very difficult to remove from the steel strap).
greg
greg
flion
Well Known Member
One of the best things I ever built was this little A-frame on wheels. You can see the side with the tools but the other side is sheeted with particle board. It's big enough to display two sheets at a time and the top is open so I can have several sheets pinned to it and flip them back and into the top without flipping them over the tools.

Two sheets of peg-board, equivalent particle board, 4 or 5 2x4 for the frame. The expensive parts were the wheels (but you can find heavy-duty casters for cheap if you look; I just wanted the fancy new ones) and all the hooks for the peg-board.
Two sheets of peg-board, equivalent particle board, 4 or 5 2x4 for the frame. The expensive parts were the wheels (but you can find heavy-duty casters for cheap if you look; I just wanted the fancy new ones) and all the hooks for the peg-board.
az_gila
Well Known Member
Hit it....
gil A
Boy.... THREE hammers!!!!......
Two sheets of peg-board, equivalent particle board, 4 or 5 2x4 for the frame. The expensive parts were the wheels (but you can find heavy-duty casters for cheap if you look; I just wanted the fancy new ones) and all the hooks for the peg-board.
gil A
Large drawings on walls
I just have the regular non-ferrous gyproc walls in my garage.
Except the one.....
I bought a small length of sheet metal from a plumbing/heating place.
This stuff was (I think) about 30 inches wide.
I used drywall screws through 1/4" washers to hold the sheet metal to the wall. It's galvanized, I believe.
Then, off to leevalleytools.com for some fridge magnets. The silver ones are good enough that a couple holds half of the empenage drawing package to the wall.
I made it 30" high and the width of one of my workbenches.
Has the added benefit of being able to write on it with a sharpie for those tool order wish lists.
I'll probably put even more up in the new shop. The magnets weren't cheap, but I thought that they were worth it. I also use them to hold everything on the back of the steel personnel door to the garage - Van's calendars, catalogs, etc. The brass coloured ones are stronger than needed just for the drawings. I've also used the brass coloured ones to hold messed-up parts on the wall too.
links for the magnets:
silver
http://www.leevalley.com/garden/page.aspx?c=&p=42359&cat=2,40733,40734
hi-strength brass coloured
http://www.leevalley.com/hardware/page.aspx?c=&p=44536&cat=3,41305
I have noticed others taping drawings to whiteboards, or magnets used with magnetic whiteboards. I thought that this was cheaper, and the few screws/washers standing proud of the surface haven't caused any trouble.
AX-O
Well Known Member
From my log.
After talking to my Buddy Mike. We came up with a way to hold the construction plans. He wanted a way to save space and I just wanted a way to keep things organized. I went to Home Depot and bought an 11/32 X 24 X 48 inch sheet of plywood ($6.50) and 2 door hinges ($1.79 each). I found a stud then drilled a 3/4 X 4 X 24 inch piece of plywood to it. Then I screwed each door hinge between the 11/32 X 24 X 48 inch sheet of plywood and a block of plywood (3/4 X 4 X 6 inches). Once that was done, I screwed the other side of the hinges to the 3/4 X 4 X 24 inch piece of plywood. I also added a small lock to it, so the board could be secured. I thought about putting some lighting hole on the wood but this is not a plane. I need to spend my time somewhere else. The board ended up 3/4 of an inch away from the wall. That way I can fold my plans over and not crunch the plans from behind. The Plans are held to the board by simple office clips.


After talking to my Buddy Mike. We came up with a way to hold the construction plans. He wanted a way to save space and I just wanted a way to keep things organized. I went to Home Depot and bought an 11/32 X 24 X 48 inch sheet of plywood ($6.50) and 2 door hinges ($1.79 each). I found a stud then drilled a 3/4 X 4 X 24 inch piece of plywood to it. Then I screwed each door hinge between the 11/32 X 24 X 48 inch sheet of plywood and a block of plywood (3/4 X 4 X 6 inches). Once that was done, I screwed the other side of the hinges to the 3/4 X 4 X 24 inch piece of plywood. I also added a small lock to it, so the board could be secured. I thought about putting some lighting hole on the wood but this is not a plane. I need to spend my time somewhere else. The board ended up 3/4 of an inch away from the wall. That way I can fold my plans over and not crunch the plans from behind. The Plans are held to the board by simple office clips.
Last edited:
Norman CYYJ
Well Known Member
Two medium spring paper clips work well. Just run a couple of nails into the wall to hang the clips and drawings from.
flion
Well Known Member
Boy.... THREE hammers!!!!
gil A
The claw hammer is for the occasional woodwork, the dead blow is for gently moving stubborn bolts, the 5# sledge was for riveting the spars and smacking smart-aleck bystanders...
Drop in if you're ever up this way; we don't have a TC up here and I bet I've got lots you can comment on. I let you hold the sledge...
Lots of good ideas here. The important thing is to make it work for you.
John Courte
Well Known Member
I just used a cheap presentation easel from Staples. Clipped the plans to a piece of foam-core, like so:

lucky333
Well Known Member
Oh now that just ROCKS!
Being one of those 'visually organized' guys whose things actually cease-to-exist when put away, this has immediate and lasting appeal. Thanks!
John
One of the best things I ever built was this little A-frame on wheels. You can see the side with the tools but the other side is sheeted with particle board. It's big enough to display two sheets at a time and the top is open so I can have several sheets pinned to it and flip them back and into the top without flipping them over the tools.
Two sheets of peg-board, equivalent particle board, 4 or 5 2x4 for the frame. The expensive parts were the wheels (but you can find heavy-duty casters for cheap if you look; I just wanted the fancy new ones) and all the hooks for the peg-board.
Being one of those 'visually organized' guys whose things actually cease-to-exist when put away, this has immediate and lasting appeal. Thanks!
John
rv9aviator
Well Known Member
Potato Chip Clips on the wall works great!
az_gila
Well Known Member
Check PM
flion - check your PM in box... gil A
The claw hammer is for the occasional woodwork, the dead blow is for gently moving stubborn bolts, the 5# sledge was for riveting the spars and smacking smart-aleck bystanders...
Drop in if you're ever up this way; we don't have a TC up here and I bet I've got lots you can comment on. I let you hold the sledge...
Lots of good ideas here. The important thing is to make it work for you.
flion - check your PM in box... gil A
Pretty good variety of ideas.
I nailed a 2 X 2 to the wall. Then two finishing nails in that, left sticking out about 3/4" and turned up a little to make hooks. Probably would have been just fine if I had stopped there & used spring clamps, but I had to make it a little better. I took 2 1X2's, longer than the drawings, ran screws thru them at the ends to clamp the top edge of the drawings between them. A couple eye screws on top of one of the 1X2's & I can hang them from the finishing nails in the 2X2. If I want to see another sheet, I just flip the front ones over. When I move on to another structure, then it is sometimes necessary to loosen them up & move a new sheet in front, but usually I just flip them over until the one I want is displayed. Easy to take down off the wall to lay out on the table.
Not the ideal setup as far as I am concerned, but I haven't seen one I like better.
I gets windy here now and then. To keep the drawings from ripping as they blow in the wind when the garage door is open, I just clamp them together with a spring clamp and it acts both as a weight and strengthens them--strength in numbers sort of thing.
Richard Scott
RV-9A Fuselage
Wire and clips....
Hi Don!
As my -6 project grew I found that stringing a wire somewhere in a free spot and hanging the plans by those metal clips you 'borrow' from the office worked best. They slide out of the way quickly if you need something behind them, also...
b,
dr
Hi Don!
As my -6 project grew I found that stringing a wire somewhere in a free spot and hanging the plans by those metal clips you 'borrow' from the office worked best. They slide out of the way quickly if you need something behind them, also...
b,
dr
jsharkey
Well Known Member
I have a 4' x 8' bench and have the pile of "D Size" drawings in use at any one time lying on one end of the bench. All the other drawings are rolled up and stored on the big 4' x 8' shelf under the bench - along with other tools and "stuff". So far I have had plenty of room left to work on details.
Jim Sharkey
RV6 - Wiring!!!!!
Jim Sharkey
RV6 - Wiring!!!!!
flytoboat
Well Known Member
My solution
Thanks to everyone for all your suggestions. I finally decided last night to use my roll around tool cart to hold my plans. I actually got this idea from Troy Grover at Grov-Air when I went there for my RV builders class (highly recommended for new folks who haven't done sheet metal work before).

I also have a roll around peg board, but didn't want to cover up that much tool hanging space.

Thanks to everyone for all your suggestions. I finally decided last night to use my roll around tool cart to hold my plans. I actually got this idea from Troy Grover at Grov-Air when I went there for my RV builders class (highly recommended for new folks who haven't done sheet metal work before).
I also have a roll around peg board, but didn't want to cover up that much tool hanging space.
mvidalr
Well Known Member
And once you're finished?
How do you guys keep your plans securely stowed once you dont use them anymore?
I don't want to roll them again to their original cardboard tube. I'm thinking about folding them to fit them in a three-ring binder, but that will damage the paper quite a lot
How do you guys keep your plans securely stowed once you dont use them anymore?
I don't want to roll them again to their original cardboard tube. I'm thinking about folding them to fit them in a three-ring binder, but that will damage the paper quite a lot

humptybump
Well Known Member
I took a chapter from my old civil engineering days and clamp all the large drafting sheets between two pieces of flat stock (about 3/4" wide and 8" longer than the narrow side of the plans. The plans then can hang on the wall when I need them out of place but can be on a table surface to review and reference.
Back in construction, we kept all active buildings plans this way in a rack in the drafting office. Old habits.
I now have two hooks in e back of the guest room closet and the RV-8 plans hang there for safe storage and easy retrieval.
Back in construction, we kept all active buildings plans this way in a rack in the drafting office. Old habits.
I now have two hooks in e back of the guest room closet and the RV-8 plans hang there for safe storage and easy retrieval.
I work for a steel shop so I used some steel sheet to make an angled board that I mounted on a door in my shop. Yes, the door still functions. I pop riveted a lip on the lower edge and a hinged plexi sheet on the top. I can lift the plexi and rest it on top of my head while I change drawings.

Greg Arehart
Well Known Member
As a geologist, I use a lot of maps. My wife is an artist with a lot of drawings and such. We have two sets of metal map drawers, and one of the drawers has all my RV plans in it. As the world goes digital, these kinds of things are selling for cheap, but they do take up some space (mine have about a 3 x 4' footprint, but are stackable).
Greg
Greg
rzbill
Well Known Member
If the drawings are folded properly (engineering fashion), they may be stored in any file drawer or file box in pendaflex folders. I used a file cabinet.
At my shop (which is empty now), I used a section of bare wall for display. I mounted a scrap steel strip horizontally and held the active drawings with old speaker magnets.
File box with drawings is now at the hangar.
At my shop (which is empty now), I used a section of bare wall for display. I mounted a scrap steel strip horizontally and held the active drawings with old speaker magnets.
File box with drawings is now at the hangar.
Last edited:

