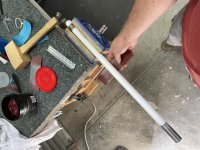
Has anyone had any issues installing the flap torque tubes into the uhmw blocks?
The plans have you bolt on the blocks then install the torque tubes later on, but I did a test fit of the blocks onto the tubes and can’t get them to go on.
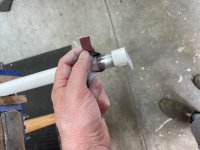
I can get the raw (un powder coated) end into the outboard block with some force, and it will turn but with extreme friction. I can’t turn it with just a finger - needs a good wrenching to make it turn. It will not slide on past the power coating - I’ve sanded the ends of the powder coat transition as per the plans.
If I sand the holes in the blocks to get it to slide past the powder coat, I think the fit will be very loose on the bearing surfaces.
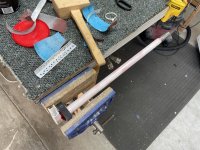
I have measured the UHMW blocks, as well as the CS-00010 flap arm in two dimensions, 90 degrees apart and called them Horizontal and Vertical. I used a set of calipers, so there is likely a bit of error, but I gives an idea of what is going on.
As you can see, the section of the part which is unpowder coated (raw) is 0.0015-0.0030 larger! than the hole in the blocks – it goes in, but with force. The powder coated section is 0.015ish bigger than the hole! I would have to sand all the powder coating off to have any chance of getting these in? OR use total brute force? Is this the correct approach?
UHMW Blocks Hoz Dia Vert Dia
L Outboard 0.9955 0.9970
R Outboard 0.9955 1.0005
L Inboard 0.9990 0.9920
R Inboard 0.9940 0.9940
Flap Arm Raw 0.9985 0.9985
Flap Arm PC 1.0115 1.0075
Does anyone have a set of UHMW blocks / flap torque arms we can compare measurements?
Before taking these measurements I emailed support and had the following response. I have not had a response yet after emailing them the measurements above. I can’t imagine with the above dimensions how any of the below is going to make them fit:
The plans have you bolt on the blocks then install the torque tubes later on, but I did a test fit of the blocks onto the tubes and can’t get them to go on.
I can get the raw (un powder coated) end into the outboard block with some force, and it will turn but with extreme friction. I can’t turn it with just a finger - needs a good wrenching to make it turn. It will not slide on past the power coating - I’ve sanded the ends of the powder coat transition as per the plans.
If I sand the holes in the blocks to get it to slide past the powder coat, I think the fit will be very loose on the bearing surfaces.
I have measured the UHMW blocks, as well as the CS-00010 flap arm in two dimensions, 90 degrees apart and called them Horizontal and Vertical. I used a set of calipers, so there is likely a bit of error, but I gives an idea of what is going on.
As you can see, the section of the part which is unpowder coated (raw) is 0.0015-0.0030 larger! than the hole in the blocks – it goes in, but with force. The powder coated section is 0.015ish bigger than the hole! I would have to sand all the powder coating off to have any chance of getting these in? OR use total brute force? Is this the correct approach?
UHMW Blocks Hoz Dia Vert Dia
L Outboard 0.9955 0.9970
R Outboard 0.9955 1.0005
L Inboard 0.9990 0.9920
R Inboard 0.9940 0.9940
Flap Arm Raw 0.9985 0.9985
Flap Arm PC 1.0115 1.0075
Does anyone have a set of UHMW blocks / flap torque arms we can compare measurements?
Before taking these measurements I emailed support and had the following response. I have not had a response yet after emailing them the measurements above. I can’t imagine with the above dimensions how any of the below is going to make them fit:
I don’t have a CS-00010-PC in stock here to verify dimensions.
The formation (by you) of a lead-in radius, chamfer, taper, and
The smoothing/polishing of the weldment and
The liberal use of grease and/or wax (can be cleaned up later)
Has been used by many builders before successfully.
Attachments
Last edited: