What's new
Van's Air Force

Don't miss anything! Register now for full access to the definitive RV support community.

Elevator counterweight

SuperCubDriver

Well Known Member
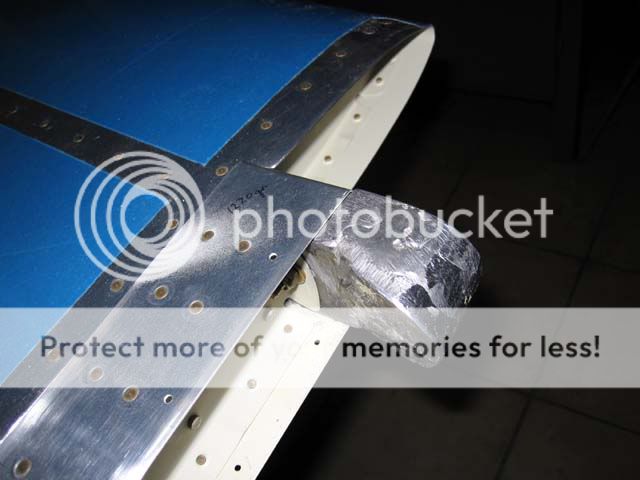
I trimmed the counterweights E-714 for the elevators according to the E-714 TRIM DETAIL on DWG 5. Now the left elevator with the trim tab is out of balance, I have to add about 8 oz. to get it balanced. This is probably more than I trimmed away before. How did others deal with this?
 
It's only the right counterweight that's supposed to be trimmed (it says so on DWG 5 under the full scale drawing of the E-714

It's probably easiest to order a new one or swap with somene who hasn't done this part yet.
 
Yes, DWG 4 shows the counterweight for the left elevator untrimmed. And now I see it: RIGHT ELEVATOR ONLY.
The instructions however on Page 6-9 PREPARING THE LEFT ELEVATOR are saying that the left elevator is similar to the right elevator, the only difference is the use of the... trim..... So another mistake, I know to get this counterweight out is difficult without bending the counterbalance skin!
 
Last edited:
In the old days of RV building we used to pour our own counterweights using molten lead. Not that difficult to do. Just get some lead fishing weights or equivalent, place in a coffee can and heat with a torch until the lead melts. Aluminum foil makes a good dam where needed, but you should be able to pour the lead around the counterweight that you have in place and then tidy up with a nice flox fill of some sort to smooth out the surface, something that a lot of guys do anyway! Cut the lead weights with a hack saw to the required weight before melting. Oh, and be careful! :)
 
I did the same (more or less)

I cut off too much lead so the end result was an out of balance elevator.

I went to the scrap yard and picked up various pieces of lead then I pop riveted a nice piece to the rib using the tooling hole in the rib and addied a couple of layers of glass over it for my own piece of mind.

I was afraid that if I used some mayor surgery I was gonna mess the elevator up too much. Bending skins etc

Good luck

Marco
 
If you still have access to the tip, do yourself a favor and add one or two (AN3) nut plate close to the tip (in front of the lead weight) One good place to add the nut plate is at the existing tooling hole.
If you are planning on painting the plane, good chances are that you will need to add more weight later on and by having these nut plate, you will have the option on just bolting more weight with ease.

My untrimmed left elevator which was leading edge heavy, end up needing 5.5 oz of weight after the paint to make them near perfect balance.
 
Here is what I did. I have a bucket full of lead and solder. I melted some and built up the counterweight again. But good point with additional nutplates in the tip, no extra weight because the lead will be trimmed if too heavy. If not it?s easy to add weight.


IMG_1415edit.jpg
 
OK, looks good to me. :) I had forgotten that the RV-7 counterweight design had changed from the RV-6 pretty radically. On the -6, the counterweights are bolted into the recesses of the horn, on both sides. So on the inboard side, you can fill the void around the lead weight with Feather Fill or equivalent to finish the inboard surface of the horn. On the outboard side, the fairing covers up the mess, as I recall. I am only guessing, but any required additional weight can be added to the inboard side of the horn.
 
counterweight

Remember that painting will add quite a bit of weight on the back end, so until it is painted, you may want to leave it a bit over balanced (nose heavy) so that you have lead to remove when balancing after painting.
 
Yes it is overbalanced now, both of them. The horn is too haevy, goes down so can add color/weight. I think I will add the nutplates described by leaker311 just in case.
 
Back
Top