What's new
Van's Air Force

Don't miss anything! Register now for full access to the definitive RV support community.

Countersunk Rivets on Trim Tab Bends?

txnbuilder

Active Member
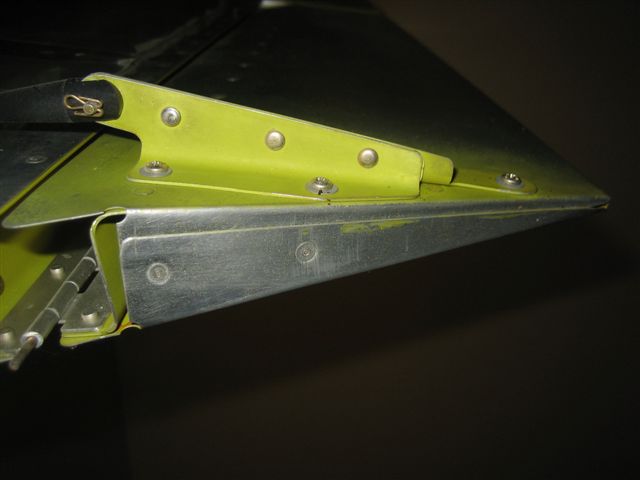
I'm finishing up my trim tab, and just noticed the plans call out countersunk rivets in the trim tab bends. How exactly is one supposed to dimple these holes?

I actually didn't 'just' notice this now. Before I started, I read the part in the instructions where the bottom side of the trim tab spar has been riveted, but clecoes still hold the top edge, the spar, and the piano hinge. The manual talks about sighting down the elevator trailing edge and adjusting the tab for any twist. After this is done, THEN with everything in place and the trim tab 'de-twisted' you drill the holes on the sides and cleco them to keep the desired form. Of course, at this point, the spar is riveted to the bottom, and it's just about impossible to dimple these holes.

So, I will use a regular pop rivet (AD-41-ABS) and be done, but I'd still like to know if I'm somehow misreading the instructions?


Luis Orozco
RV7-A - Wings on their way (literally!)
 
I'm not familiar with the exact part you are describing, but do you think one of these would have worked?

857.jpg


http://www.averytools.com/cart/p-857-pop-rivet-dimplers.aspx

-Jim
 
No way to get them in there...

I am referring to the 'sides' of the elevator trim tab.

Here is a picture:

http://www.fabs-designs.com/rv7a/uploaded_images/0142_TrimTabWeb-737315.jpg

The problem (as I saw it, anyway) is that I think the manual instructs you to drill these holes after the little trim spar has been riveted to the bottom of the skin, clecoed to the top, and the trim tab has been 'squared off' so it doesn't look warped with respect to the elevator.

I think once the holes on the sides are drilled I could have removed the clecoes on the top of the spar and tried to dimple the two overlapping bends at one time with the tool you mention (which I do have). Probably what threw me off was the note about 'carefully maintain alignment, etc, etc.", but once those holes are drilled, *they* maintain alignment even if the clecoes on the top part of the spar are removed re-positioned.

Just typing this out may have answered my own question :)

Luis Orozco
 
Trim tab end rivets

I had the same problem with my -9A trim tab. I used the pop-rivets without dimpling at all, and the rivets cleared fine, but it didn't look very nice. I ended up rebuilding a new trim tab for several reasons, and dimpled these holes before riveting anything. It came out much better the second time around. I don't recommend you build another trim tab just for that, though. Remember, as long as the rivets clear the elevator, nobody will know but you that they weren't dimpled.
 
How I got my trim tab to look good.

I will try to expound on it a little more.

The magenta text is added from the original post.

From http://www.gen-aircraft-hardware.com...Plane_proj.asp

You will see on the site pictures that go with the paragraph below.

It is for the RV6

The bend on the elevator tab was a bit fun. I clamped a piece of 1/8th inch aluminum inside the tab and also held the 1/8th in bar in a vise at the same time, before assembly, and then I used a peewee roller as shown below. Radius the aluminum before clamping itso as not to crack the area where you are bending it., then once clamped carefully, roll the roller over it slowly back and forth until it is the angle you want, focusing the pressure as close as possible to the part you want to bend. I fit it all up and drilled the holes for the blind rivets after bending the tabs but before I assembled it. The rivets you see are CR3214-4-2 rivets. These have almost an identical head size of the MS20426AD3 rivets, but the have 1/8"shank and are considered a structural blind rivet.I suggest dimpling for a 3/32 and then drilling it to an1/8th hole before putting in the rivets. I used two spaced evenly on each end. I know the grip is a little long but they all worked great for me and the strength should be more than adequate.

BTW the roller is a wallpaper tool. it was originally used by me for installing de-ice boots when I was working on planes for a living.

We sell these rivet in packs of 10 p/n CR3214-4-2pkg/10

You wont need the hundred pack without the /10 as a suffix unless you fall in love with these little blind "oops" rivets, then you will want more.

elvtabend.jpg


peeweeroller.jpg
 
Last edited:
Back
Top