Hey guys-
This is a specific question that I didn't get a clear answer from Vans. In the end, I already decided to countersink the skins but wanted to know if other managed to avoid this, did the same or just went with truss head screws.
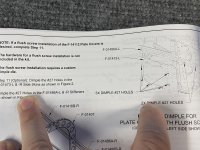
On page 10-14 there are some specifics for an (optional) set of directions for people who prefer flush screws for the access panels. This lead to some additional dimpling of the #27 holes (for the #6 screw) and different set of nutplates to receive the dimnple.
There are also some places where you need to dimple the stiffeners (namely F-01486A-L&R). However, they do not address the two nutplates at the top (which get riveted to the longerons on page 20).
The even provide a fairly detailed image (attached below) for you to clearly see the holes you need to prep if you are priming (like me) and want to do all your prep first.
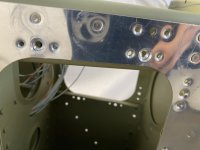
I decided to do an entire side first but when I got the nutplates (page 10-20) step 3 (optional) says to machine countersink the #27 holes common to the skins and the longerons. I assume they mean to countersink both the skins and the longerons at the same time as they are already riveted? It seems like it would have been easier to just dimple the skins and counter sink the longerons BEFORE installing the skins (when I countersunk all the #40 holes). Is this how other people did it or did they catch it ahead of time and countersink just the longeron and dimple the skin?
It does appear that I have ample edge distance but I sure didn't like countersinking the skin.
Thanks for your feedback. Curious if this is how others managed this part or if they caught it ahead of time and just countersunk the longeron.
Allen
This is a specific question that I didn't get a clear answer from Vans. In the end, I already decided to countersink the skins but wanted to know if other managed to avoid this, did the same or just went with truss head screws.
On page 10-14 there are some specifics for an (optional) set of directions for people who prefer flush screws for the access panels. This lead to some additional dimpling of the #27 holes (for the #6 screw) and different set of nutplates to receive the dimnple.
There are also some places where you need to dimple the stiffeners (namely F-01486A-L&R). However, they do not address the two nutplates at the top (which get riveted to the longerons on page 20).
The even provide a fairly detailed image (attached below) for you to clearly see the holes you need to prep if you are priming (like me) and want to do all your prep first.
I decided to do an entire side first but when I got the nutplates (page 10-20) step 3 (optional) says to machine countersink the #27 holes common to the skins and the longerons. I assume they mean to countersink both the skins and the longerons at the same time as they are already riveted? It seems like it would have been easier to just dimple the skins and counter sink the longerons BEFORE installing the skins (when I countersunk all the #40 holes). Is this how other people did it or did they catch it ahead of time and countersink just the longeron and dimple the skin?
It does appear that I have ample edge distance but I sure didn't like countersinking the skin.
Thanks for your feedback. Curious if this is how others managed this part or if they caught it ahead of time and just countersunk the longeron.
Allen