What's new
Van's Air Force

Don't miss anything! Register now for full access to the definitive RV support community.

Canopy vs panel

nohoflyer

Well Known Member
Patron
Well I thought I could put off my panel until the end and have an easy install with the forward top skin being off so nice access. I got my slider kit and it turns out that it looks like almost immediately I install the forward roll bar which has a brace that goes into the top skin.

Any thoughts on panel install order?
 
The roll bar brace bolts in. Fit the roll bar and brace then remove the brace when you get around to installing the skin. Make your life easier by delaying the install of that skin as long as possible
 
Last edited:
Overall it is worth installing the wiring and plumbing with the forward top skin off, though there are some disadvantages because the wiring can get in the way during riveting.

The way I did it and would do it again is to fit the roll bar and brace then take them off. Then fit the panel blank and the forward skin including the slot for the brace, complete all of the dimpling etc. to the point of being ready to rivet the skin on and then take it off.

Put the roll bar and brace and forward skin aside and do the panel wiring and plumbing for brakes, pitot/static etc. and make the instrument panel. Remove the instruments and panel and put them aside.

Rivet on the forward skin and then fit the roll bar and brace.

Fit and install the windscreen.

Final install the panel and instruments.
 
Forward Top Skin

I didn't follow the typical plan. I wanted to wait as long as possible to order electronics. Since I didn't have them, I couldn't do all that wiring.
It takes some time to install the canopy and skirts. I didn't want expensive electronics sitting idle. I installed the canopy, windshield, forward tip skin and trims before the electronics. Yes, I spent a lot of time laying under the panel. No big deal. I've worked on cars all my life. Airplane was far more comfortable. I built a platform and used a kinder mat. I can sleep under there.
Anyway, whichever plan you choose, don't cut and fit the roll bar brace till the canopy is fit. The roll bar may need to be shimmed a tiny bit. That throws off the dimension of the holes for the roll bar brace. Yes, I had to buy a new one.
 
It's interesting how there's a million ways to skin this cat. Larry held off due to shimming the roll bar. I went the other way.

I noticed that without the brace in place, when you latch the canopy, it can flex the roll bar back a bit. I didn't want that stuff to be able to wiggle at all as I was fitting the plexiglass, so I made sure to do that with the brace in place.

Of course it's almost certain that his canopy fits better than mine :)
 
SNIP….
I installed the canopy, windshield, forward tip skin and trims before the electronics. Yes, I spent a lot of time laying under the panel.

You guys are killing me. As I’ve posted on many occasions, build the panel on the bench then install as an assembly. Never violate the rule of “never on your back with your head under the panel”.

Don’t forget you will soon want to modify the “perfect panel” you designed after you are flying. Build for easy updates, upgrades and maintenance.

On all of my planes the airframe is 100% done before the panel goes in.

Carl
 
Cart before the horse

It's interesting how there's a million ways to skin this cat. Larry held off due to shimming the roll bar. I went the other way.

I noticed that without the brace in place, when you latch the canopy, it can flex the roll bar back a bit. I didn't want that stuff to be able to wiggle at all as I was fitting the plexiglass, so I made sure to do that with the brace in place.

Of course it's almost certain that his canopy fits better than mine :)

I don't know about that. I do tend to find the hardest way to accomplish a task!
By the way, the panel does come out fairly easy but there's a few wires you can't install on the bench! :D
My panel has two sub panels left and right hinged at both the sub panel and instrument panel. The drop down allowing access to a ton of stuff.
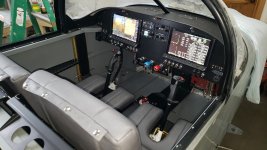
20231012_144655.jpg
 
You guys are killing me. As I’ve posted on many occasions, build the panel on the bench then install as an assembly. Never violate the rule of “never on your back with your head under the panel”.

Don’t forget you will soon want to modify the “perfect panel” you designed after you are flying. Build for easy updates, upgrades and maintenance.

On all of my planes the airframe is 100% done before the panel goes in.

Carl

I'm curious as to how it is possible to avoid going under the panel if the airframe is already complete? E.g. there are all of the engine sensor wires that need to be routed through the firewall; power wiring; control cables from panel to heater and parking brake valve; engine and prop control cables; coax runs for comm and transponder; audio wiring to jacks. Then there's also all of the securing with adel clamps, cable ties etc.

I managed to do all of this without crawling under because the fwd skin was off and access was easy just standing beside the fuselage and reaching in. Most harnesses and sub-harnesses were completed on the bench but good access made it easier to get the lengths right. I know the Van's traditional build manual implies to complete the airframe before the panel but I don't see how it's possible to do that without crawling under?
 
Last edited:
I'm curious as to how it is possible to avoid going under the panel if the airframe is already complete? E.g. there are all of the engine sensor wires that need to be routed through the firewall; power wiring; control cables from panel to heater and parking brake valve; engine and prop control cables; coax runs for comm and transponder; audio wiring to jacks. Then there's also all of the securing with adel clamps, cable ties etc.

I managed to do all of this without crawling under because the fwd skin was off and access was easy just standing beside the fuselage and reaching in. Most harnesses and sub-harnesses were completed on the bench but good access made it easier to get the lengths right. I know the Van's traditional build manual implies to complete the airframe before the panel but I don't see how it's possible to do that without crawling under?

Yep - so you did all this with the forward skin off. What will you do for maintenance, updates and such.

You can avoid this pitfall if you first divide everything into:
- Stuff that says in the plane
- Stuff that stays on the panel when it comes out of the plane

The RV-8 and RV-10, if built to plan, provide a nice way to divide this up. The side wings on the RV-8 or the lower apron on the RV-10 stay in the plane. Here is where you mount most switches and breakers. With the panel out you have easy access to it all, as well as engine control cables and such.

On planes like the RV-6 you can do the same approach if you first make a lower apron. We just did this on an RV-6 that is getting new dual screen SkyView install. Not hard, just aluminum, nut plates and rivets. Engine controls are mounted on a piece of bent aluminum attached to the bottom of this apron. XPDR, EMS, ARINC, Dynon remote radio and such are mounted behind the panel on the next forward bulkhead. Again - all within easy reach when the panel is out of the plane.

The biggest pain on the panel is the radio stack, and especially the audio panel. If the panel is on the bench you can now have a cup of coffee when working it.

Some planning goes into this, but once you break the code it is very easy.

For photos PM me your email address.
Carl
 
Back
Top