FireMedic_2009
Well Known Member


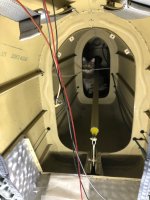
I bought the plane back in April. The plane was involved in a ground loop 4 yrs ago and the left wing tip was damaged and repaired by the seller. A prop strike was also involved in the ground loop.
The bulkhead (F-608L and R) looks less deformed in the photos. There are a couple of loose rivets on the bottom right corner of the bulkhead. On the RV-7’s the bulkhead number is the same but F-708L and R. See dwg 17 (RV-7) or dwg 22 (RV-6) to see location of the bulkhead in the fuselage.
I know worse case I can remove the bulkhead and replace it but will be a bit of a pain and involve touch up paint of the rivets. I was looking for ideas on how to repair it. What’s a interesting is there is no skin waviness or buckling on the sides or the bottom of the fuselage. I have not yet tried to straighten the buckle in the lower part of the bulkhead. I assume even if I can straighten it I’m sure it will not be as strong as it originally was, therefore prone to buckling again. Would adding a flat doubler to the opposite side of the raised strengthener be acceptable? The doubler would simply be a flat piece (no 90 edge to rivet to the bottom skin) at the bottom of the bulkhead and up around the bottom up to the 2nd longeron on both sides. I could rivet it together with a row at the top and bottom with 2” spacing. Another option could be to use triangular brackets, 4ea evenly spaced out along the bottom of the bulkhead, perpendicular to the bulkhead. Even though it would require riveting to the bottom of the skin, it wouldn’t be visible, unless you were underneath the aircraft. Of course, after looking at the pictures, I might have to add another triangular bracket on each side at the first longeron from the bottom
Thanks
Daren
Last edited:
 makes me think you should replace those while you are in there. It also makes me want to inspect a lot of other rivets to see what the shop heads look like. Those are some of the easiest rivets to drive as the bulkhead is not in the airplane when those are driven (as I recall.....) You have likely inspected the other bulkheads in the fuselage......