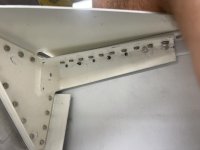
I'm having trouble bucking the rivets on the skin side of the upper engine mount bracket flange in my RV-8. Does anyone have a suggestion on what kind of bucking bar or technique I should use on these rivets? The shop heads of the previously driven rivets are making it hard to get and keep the bucking bar in position. I drove two rivets (that will be drilled out) already and you can see how bad the shop heads are because of this.

Van's Air Force
You are using an out of date browser. It may not display this or other websites correctly.
You should upgrade or use an alternative browser.
You should upgrade or use an alternative browser.
bucking trouble
- Thread starter bmellis11
- Start date

It can be a real pain to drive some of those when other shop heads are in the way. I'm spit balling but a couple things you could try. 1) Get a long thin tungsten bucking bar that might fit better around the other shop heads. AS has one that is 5/8x1x4 that might work. 2) Could you back rivet the rivets? Aircraft spruce sells a bucking bar that looks like a dumbbell. I think it's around 6 pounds. You could put it on the skin side of the rivet and use a back rivet set on the shop head side, assuming of course that the other side is a flush head rivet. 3) Lastly, a pulled rivet could be an option too.
Last edited:
Marc Bourget
Well Known Member
Have a friend with a milling machine?
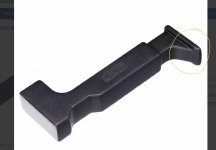
Consider a custom bucking bar, with slots milled in the side (top as shown in the photo) to clear the installed rivets.
Mild steel is adequate for temporary bucking bar use. Remember to protect with tape. If you're careful with the milling and tape, you should be able to form level shop heads as the side will help maintain alignment of the bucking bar.
I'm guessing without a photo from the side, but it looks like the "top" rivets are spaced away from the "side" rivets.
Can you remove the "top" rivets that are in line with the rivets you need to drive, shoot them, then replace the removed rivets?
Last edited:
wirejock
Well Known Member
bar
Agree
-Remove the rivets in the way and drive the difficult ones then replace the others
-Use the angled face of the tungsten. It takes some practice to orient it correctly but it works for tight spots
-Buy the thin tungsten. It also works but one of those is going to need the angled face.
Agree
-Remove the rivets in the way and drive the difficult ones then replace the others
-Use the angled face of the tungsten. It takes some practice to orient it correctly but it works for tight spots
-Buy the thin tungsten. It also works but one of those is going to need the angled face.
rapid_ascent
Well Known Member
You need a bucking bar with a foot of some sort. You can get one for about $20 or so.
Here is an example of one that might work for you.
https://www.yardstore.com/bucking-bar-1-8-lbs
They have a few different ones.
Here is an example of one that might work for you.
https://www.yardstore.com/bucking-bar-1-8-lbs
They have a few different ones.
Consider moving the problematic rivets. Drill new holes 1/2 way between the existing ones and closer, 1/4" = 2D, to the edge of the longeron.
Is the side skin pre-punched?
Looks like the problematic rivets are into a radius of the weldment. In my experience they will always nail over.
.
Is the side skin pre-punched?
Looks like the problematic rivets are into a radius of the weldment. In my experience they will always nail over.
.
(offtopic)
Curios that RV-8 uses a rounded steel "angle" for both "top" and "side" rivets, whereas in RV-7 there are two independent tabs. I wonder, why. RV-8 one looks thicker, too.
WD-602-R-1-PC vs WD-802-R-1-PC and WD-603-R-1-PC vs WD-803-R-1-PC, if I guessed RV-8 part numbers right.
I like RV-8 style brackets, the edge distance hunting in RV-7 was a bit annoying.

