What's new
Van's Air Force

Don't miss anything! Register now for full access to the definitive RV support community.

Baffled Again Again

Blizzard

Well Known Member
My Cowling is fitted on and I'm really pleased with the fit. I've measured it dozens of time and the front of the cowl is exactly where it needs to be based on my 3 blade Hartzell prop.

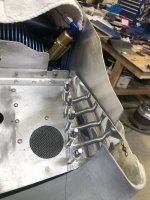
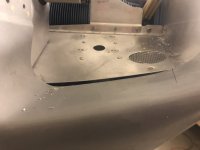
Here's my new issue.....the forward edges of the left and right air ramps are not even close to what the plans show they should be. Way too long. I can deal with the right side by shortening it as required. The real issue is the left air ramp. I can't shorten it because of the scat inlet hole is already at the forward edge of the ramp.

Has anyone ever reduced the aft edge of the lower cowl inlet distances to make it all fit? As it is the Scat inlet would have to be 3/4 of an inch aft or the aft edge of the lower left cowl inlet would need to be reduced by 3/4 of an inch.

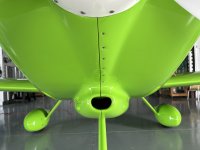
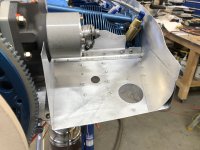
In the attached photos one shows a tiny blue mark. This would be where the forward edge of the scat hole would be as is. The second photo show how far the #2 baffle extends forward in to the cowl. This is AFTER the initial cut the plans call for. Am I missing something obvious????

Thanks again
IMG_6558.jpgIMG_6559.jpg
 
I don’t think this is unusual. I can’t speak for the 10 but on my 6 I had to shorten and steepen the ramp angle on one side. I didn’t have any scat tube in my ramps.
Hopefully a 10 builder can chime in but my guess is you just make it work as you can.
 
Generic information but that cowl needs to be cut back a LOT. Otherwise you will find it difficult to impossible to get the lower cowl on and off. Unless you have 1 to 1 1/2" betwee colw and spinner.
 
I don't think the solution is to cut the fiberglass cowl inlet because that would probably take off too much. Normally there would be a parallel gap of 3/8" or more between the edge of the baffle inlet ramp and the cowl inlet so as to allow for relative movement and for cowl installation/removal. If the cowl inlet in the photo was cut back to match the apparent position of the left ramp then there wouldn't be very much of it left!
Is the left ramp already bent into the correct position? The edge should be lower than the fiberglass to allow for the baffle seal material. Otherwise I think you may need to reposition the SCAT hole. Hurry slowly in any case...
 
3 blade prop with stock bottom cowl will be problematic at best for single person cowl install/removal. I had to split the lower cowl in order to get by the 3 blade prop. (Even extended the slot for more clearance) The piano hinge nicked the prop a few times until I realized it needs to be 2 pieces.
 

Attachments

  • IMG_4709.png
    IMG_4709.png
    6.9 MB · Views: 46
  • IMG_4707.jpeg
    IMG_4707.jpeg
    1.7 MB · Views: 46
I just went through this a couple months ago. The left side gave me grief trying to get it to fit. For me it was the angle of the ramp meeting the cowl. What ever you do …..do not cut that cowl back! If I was home I could measure my distance and compare to yours. It’s a lot of fiddle farting around to get things to line up proper and the instructions and drawings are less than stellar. I feel your pain.

keith
 

Attachments

  • IMG_8901.jpeg
    IMG_8901.jpeg
    2.3 MB · Views: 50
  • IMG_8872.jpeg
    IMG_8872.jpeg
    1.7 MB · Views: 47
  • IMG_8862.jpeg
    IMG_8862.jpeg
    1.6 MB · Views: 47
I'd cut the aluminum ramps back as far as you need to. Then either relocate the flanged opening for the heat muff aft or just trim the edge of it's flange to make things fit. If you "lose" the rivet at the forward edge, just replace it with ones on each side in locations where you can get appropriate edge distance.
 
Splitting the cowl is definitely in the plan. I did trim the ramps back significantly. Still struggling to get the bottom cowl on with my "prop simulator " on. May work out better when when I split the bottom cowl. We'll see. Trimming the top edge of the baffles initially is a bit of a catch-22 also. You can't put the top cowl on till they're trimmed and you can't adjust the final trim until it's on. The plans look like the trim is pretty close to a line drawn from the top edge of the 5 and 6 baffle and extended straight forward. Is that a close "initial trim" ? I told a friend of mine who's about at the same stage of build on his -10..........at this point in the build, "I think the plans may be for entertainment purposes only"!! LOL
 
I am sorry but those split cowl's are fugly looking. On my -10, I made the lower intake snorkel removable. That made it pretty EZ for me to remove and install the lower cowling by myself. Did the same on my -9A.
 
I am sorry but those split cowl's are fugly looking. On my -10, I made the lower intake snorkel removable. That made it pretty EZ for me to remove and install the lower cowling by myself. Did the same on my -9A.
LOL... I get it! Not into "fugly" either. The technique I'll be using is to remove the snorkel as one piece also. Once the snorkel is removed that only leaves about an 8 inch split line up the chin and then each half becomes independently removable from the sides. I'll be using Skybolts to secure the snorkel on and also joining the short seam up the chin. I agree, I'm not a fan of the split the whole lower cowl down the middle technique. Hopefully this technique will make the split less obvious. Input and experience are always welcome. Thanks
I am sorry but those split cowl's are fugly looking. On my -10, I made the lower intake snorkel removable. That made it pretty EZ for me to remove and install the lower cowling by myself. Did the same on my -9A.
 
I am sorry but those split cowl's are fugly looking. On my -10, I made the lower intake snorkel removable. That made it pretty EZ for me to remove and install the lower cowling by myself. Did the same on my -9A.
I split my -10 cowl (showplanes). Best mod ever.

According to everyone who has seen it, it’s definitely not fugly.
 
Back
Top