Gash
Well Known Member
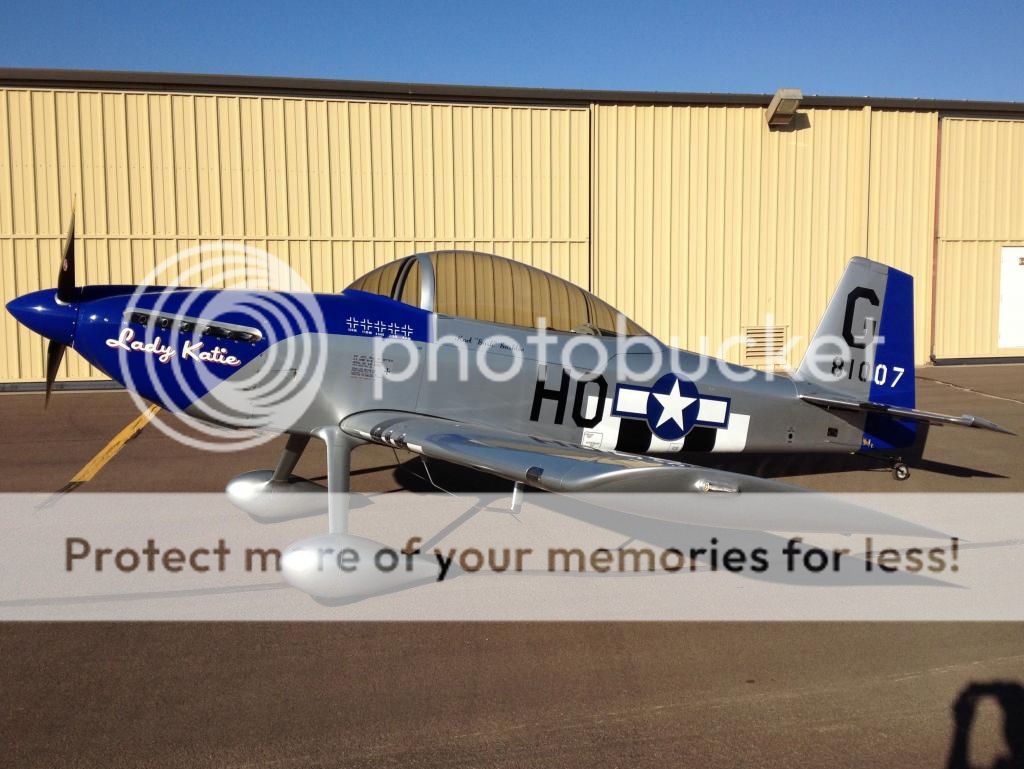
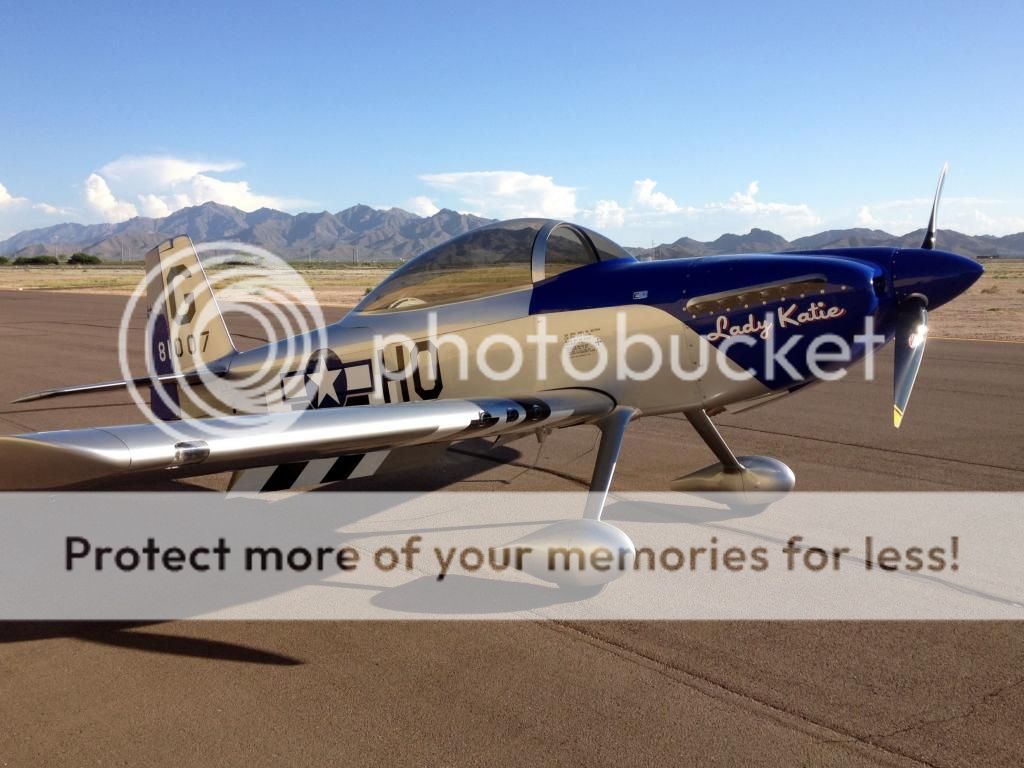
After flying a bare aluminum RV-8 for almost two years, I finally got around to finishing it by having my airplane completely vinyl wrapped by AircraftWraps. As you can see by the photos, the results are amazing. For anyone who is "on the fence" trying to make a decision about wrapping versus painting, hopefully this little review will give some details to help with your decision.
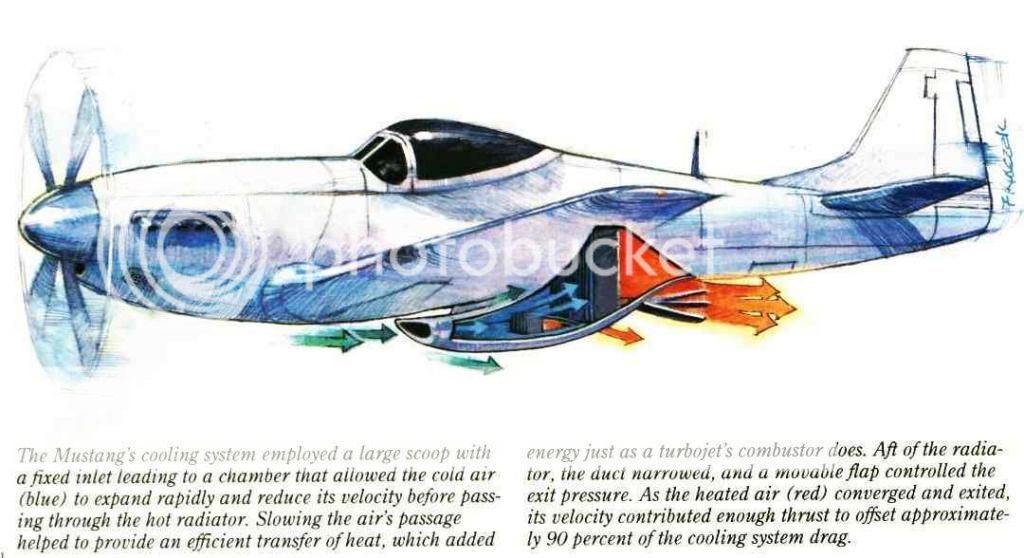
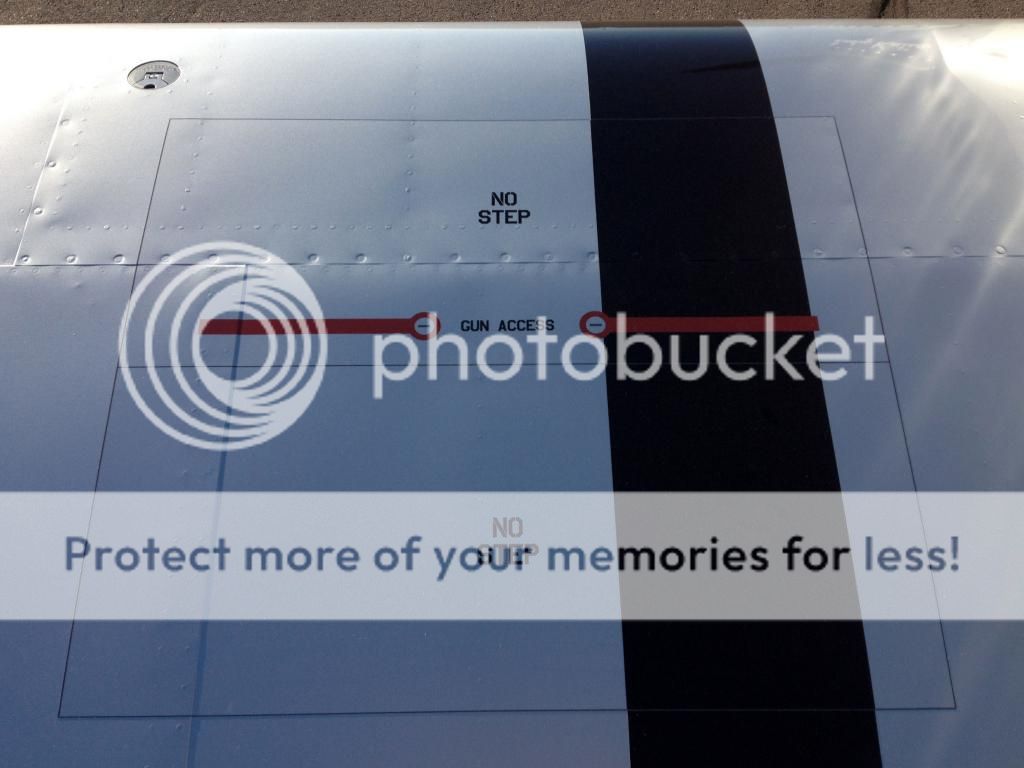
Planning. I spent over 6 months working with Craig at Scheme Designers to come up with a detailed plan. He did a great job of taking my inputs, detailed P-51 Mustang photos, and other ideas and adapting them to the RV-8. My goal was to be as historically accurate as possible to a 352nd Fighter Group "Blue Nosed B@stards of Bodney" P-51D. Colors, dimensions, measurements and placards are all as accurate as we could make them while fitting onto the RV-8 shape. Some placards are excluded simply to avoid looking too cluttered. I did indulge in some non-historical creative license with the name "Lady Katie", actual Vans Aircraft serial number on the tail, and personally significant dates under the five Balkenkreuz kill crosses. One note on the blue color. It is very difficult to find the accurate 352nd Fighter Group blue. Luckily I discovered that the P-51D "Little Rebel" had the actual paint code matched from a paint sample from inside the still standing Bodney Field latrine where extra blue paint was used on the walls of the toilets. Scott from AircraftWraps and I matched that color very closely by holding vinyl samples next to the P-51 paint in daylight until the naked eye could not see a difference. As a result, what you see here is historically accurate.
Decision. I was originally going to paint my airplane. I found several reputable paint shops and got quotes from each. Then when Scott introduced AircraftWraps here on VAF, I was one of the first to contact him to learn about his materials and process. I was very impressed with his description of the material quality, durability, weight savings, cost savings, time savings, and infinite possibilities for applying detail and imagination without the limitations of paint. The decision was for me a "no brainer". My cost to wrap was about 2/3 of the average paint quote. I also saved approximately 20 pounds compared to the weight of paint!
Process. Three days from start to finish. That's right. That's all the time it took for a crew of 4 guys to complete the job. I should note that this is a complete covering vinyl wrap. Every inch from tip to tail is covered in silver and blue vinyl. After watching the AircraftWraps crew working on my plane, my conclusion is that these people are a bunch of Type A, detail oriented uber-craftsmen who love airplanes. They are definitely not just run-of-the-mill vinyl wrappers like you'd find at an automotive vinyl shop. They put seams in aesthetically thoughtful and aerodynamically smart locations, and they have the ability to make the vinyl look great around tough shapes like intakes and the spinner. This is the reason Red Bull and others are knocking on their door now. When my finished airplane was delivered, Scott personally showed me the masterpiece and taught me how to care for a wrap--just 50/50 water and rubbing alcohol in a squirt bottle wiped on with a microfiber cloth to slide the bugs right off the surface. No need to ever wax or polish. Simple and quick.
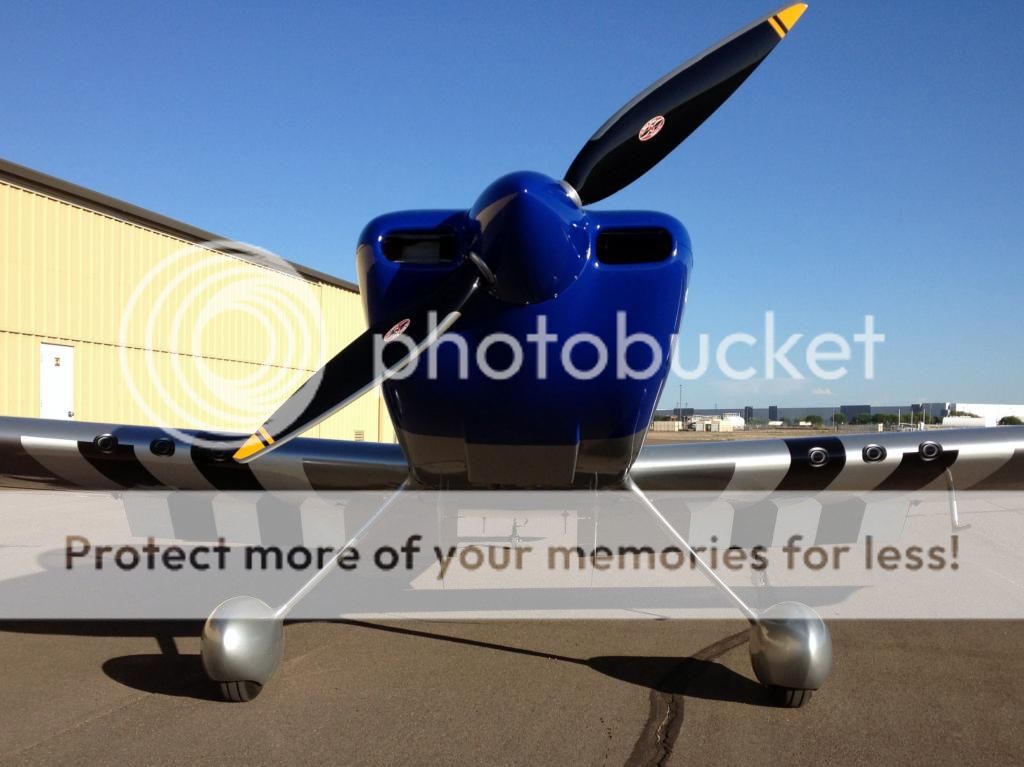
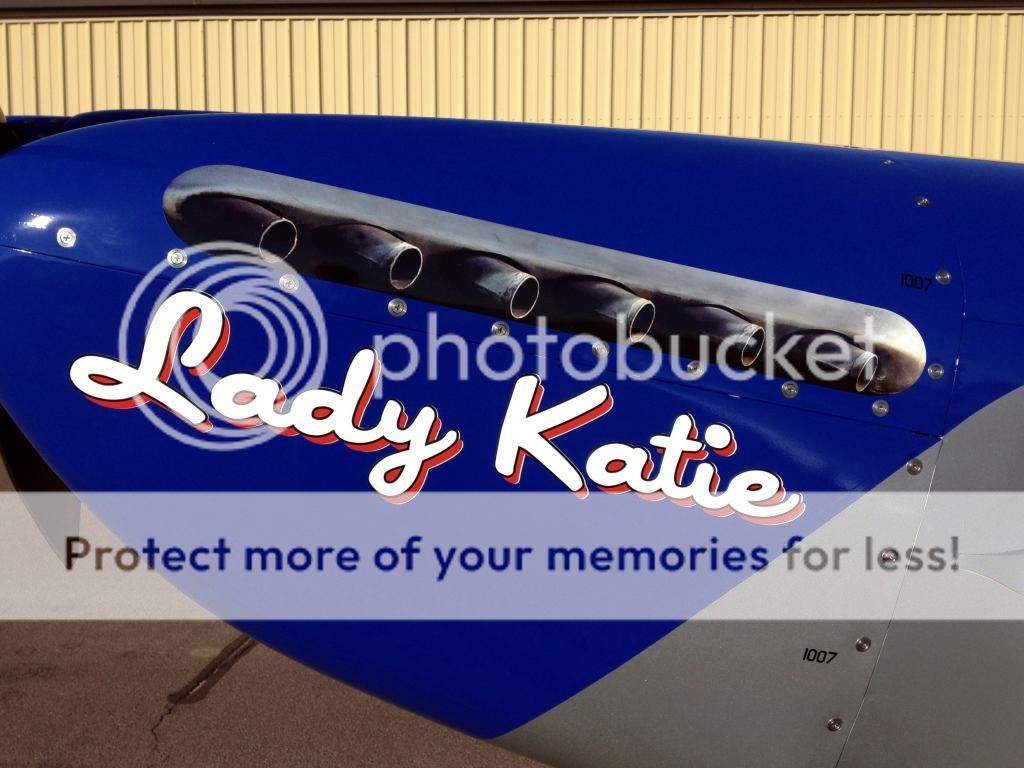
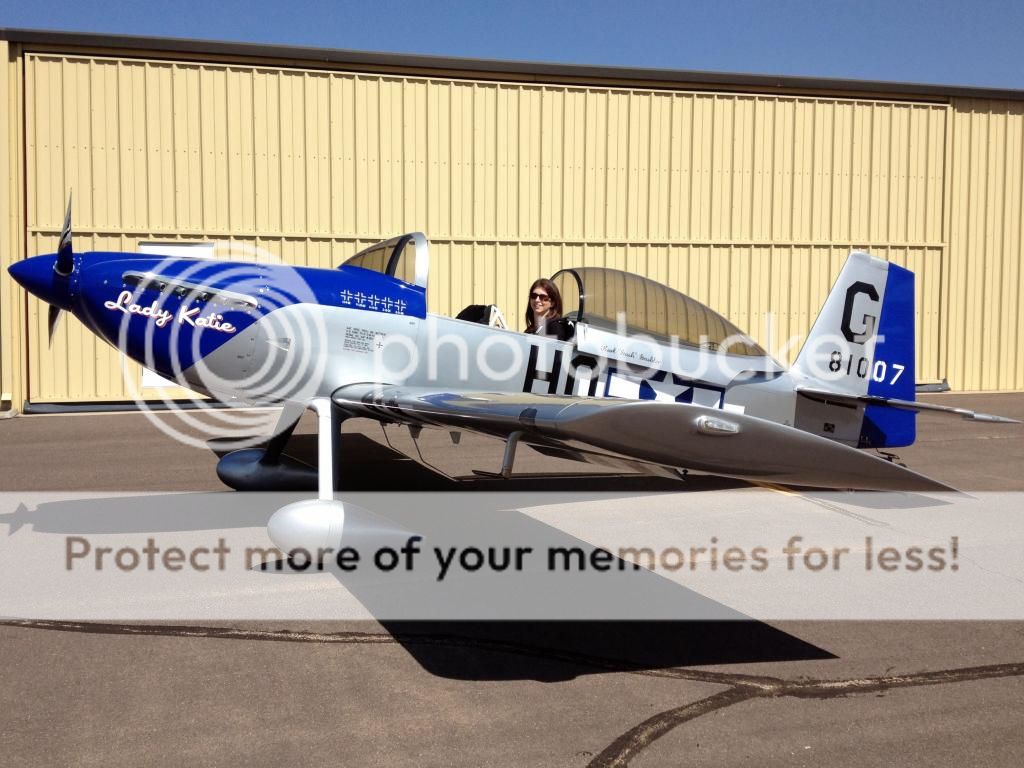
Results. AircraftWraps far exceeded my expectations. The airplane matches the scheme on paper exactly to the milimeter. Whatever you can dream up on paper, these guys can faithfully and precisely match on an airplane. It's really pretty amazing how this new technology can take complex and detailed plans and cost-effectively bring them to life. My favorite example of this is the exhaust stacks on my airplane. I asked Scott if they could make them look realistic and 3-dimensional. He said "yeah, we can do that" and boy, was he right! I would have paid hundreds of dollars to have an artist airbrush these exhaust stacks, but with vinyl it's as simple as printing and applying. Finally, there's the reduced drag from the way vinyl covers rivets and imperfections. I have not yet precisely measured the airspeed increase from parasite drag reduction, but yesterday I did have a "wow" moment when I pushed all the levers forward and sustained 189 kias in level flight at 2500 MSL on a hot Arizona day with full fuel tanks and 30 pounds of luggage in the back. I hadn't seen that before, that's for sure. Maybe I need to take this thing to Reno next year...
Photos. So now for the important part of this post, the photos!
...and the final picture, my wife got to be the first passenger on a lunch date to Chandler Municipal Airport today. It's great to finally be flying in a "finished" airplane!
Planning. I spent over 6 months working with Craig at Scheme Designers to come up with a detailed plan. He did a great job of taking my inputs, detailed P-51 Mustang photos, and other ideas and adapting them to the RV-8. My goal was to be as historically accurate as possible to a 352nd Fighter Group "Blue Nosed B@stards of Bodney" P-51D. Colors, dimensions, measurements and placards are all as accurate as we could make them while fitting onto the RV-8 shape. Some placards are excluded simply to avoid looking too cluttered. I did indulge in some non-historical creative license with the name "Lady Katie", actual Vans Aircraft serial number on the tail, and personally significant dates under the five Balkenkreuz kill crosses. One note on the blue color. It is very difficult to find the accurate 352nd Fighter Group blue. Luckily I discovered that the P-51D "Little Rebel" had the actual paint code matched from a paint sample from inside the still standing Bodney Field latrine where extra blue paint was used on the walls of the toilets. Scott from AircraftWraps and I matched that color very closely by holding vinyl samples next to the P-51 paint in daylight until the naked eye could not see a difference. As a result, what you see here is historically accurate.
Decision. I was originally going to paint my airplane. I found several reputable paint shops and got quotes from each. Then when Scott introduced AircraftWraps here on VAF, I was one of the first to contact him to learn about his materials and process. I was very impressed with his description of the material quality, durability, weight savings, cost savings, time savings, and infinite possibilities for applying detail and imagination without the limitations of paint. The decision was for me a "no brainer". My cost to wrap was about 2/3 of the average paint quote. I also saved approximately 20 pounds compared to the weight of paint!
Process. Three days from start to finish. That's right. That's all the time it took for a crew of 4 guys to complete the job. I should note that this is a complete covering vinyl wrap. Every inch from tip to tail is covered in silver and blue vinyl. After watching the AircraftWraps crew working on my plane, my conclusion is that these people are a bunch of Type A, detail oriented uber-craftsmen who love airplanes. They are definitely not just run-of-the-mill vinyl wrappers like you'd find at an automotive vinyl shop. They put seams in aesthetically thoughtful and aerodynamically smart locations, and they have the ability to make the vinyl look great around tough shapes like intakes and the spinner. This is the reason Red Bull and others are knocking on their door now. When my finished airplane was delivered, Scott personally showed me the masterpiece and taught me how to care for a wrap--just 50/50 water and rubbing alcohol in a squirt bottle wiped on with a microfiber cloth to slide the bugs right off the surface. No need to ever wax or polish. Simple and quick.
Results. AircraftWraps far exceeded my expectations. The airplane matches the scheme on paper exactly to the milimeter. Whatever you can dream up on paper, these guys can faithfully and precisely match on an airplane. It's really pretty amazing how this new technology can take complex and detailed plans and cost-effectively bring them to life. My favorite example of this is the exhaust stacks on my airplane. I asked Scott if they could make them look realistic and 3-dimensional. He said "yeah, we can do that" and boy, was he right! I would have paid hundreds of dollars to have an artist airbrush these exhaust stacks, but with vinyl it's as simple as printing and applying. Finally, there's the reduced drag from the way vinyl covers rivets and imperfections. I have not yet precisely measured the airspeed increase from parasite drag reduction, but yesterday I did have a "wow" moment when I pushed all the levers forward and sustained 189 kias in level flight at 2500 MSL on a hot Arizona day with full fuel tanks and 30 pounds of luggage in the back. I hadn't seen that before, that's for sure. Maybe I need to take this thing to Reno next year...
Photos. So now for the important part of this post, the photos!
...and the final picture, my wife got to be the first passenger on a lunch date to Chandler Municipal Airport today. It's great to finally be flying in a "finished" airplane!
Last edited:
")