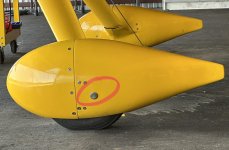
Temperature changes in my area are pretty extreme and I find that I'm having to check my tire pressures frequently (desired 35 in mains and 40 in NW). I'm considering drilling 1" holes in the pant fairings for easier access to the valve stems as I see many RV owners have done. I have the following questions for those who have done this surgery.
1. What is the most convenient location for the valve stem for straight on access? 9 o'clock, 3 o'clock or (other "o'clock")? .
2. What method is used to locate the hole? I was considering removing the entire pant, setting up a laser pointer on a scissor jack and pointing at the tip of the valve stem, then re attaching the pant and marking the laser spot on the pant. Any other easier method?
3. Given the "fragility" of the extremely thin fiberglass skin of the pants, would the use of a barrel diamond grit bit be the safest bit in order to drill slowly and reduce the chance of shattering the fiberglass? If not, what kind of bit would be safe to use? I can be ham fisted at times with a drill.
4. What type of (snap in) plug would be best considering that it would be painted in the matching pant color and have to be removable (and replaceable if lost)? Metal? plastic? Where could one find these plugs.
Link to diamond bit Amazon
https://www.amazon.com/gp/product/B0C3LC8296/ref=ox_sc_act_title_1?smid=A3BSP3E1ABPLNY&th=1
If there's a thread somewhere in the forum that covers all of this, I'd appreciate a link
Thanks in advance
")