What's new
Van's Air Force

Don't miss anything! Register now for full access to the definitive RV support community.

1/8” cup set and oval hole

swift12

Well Known Member
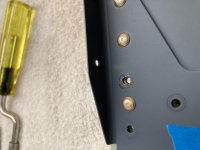
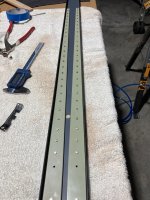
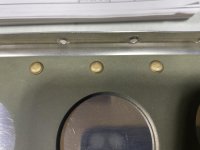
So I used my Cleaveland squeezer 1/8” cup set (yes definitely not the 3/32) and it left rings around my ad470-7 rivets like in the pic….they don’t look bad and the camera makes them look worse but anyone else get this? I see online a lot of rivets look untouched after riveting. Cheers.

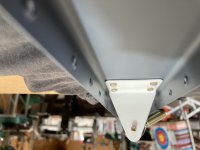
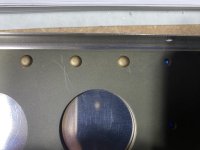
Plus that rotten last rivet that I munched and drilled out in a rush without thinking carefully has made that hole ugly. I touched up with primer and put another rivet in there….then took it out…thought I better check that hole to find I have ovalled it to .150. I am assuming I’ll need to drill and fit a 5/32 rivet….edge distance no issue on that piece. Comments?
 

Attachments

  • B8CFF496-1AA0-4AED-B262-27C605C40054.jpg
    B8CFF496-1AA0-4AED-B262-27C605C40054.jpg
    174.9 KB · Views: 395
I ran into this same thing. The cup set from cleaveland leaves a circular witness mark on the universal rivet heads. Take a small piece of masking tape and put it over the rivet head before squeezing them. They’ll look pristine.
 
I ran into this same thing. The cup set from cleaveland leaves a circular witness mark on the universal rivet heads. Take a small piece of masking tape and put it over the rivet head before squeezing them. They’ll look pristine.

Thanks I’ll try that.
Cheers Glenn.
 
Send the pic to cleaveland for their review.

If tape resolves it, that might be ok, but I wouldn't be happy seeing rivets with marks like that in the airplane. I believe what you are seeing is the image in AC43.14 Figure 4-6 with the left Riveting Tools figure.

https://www.faa.gov/documentlibrary/media/advisory_circular/ac_43.13-1b_w-chg1.pdf

I can’t find the reference in there….long document. What do you think the marks will do? The pic makes them look worse than in real life. However I did not notice them on the VS 470 rivets….however they were not -7 like most of these. The shop heads are all .070 …..the squeezer was a Cleaveland tools one. I can’t see the marks reducing the strength of the rivet heads just don’t like to see them.
 
I don't know what the indentations will do, I'm not an engineer nor done any work on stress analysis for rivets. As a buyer, if I saw indentations like this on a number of rivets in an aircraft, I would likely pass because of the unknown structural impact. And I would also wonder what other odd things were in the build that I'm not seeing.

Were the rivet sets also from Cleaveland or just the squeezer? Give the manufacturer of the rivet sets a call and ask for their feedback. Also ask Vans. Show pics to both of them. You don't want to be a year into your build and have someone say "thats not to spec".

Easy to figure it out now with just an email, and have documentation to show it. That way you never have to worry about it in the future.

All Cleaveland tools. They are more of a witness mark than indentations….the camera does awful things to pics with shading etc.
 
This from the vans site re smileys which are way worse than the witness marks from the tool set….says rivet ok just looks bad. So I cant imagine for a second there is any structural issue however I have emailed Cleaveland to find out…I’m more worried about that hole that I screwed up waiting to see what vans says. Probably a 5/32 rivet will suffice but how to get the hole round without the drill wandering….
 

Attachments

  • 0ADA302E-6487-41D3-9616-F3B8787F4C57.png
    0ADA302E-6487-41D3-9616-F3B8787F4C57.png
    495.1 KB · Views: 197
Bad or mismarked set. I'd send it back.
The set should be slightly less "cupped" than the rivet it is setting.
If anything, the top of the rivet dome should end up looking polished. No "rings".
 
Tape

I ran into this same thing. The cup set from cleaveland leaves a circular witness mark on the universal rivet heads. Take a small piece of masking tape and put it over the rivet head before squeezing them. They’ll look pristine.

Yep. I use black Gorilla tape. Little square is good for several rivets. Also use the tape when I use gun and bar. My preferred riveting method.
Flush rivets I use 3M Heavy Packing tape.
 
Bad or mismarked set. I'd send it back.
The set should be slightly less "cupped" than the rivet it is setting.
If anything, the top of the rivet dome should end up looking polished. No "rings".

Mis marked for what type of rivet? Can’t be a 3/32 because I have done that already and it completely ruins the head? The 3/32 set is a lot smaller than the 1/8 set
 
I spoke with Mike from Cleaveland about this. He sent me another cup set to try. It did the same thing. My friend is building also and his cup set from Plane Tools does the same thing. Just put a piece of tape on it if it bothers you. Problem solved.
 
Mis marked for what type of rivet? Can’t be a 3/32 because I have done that already and it completely ruins the head? The 3/32 set is a lot smaller than the 1/8 set

Here's some rivets set with a variety of sets I have. Only the first one shows a slight ring, that is pretty much just on the coating, not a groove. The middle one is from the Avery set. The others, I'm not sure. They have markings, but I
don't know who made them. I also checked the rivets on my QB wing and spar. No obvious rings on those. I have a bunch of the (vintage) SM sets that came with a giant c-frame CP riveter I bought on CL. I could spare one if you want to try it.

On this chart you can see how the set is supposed to mostly drive the center of the rivet.
 

Attachments

  • IMG_1474.jpg
    IMG_1474.jpg
    504.1 KB · Views: 246
  • rivets.jpg
    rivets.jpg
    324.3 KB · Views: 206
Here's some rivets set with a variety of sets I have. Only the first one shows a slight ring, that is pretty much just on the coating, not a groove. The middle one is from the Avery set. The others, I'm not sure. They have markings, but I
don't know who made them. I also checked the rivets on my QB wing and spar. No obvious rings on those. I have a bunch of the (vintage) SM sets that came with a giant c-frame CP riveter I bought on CL. I could spare one if you want to try it.

On this chart you can see how the set is supposed to mostly drive the center of the rivet.

Thanks Mike. great information there. has me a little worried now. I put some engineers blue on the set and sure enough it does not sit mainly on the crown of the rivet...yet my rivet set does...(for the gun) so cleveland is sending me another one of the current batch. I wont rivet any more of these until I have this issue sorted. Im in New Zealand which makes the loaning very difficultBut i did appreciate your offer. Ill get the new set and try it...great support by cleveland though. Now I am wondering if my rivets are all toast including my VS which is built. all the 470 universal heads have those marks to some degree. (except those awful rivets on the lower VS rib I had to set with the gun set!) If I have to drill them out I'm sure damage will occur and will it be worse to do that than leave them? thankfully I have not done the rear spar yet and wont touch it until I have rivets like in your pic.
 
Well I spoke to Cleaveland and they are sending me a new cup set to try. DJ said to sand this one and try it. It works much better now. But I want to try a polished new one from the new batch to see if mine was not right. I’m getting a much better head but it’s fairly easy to tilt the head of the squeezer slightly and get an angled shop head. I chucked it in my lathe and used a screw head and sandpaper to linish end the edge down. Then put the rear spar together. Now I have this result do I risk removing the front spar rivets? A local LAME said even though they were slightly indented by the cup set he felt they were perfecty acceptable. Still waiting on vans reply.
 

Attachments

  • B586661B-1DCC-42C7-A935-B066BB21AA62.jpeg
    B586661B-1DCC-42C7-A935-B066BB21AA62.jpeg
    868.3 KB · Views: 152
  • 7FA9D598-A37F-4569-8876-0884A1588A0D.jpeg
    7FA9D598-A37F-4569-8876-0884A1588A0D.jpeg
    849.2 KB · Views: 136
  • 7A137710-AA7D-4F1C-8977-2275C609D6F2.jpeg
    7A137710-AA7D-4F1C-8977-2275C609D6F2.jpeg
    418.7 KB · Views: 165
  • D936CBD8-7B5E-44DE-A4B4-7981551A1B16.jpeg
    D936CBD8-7B5E-44DE-A4B4-7981551A1B16.jpeg
    472.1 KB · Views: 136
Last edited:
so the rear spar is done but I need to buy an inch pound torque wrench. I found I could not always get the rivets in the outer hinge brackets nice and straight...they like to angle with the squeezer....unlike the middle brackets...I think because the outer ones have -5 rivets and the middle ones -6 but the outer ones really need to be -4 1/2....they are just a smidge long....but that was the rivet specified on the plans...have a shot of one of the hinges with a wee angle on a rivet...look ok?...they are all .066 give or take nicely within the .050 to .070 spec but the heads quite wide so the gauge does not fit over them...from what i understand the head depth is the important spec.

The spar is nice and straight....these rivets went well. Im pretty happy with the rear spar except putting that **** relief on the top of it rather than the bottom....which vans said no worries...no strength loss there...just aesthetic and wont see it anyway....
 

Attachments

  • 69293749868__163788DF-F810-418A-B85D-FEB89DB9B0E4.jpg
    69293749868__163788DF-F810-418A-B85D-FEB89DB9B0E4.jpg
    205.3 KB · Views: 111
  • 69294263504__6091FB1A-CF14-4CCB-8355-F98135CC9163.jpg
    69294263504__6091FB1A-CF14-4CCB-8355-F98135CC9163.jpg
    474 KB · Views: 128
  • 69294270846__181199F4-9FA5-4102-B10E-CF0C53B0BDC5.jpg
    69294270846__181199F4-9FA5-4102-B10E-CF0C53B0BDC5.jpg
    412.2 KB · Views: 120
For reference... 1/8" rivets.
The rivet on the left was squeezed with a 1/8 set.
The rivet on the right was squeezed with a 3/32 set.
20221216_224357.jpg
 
Yup done that once and it totally munted the head….my problem is the 1/8” cup set is not the correct shape. Cheers for the photo. Sure shows that a 3/32” set is far smaller and will show like that on the rivet.
 
swift12,

I am seeing the same witness ring from my 1/8" cup squeezer set from Cleaveland. It goes all the way around and you can't feel it, but it looks bad. I received my set back in April, but really noticed it when riveting the doubler on my vertical stabilizer rear spar now that I have my tail kit. Thank you for starting this thread. I've sent Cleaveland an email and hope to hear back from them soon.

Doug
 

Attachments

  • IMG_5330.jpg
    IMG_5330.jpg
    249.5 KB · Views: 141
  • IMG_5328.jpg
    IMG_5328.jpg
    323 KB · Views: 148
Last edited:
swift12,

I am seeing the same witness ring from my 1/8" cup squeezer set from Cleaveland. It goes all the way around and you can't feel it, but it looks bad. I received my set back in April, but really noticed it when riveting the doubler on my vertical stabilizer rear spar now that I have my tail kit. Thank you for starting this thread. I've sent Cleaveland an email and hope to hear back from them soon.

Doug

thanks doug...you can feel it...look under a magnifying glass...this is what you see...I have sanded out my cup set and now the rivets are perfect. the rear spar is great...wondering if i need to remove the front ones...i know if i do ill make a worse mess and if i dont my OCD will do my head in. there is a small edge on the properly set rivet...these have a more crushed edge...however vans says build on...cleaveland says fine...a local LAME says he would be happy to sit in the aircraft and an old dog working with the LAME said "you know you are gonna make a lot worse F ups than this dont you?"
so everyone says leave them...p.s. I measured the manufactured head un riveted at .062...rivited on both the good and bad and both are .056...so the manufactured head has still crushed the same amount its just the cup set has driven a small ring into the outer edge....which makes me think that the rivet is set structurally sound just not as pretty as perfect. drilling them out makes me shudder as there is surely going to be some scary moments...so im leaving them....just sort your cup set before moving on. (cant get pic to work sorry)
 
Last edited:
Back
Top