What's new
Van's Air Force

Don't miss anything! Register now for full access to the definitive RV support community.

Tip: Drilling Spar for Tank Platenuts

RudiGreyling

Well Known Member
Hi Everyone,

I thought I?d share my tip on quicker drilling the spar (RV7 in this case) for the tank plate nuts. Lots of people experience problems when countersinking the spar, since the hole gets too big for the pilot hole and start to go oval or chatter. I did a lot of research and a lot of people make single nutplate/spar jigs, then move them to each hole, but that takes way too long.

I borrowed some ideas from others and improved on them. This tip should save you lot of time if you have the correct tools. If you have further improvements or tips please post them below to consolidate all the spar drilling tips.

Kind Regards
Rudi

Required Tools:
  • #19 Pilot Countersink - 3 flute cutter (got mine from Cleaveland tools as part of their RV package)
  • Stock Aluminium Angle 1/16 to 1/8 thick
  • Battery operated drill
1) Start by clamping the stock aluminium angle under the spar flange for the whole length you want to drill the nut plates. You can also see how I support the spar upright simply by clamping two wooden blocks on the thick inboard edge, and than light clamping the bottom flange on edge of the table.
spar_02.jpg


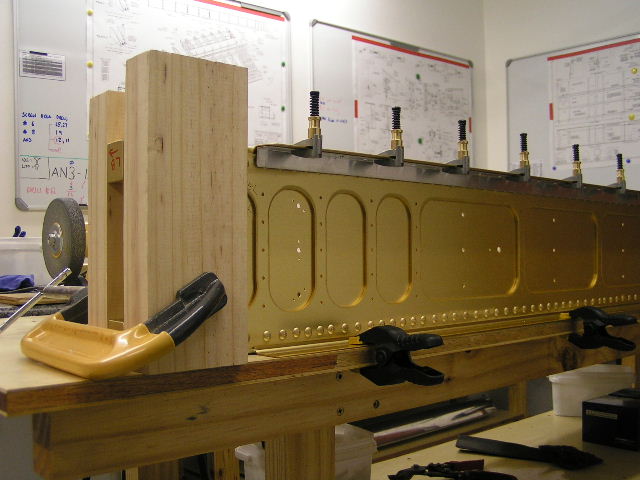
Masking tape the top gap between the spar and spar flange in order to eliminate any shavings going in there.
spar_04.jpg


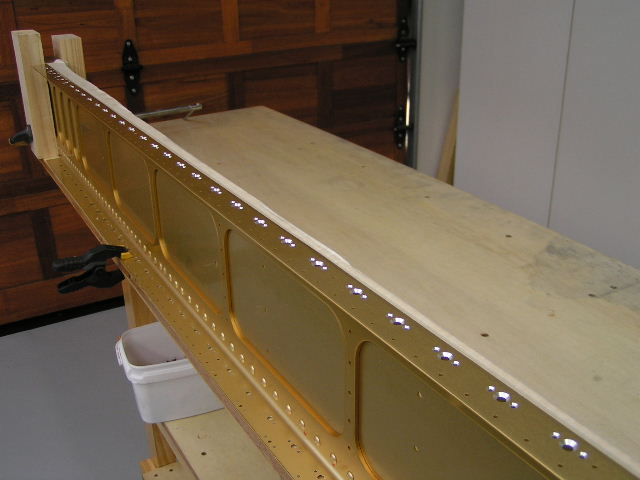
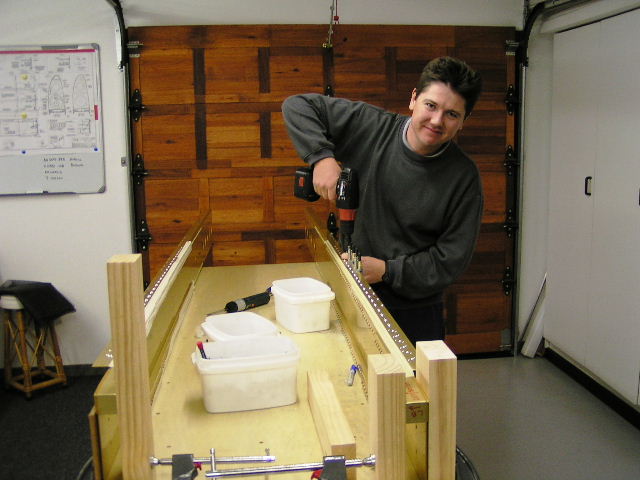
2) Take your high speed air drill and final drill all the #19 size holes from the top through the spar through the aluminium angle. Keep it steady, it will take a small effort to get through the aluminium angle stock.

3) Take a high torque battery operated drill, and countersinks all the #19 holes with your #19 countersink. I prefer the battery operated drill on the big countersink holes because the torque is linear with the speed control and produced less chatter than my electric drill and my high speed air drill does not have enough torque.
spar_03.jpg


4) The Countersink instructions for the spar can be found in the RVator : 2005, First Issue, page 10

RVator:
...We countersink until the top of the screw is level with the surface, then go 2 clicks deeper on the microstop. The actual outside diameter of the countersink measures .365 to .375"
Continue on next Post...


Update: 10 Aug 2005 with RVator countersink instructions
 
Last edited:
...Continued from above:

The #8 screw fits with a good countersink halo around it, but not too much.

5) After countersinking all the #19 holes, do the inspection pannel #6 screws with a #28 drill and with your #28 pilot hole countersink. Remove and mark the aluminium angle for the orientation used on the spar. In my case (RV7) I could reuse the Right Top spar holes just drilled now for pilot holes in the Bottom Left spar holes, without re-drilling and vice versa (Use the other side of the aluminium angle for drilling the Right Bottom and reuse for Top Left)

I guess if you use an aluminium bar of just the correct width you could simply flip it upside down and use it for all 4 sides. I didn?t test this theory with the aluminium bar for all 4 sides though...so if you use it and works let us all know below.

6) Final drill all the #40 holes, then countersink them with your #40 countersink pilot as per normal for flush rivets. I used my high speed air drill for the small holes.

7) Debur the holes and the flip spar flip over repeating the process, checking of you can re-use the pilot holes already drilled into the aluminium angle as discussed above.
spar_08.jpg
 
Last edited:
Nice tips, Rudi...

Rudi.

Thanks for the nice write-up and excellent supporting photos. I am about to begin this process very shortly on my -9, and will use your advice.

Thanks.
 
I found that in order for the .032 thick test piece to lie flush on the surface of the spar the top of the countersunk hole had to be .375-.395 diameter. A smaller hole would cause the fillet on the back of the dimple to contact the sharp corner at the hole/flange intersection. I used Cleaveland Tool dimple dies.
Steve
 
See RVator article

Good method Rudi. If you are willing to spring for the cost of all that aluminum angle, it is the best method I've seen. Trying to use a short piece of angle is really hard to keep clamped tight and you end up with a wallowed hole anyway. That said, I followed Van's method and got reasonably round and clean countersinks. I would do it the same way next time with no hesitation.

A recent issue (within the past four issues) of RVator described the ideal countersink as having an outside diameter of (I'm going from memory here) .365-.375". Naturally, I aimed for .370". Many people go larger than that trying to make a dimple sit flush in the countersink, which it will not until the screw is actually screwed into the dimpled skin and the platenut. This is what Van's was trying to discourage in the RVator article.
 
Hi Alpine Lake,

I have searched the RVator and found it: 2005, First Issue, page 10

RVator:
...We countersink until the top of the screw is level with the surface, then go 2 clicks deeper on the microstop. The actual outside diameter of the countersink measures .365 to .375"
2 clicks on the countersink stop = 0.002"

When I come up with my 0.345 measurement I actually screwed a .032 skin to the spar and checked as I went deepter. Being made aware of the RVator instructions I rechecked my countersinks last night by dropping screws in them and checking if they are level with the surface. My screws and 0.345 diameter countersinks leave the screw just below the surface, as per RVator instructions but at a smaller countersink!! Go figure!!

Anycase if you have gone to deep, Vans has a fix for it as well. Basically it calls for drilling out the countersink with a 7/16" unibit. Fill it with a 7/16" filler slug and a 0.040 backing strip is riveted on between the spar and nutplate. Backdrill the filler and re-countersink.

I will update the TIP text in post 1 & 2 above with the new information.

Kind Regards
Rudi
 
Last edited:
Just want to update this thread.

I emailed vans support and asked them to confirm their OD countersinking for screws #6 & #8:

1) #8 screws on the spar flange. OD of the csk should be <3/8 = <0.375
2) #6 screw csk should be <5/16 = < 0.3125

Regards,
Rudi
 
RudiGreyling said:

I guess if you use an aluminium bar of just the correct width you could simply flip it upside down and use it for all 4 sides.
I didn?t test this theory with the aluminium bar for all 4 sides though...so if you use it and works let us all know below.

Group,

I used aluminium flat bar (30x3mm) and it worked on all 4 sides like a charm. ;)

Thanks for a great tip Rudi :D

Andre Burger
South Africa
RV-8 Wings
 
Back
Top