What's new
Van's Air Force

Don't miss anything! Register now for full access to the definitive RV support community.

Quick Filler Test

DanH

Legacy Member
Mentor
Did a simple experiment to compare the peel strength of Evercoat Rage Gold (polyester) to West (epoxy) and micro when applied to aluminum.

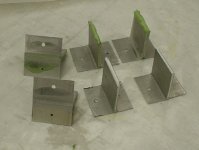
Prepared six coupon sets by sanding a strip of alclad 2024 with 120 grit and shearing it into 12 pieces 3" long x 2" wide. Each went in the brake and 1" was bent 90 degrees. The all coupons were cleaned with wet MEK and new rags. Three sets were bonded using Rage Gold, and three were bonded using dry micro. All were a simple sandwich; blob on filler, apply the other coupon, and squeeze until filler extruded out all sides with about 1/8" in the sandwich. After 24 hours to cure, the flat bottoms were sanded to eliminate excess filler along the bond line.

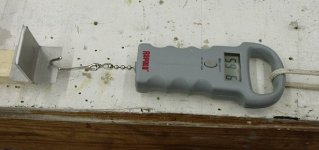
The test fixture was not exotic; a screw in the benchtop and my trusty electronic fish scale.

The first polyester coupon pegged the scale at 75 lbs without separating. The second failed at less than 10 lbs. The third again pegged the scale.

All three epoxy coupons pegged the scale at 75 lbs.

Ok, next test was to clamp one leg of each coupon in the bench vice and pull the other at an angle of about 10 degrees, which increased the peel force by flexing the aluminum "handles". Both remaining polyester coupons failed at low values with a slight "pop". All the epoxy coupons again pegged the scale.

I finally broke all three epoxy coupons by grabbing the free leg with a pair of vicegrips and jerking them as hard as I could (I'm 6-2 and 210 lbs). All required repeated attempts and the last one nearly whipped me.

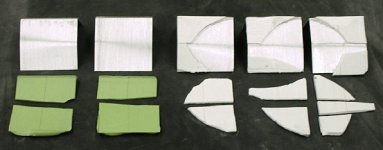
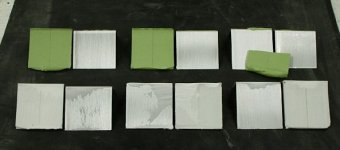
All the polyester coupons failed by peeling cleanly from the aluminum surface. With just a little work the filler could be popped off the other surface (on right).

The dry micro failed by first fracturing through the micro/epoxy, then peeling as the aluminum bent away.

In simple terms, the adhesion of a dry epoxy/micro mix was much superior to the Rage Gold polyester filler. For all the epoxy samples, failures didn't happen until I exceeded the tensile strength of the micro. Only then did they peel, and the peel wasn't necessarily clean in nature. One polyester sample failed by peel at a very low value in a straight pull, and the others peeled immediately when subjected to a slight flex of the aluminum tab.

I suspect one significant factor is the fast cure time of Rage vs the opportunity for surface wetting during the slow cure time for epoxy.

It ain't formal test lab stuff, but I think I'll stick with dry micro.

Sorry, couldn't resist the pun <g>
 

Attachments

  • Filler Test Coupons.JPG
    Filler Test Coupons.JPG
    50 KB · Views: 24
  • Filler Test Pull.JPG
    Filler Test Pull.JPG
    45.3 KB · Views: 24
  • Filler Test II.JPG
    Filler Test II.JPG
    33.5 KB · Views: 22
  • Filler Fractures.JPG
    Filler Fractures.JPG
    34 KB · Views: 24
Last edited:
<<Rage, or any body filler for that matter, isn't meant to be a structural element.>>

Of course not. The above was a check of surface adhesion.

<<For fairing in areas that don't require massive amounts of filler---fairing in the wing tip lenses for example, or covering pop rivets on the empennage tips--->>

Fairing over pop rivets on empennage tips is the exact application that brought on this in-shop check. The question was "How well does this stuff stick to sanded aluminum?" The answer was "Compared to micro, not very well at all".

Here's a secondary check. The coupons from the previous were bent about 10 degrees using pressure from the back side of the aluminum. All samples, Rage and micro, fractured and separated from the aluminum surface along the bend line. However, the Rage samples could then be popped cleanly off the surface with nothing more than a thumbnail, unlike the micro samples which required more force and then broke leaving sections still adhered.


BTW, this was very dry micro, a stiff "no slump" mix. I suspect wet micro would adhere even better, but I wanted to check the very dry, easy to sand variety.

I'm not anti-Rage; obviously there was a gallon can in my shop. I'm not wedded to it either. Everyone is welcome to choose whatever they want. I like to check before I choose.
 
<<You've done a good test, Don.>>

Thank you Scoot <g>

<<However, I if I had that kind of time to burn...>>

Maybe 40 minutes. Spent more time on photos and posting than on the actual test.
 
<<You've done a good test, Don.>>

Thank you Scoot <g>


Now THAT was funny!


Thanks to both of you for the discusion. I'm going to glass up the emp tips while I wait for my Fuse kit to arrive...my learning curve on this exact topic is about 72 hours old, so I appreciate the info.

Did get my West Sys 105/206 from the local West Marine yesterday...it's a start:eek:

Joe
 
I've only used the Rage over some form of material like epoxy glass cloth or other fillers. I think I read somewhere that if your going to apply the filler on aluminum, the aluminum should be primed first? Any input?
 
<<I think I read somewhere that if your going to apply the filler on aluminum, the aluminum should be primed first? Any input?>>

Shear some aluminum strips, prime 'em, ..............
 
I like the rage filler. I used it on bare Alum surfaces after I roughed it up with some 150 grit to ensure that it has good adhesion.

IMO, Do not prime, you will be relying on the primer to keep the filler attached to the surface.

Epoxy and microballoons are too much work and will never sand down like the rage.

-Ron
 
Primers...

Au contraire! That is another great application for Rage Gold, precisely where it is used just prior to painting. The first coat of epoxy primer will reveal all the little imperfections that will be leveled using Rage. The process goes as follows:

1. Etch/Alodine
2. Epoxy Prime
3. Fill Imperfections (Rage)
4. Surface Prime
5. Topcoat

.......

Adhesion is a non-issue as long as the builder scuffs the epoxy primer with 400-600 grit paper. This is an application where Rage kicks butt! Epoxy primer is then re-applied over exposed aluminum prior to surface priming. After wet sanding and leveling the surface primer, the first topcoat is then applied. No divets!

... and if you use this method with an aircraft grade epoxy primer...

1. The Strontium Chromate in it will provide corrosion protection

2. As you sand the filler, the primer acts a a marker to stop you sanding off the Alclad surface of the aluminum, definitely enhancing corrosion protection.

This is definitely the way to go....

gil A
 
Fascinating exchange. Rick continues to believe a 150 grit scuff will ensure Rage adhesion to bare aluminum, despite evidence much to the contrary. As for Rage over primer, where's the hard evidence either way?

Gotta be careful about beliefs. I'll check it next time I fire up the primer gun.
 
Fascinating exchange. Rick continues to believe a 150 grit scuff will ensure Rage adhesion to bare aluminum, despite evidence much to the contrary. As for Rage over primer, where's the hard evidence either way?

Gotta be careful about beliefs. I'll check it next time I fire up the primer gun.

I agree. Ask ten people about what filler to use, how to prep, filler over or under primer, etc., and you get ten different answers. Rarely is there any objective evidence to support a method. I would say that if you use a high quality polyester filler, the best advice would be to follow the advice of whoever made the stuff. They've likely done more testing than any of us will. As far as adhesion of Rage vs. epoxy, anybody who has ever messed with both would tell you that it's not even close. However, I'm not planning on towing my plane around by a big blob of either one, so absolute adhesion is probably not an issue.
 
Depends on the surface

I agree. Ask ten people about what filler to use, how to prep, filler over or under primer, etc., and you get ten different answers. Rarely is there any objective evidence to support a method. I would say that if you use a high quality polyester filler, the best advice would be to follow the advice of whoever made the stuff. They've likely done more testing than any of us will. As far as adhesion of Rage vs. epoxy, anybody who has ever messed with both would tell you that it's not even close. However, I'm not planning on towing my plane around by a big blob of either one, so absolute adhesion is probably not an issue.

Steve... unfortunately very few of the vendors will have tested their products for long term effects (adhesion and corrosion) on aluminum....:(

Adhesion of a filler, even of a thin layer, is a major issue if a loss of adhesion affects an expen$ive paint job...

gil A
 
Um, Ron, not me (Rick) believes in scuffing with 150, I have lots "o" glass experience with rage and other fillers, not aluminum. Car body buddys tell me to prime, sand, then fill, prime and final sand prior to paint on metal. I assume that would also apply to our work on aircraft skins. hey, at least I haven't praised using lead instead of plastic filler. :D
 
will stick better to primed surface

sticks better to primmer without a doubt. if you really want to stick polyester filler, the primer way is the way to go .. the c pillars on a car used to be filled with lead and filler wouldnt stick to them for ****. did my own peel tests back in 88. the epoxy primer really made the stuff stick unbelievably well.
TEHO
 
how much "stick" is really needed?

I would ask the question...how much grip do you need. Are you trying to kill a mosquito with a howitzer? If you were gluing the plane together with the stuff then by all means go for the "best" stick. If you are filling surface imperfections then all you need is the stuff that works "great". I would never promote shoddy workmanship or materials but I see a lot of people spending way too much time looking for the last 1/10th of 1% in terms of their perceived perfection. If this is what brings you pleasure then go for it. When you are comparing 2 high quality techniques it forces you to look for the tiniest (read insignificant) differences and make them seem big to support your theory. Now , if someone was promoting drywall mud to fill in the surface imperfection we would all have something to complain about!
 
<<Um, Ron, not me (Rick) believes in scuffing with 150>>

Whoops, sorry.

<<did my own peel tests back in 88. the epoxy primer really made the stuff stick unbelievably well.>>

Thanks William. Can you relate what you did?

<<how much "stick" is really needed?>>

Good question Andrew. I can't quantify it. All I did was a comparison, and the difference was much more than 1/10 of a percent.

Other than cure rate, why do you think there is a time difference?
 
You said it!!!

I would ask the question...how much grip do you need. Are you trying to kill a mosquito with a howitzer? If you were gluing the plane together with the stuff then by all means go for the "best" stick. If you are filling surface imperfections then all you need is the stuff that works "great". I would never promote shoddy workmanship or materials but I see a lot of people spending way too much time looking for the last 1/10th of 1% in terms of their perceived perfection. If this is what brings you pleasure then go for it. When you are comparing 2 high quality techniques it forces you to look for the tiniest (read insignificant) differences and make them seem big to support your theory. Now , if someone was promoting drywall mud to fill in the surface imperfection we would all have something to complain about!

You said what I was going to write. Just how much adhesion is necessary?

The guy that guided me on the prep and painting of my plane uses Rage on many of his custom car projects he is contracted to do. He is extremely experienced in both metal and glass work. He also uses Evercoat 416 Metal glaze for the fine feathering detail that is often necessary.

When I brought up this discussion, he kind of laughed. For the most part cars take much more abuse and are used much more frequently than an airplane. Also they have many more vibration sources than an airplane. He has not had any projects come back because the Rage was falling off.

The key is prep. Scrub thoroughly with degreaser, then acetone or lacquer thinner. Rough with 150 paper at least 1" past your intended fill area. Repeat the cleaning process and don't touch anything with your fingers.

I used epoxy and micro filler (West Systems 410) for any fill 1/16" or greater. Didn't have many areas that required much more. This was mixed to a thickness that did not allow any flow. Maybe less than peanut butter.

Sand and clean again. Then Rage works fantastic followed by 416 for any fine fill and feathering detail.

Real dry micro is not good for filling. It will become brittle with time.

If you really want to lock things in over a filled area, like the stabilizer and elevator tips, lay on a layer of 3/4oz glass cloth. This is like silk and will completely tie everything and lock it down. Of course more work. I did this the on the front of my cowl where I filled to get the top and bottom to match at the inlets. I figured this was going to get more abuse.

FYI, I did use a piece of 1" glass cloth over the seam of the glass and metal on all of the tail glass. No sign of problems with 315 hours and some less than perfect landings:eek:
 
not as scientific as yours but

DanH;184733<<did my own peel tests back in 88. the epoxy primer really made the stuff stick unbelievably well.>> Thanks William. Can you relate what you did? [/QUOTE said:
refinishing a 1980 camaro i stripped it to the bare metal, what I didn’t realize was the rear quarter panel was joined to the roof with lead...when I used polyester filler here it didn’t sand very well and would come unbonded when trying to feather... I put a 2 inch wide piece of 3M masking tape on it and snatched it off. (Remedial I know but effective.) The polyester lifted off until the filler got thick enough to hold itself together. I tried several different methods of cleaning...metal prep, dx 330, dtl thinners, acrylic reducers then the sales guy at the PPG store said to paint it with epoxy (dp 40) and wait about an hour and fill over it. This worked unbelievably well and feathered down to nothing and would not lift using the same methods.

NOTE: some will say cars in the 80's didnt have lead on them ive seen several that did, in this location, from the factory. all 3rd generation camaros have brass here. (82 on)
 
William,
<<I put a 2 inch wide piece of 3M masking tape on it and snatched it off......the sales guy at the PPG store said to paint it with epoxy (dp 40) and wait about an hour and fill over it.>>

Sensible trick with the tape....good show!

The primer thing was exactly what the PPG factory rep recommended to me as a tie coat between glasswork and all subsequent coats, ie, urethane primer-surfacer or finish coats. They seem to call it "wet on wet", although obviously it is not really wet when you apply the next product. I'd had a peel problem with a previous composite project (K2000 lifting off Hexcel/e-glass) and was determined to avoid a repeat. I guess that old peel problem is also the root of my suspicious nature regarding everything under my paint.
 
Darwin,
<<Real dry micro is not good for filling. It will become brittle with time.>>

Sorry..... Reference please?

<<If you really want to lock things in over a filled area, like the stabilizer and elevator tips, lay on a layer of 3/4oz glass cloth. This is like silk and will completely tie everything and lock it down. Of course more work. I did this the on the front of my cowl where I filled to get the top and bottom to match at the inlets. I figured this was going to get more abuse. FYI, I did use a piece of 1" glass cloth over the seam of the glass and metal on all of the tail glass. >>

You did major buildups with epoxy/cloth or epoxy/micro, then contoured with Rage, then laid epoxy/cloth over it, then surfaced with more Rage or an Evercoat glaze?
 
Sorry

Darwin,
<<Real dry micro is not good for filling. It will become brittle with time.>>

Sorry..... Reference please?


You did major buildups with epoxy/cloth or epoxy/micro, then contoured with Rage, then laid epoxy/cloth over it, then surfaced with more Rage or an Evercoat glaze?

Sorry..... Don't have time to look it up. From practical experience this is true. Essentially you are diluting the epoxy with a filler. The strength component is reduced. Try laying up several wafers with various viscosities of epoxy to filler ratios. You'll see the "dry" wafer is very brittle when full cured.

For me, the ratio that is a perfect compromise between is a mix where a it will very slowly flow out. This mix will adhere nicely and sand easily.

My cowl contouring involved a mix of epoxy, micro filler and a little flox as described above. Once I got the contour it was block sanded then Rage used for small spot fill detail. Don't remember if I used the 416 on the cowl. When sanded to final form, the 3/4oz glass cloth was applied over all of the fill areas. I know I used some 416 to feather the very minor edges of the cloth.
 
Darwin,
Your exact words were "brittle with time". Dry micro is certainly "brittle" in the Webster's sense. However, "with time" describes a change in material property as the mix ages. I don't believe this to be true.

As for fine filling and feathering, I don't find micro unsatisfactory in any way. I've posted the photo below previously. You're looking at epoxy/glass layups with nothing but epoxy/micro for filler. The only thing between the micro and the gray epoxy primer is a neat epoxy wipe for pinholes. No polyester filler, no urethane surfacer, no fine glass cloth. Nothing.

 
I think we're making progress here, although the usual thread drift has set in. Let's separate the applications and see if we have some consensus. Notes in parentheses are personal opinion.

Rage on bare sanded aluminum. Adhesion is poor, although it may be enough, whatever "enough" may be. (Not recommended.)

Epoxy/micro on bare sanded aluminum. Better adhesion. Adhesion increases as the mix is made more wet.

Rage over etch/alodine/epoxy primer on aluminum. This is where you might be fixing a previously unnoticed ding in a metal panel, typically as you move into the final finish process. Wipe in Rage or a glazing putty, feather sand, and spray more epoxy primer over it. (Conventional body shop practice, and perfectly reasonable. I'd suggest a bit of hammer and dolly work to minimize filler thickness. I wouldn't put a thick layer of any filler over an aluminum panel subject to flex.)

Rage over epoxy/glass or polyester/glass. Ok in thin wipes. Users don't seem comfortable with thick applications for shape and bury them under one ply of epoxy/glass. (I find no reason to use Rage in this application, except for minor pinhole and scratch fairing. When using filler to build shape, epoxy/micro is entirely reliable. For thick builds, properties can be modified with the addition of cabosil and/or flox. Flox mixes are harder to hand sand, but very, very tough.)

Rage over polyester gel coat. Shouldn't be a bond problem; both are polyester base. (It is assumed you're fixing flaws in the gel coat itself; scratches, dings, etc. When filling for shape I first remove the gel coat and use micro)

Mixed substrate; fairing glass to aluminum. A typical application might be a windshield base with glass cloth strip layups used to bond the windshield to the aluminum boot cowl. The key here is the bond between the filler and the aluminum surface. See above; seems like etch/alodine/primer is needed to ensure a reliable bond with Rage. (The required surface prep negates any speed advantage to using a fast-cure polyester filler. I'd suggest pre-wetting the aluminum surface with a neat epoxy rag wipe and applying epoxy/micro with enough thickness to exceed finished thickness at all points, then cut once for shape. No subsequent fabric overlay is required, but if it makes you happy.....)
 
Last edited:
Scott,
<<Dan, you are going to have one heck of a time getting a good chemical bond between primer coats using epoxy fillers---that is, unless you are willing to live with the imperfections of the fuselage that will inevitably appear after shooting that first coat of epoxy primer. Waiting for the epoxy filler to cure before sanding, and then having to go back to refeather, with undoubtedly close the chemical window for you. >>

A note regarding the cure time window. It depends on what you're spraying over the epoxy primer. If the next coat is urethane primer-surfacer or a finish coat, then yes, the maximum recoat window is 7 days (for PPG DPLF primer), and the reps all seem to recommend a much shorter time frame in practice (mine said "as soon as you can clean and reload the gun"). However, if you are willing to shoot another coat of epoxy primer, there is no recoat time window. You can scuff and reshoot at any time.

When working glass I shoot the first epoxy primer coat as a surface check, nothing more. I don't bother to clean the shop or try to be dust free; I just correct the surprise pinhole or scratch and set the part aside. For a serious fix (perhaps a big ripple or low spot) I would sand off the epoxy primer and re-fill using dry micro, but I haven't had to do that in years. Later when I switch to finish paint mode I'll start with a fresh coat of epoxy primer and work up from there.

Obviously the aluminum parts are a different deal; no pinholes and not much point in a surface check If I take out the polyester can it will for very minor corrections, and as you say I'll fix it quick and move on within the window.
 
Back
Top