Wanting an in-ear headset without the extravagant prices commanded by commercial vendors, I decided to roll my own. Total cost was $70 ($50 for the Comply headset, $10 for the Shure inline volume controller, $10 for heatshrink, Radio Shack project box. I contributed the mic and plugs from a gutted AvComm PNR cupped headset). I tested the set yesterday in the air, and it worked well. ATC said sound quality was fine (with a tone to stop bugging them after the third radio check). Noise attenuation of the Comply foam tips was a little better than my PNR cupped sets (QFC) - I'll try to borrow an ANR set to compare. Comfort was far better - flew 1.5 hours, didn't notice set or earpieces.
I roughly followed the links below, but as with Pete Howell, I just used the Shure volume controller and did not use any transformers, pots. Made things real easy.
http://www.canardzone.com/members/nickugolini/CuplessHeadet/cupless_headset.htm
Here's Pete Howell's VAF write-up: http://www.vansairforce.com/community/showpost.php?p=146229&postcount=12
http://www.cozy1200.com/geeklog/article.php?story=20070427102533266

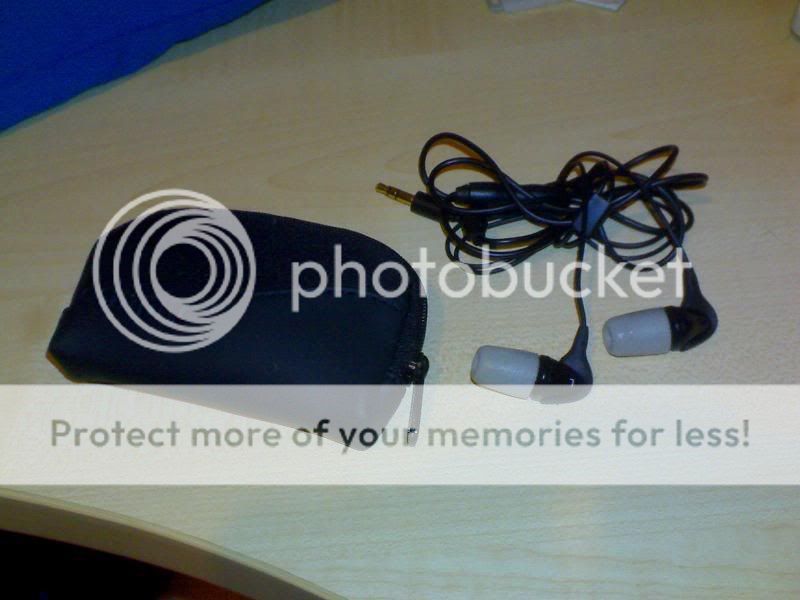
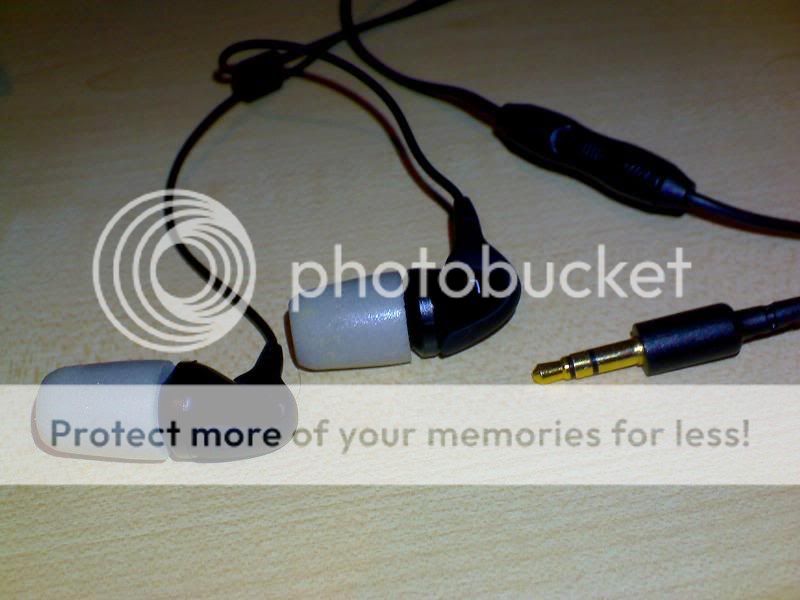
This is the completed set. I tried two earbuds - the Shure E2C @$65 (better sound quality for music) and the Comply set @ $50 (very comfortable tips, a little better sound blocking). Also note the Shure inline volume controller lower left - that plugs into box, then headset into that. Of note, I wanted a separate jack so I can take the headset away and use it for the mp3 player, etc.

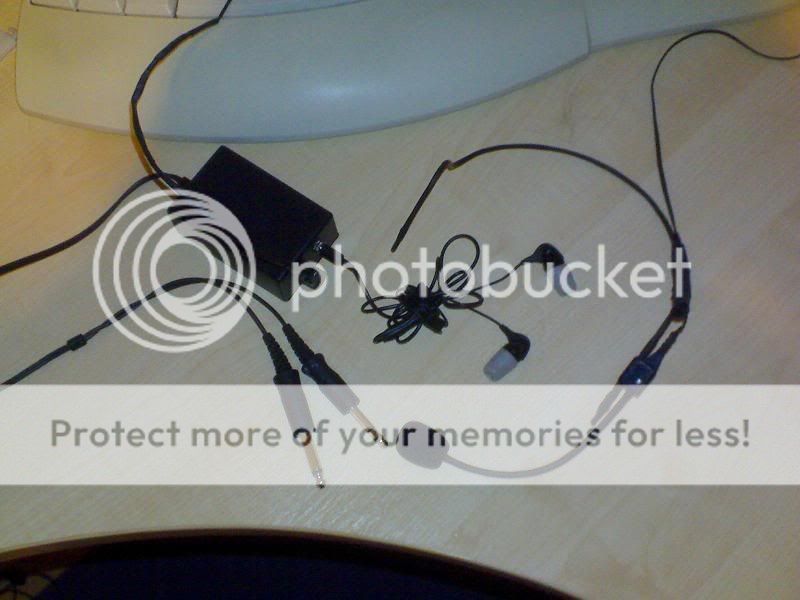
Here is the in vivo pic - I'm using the Shure ear buds, but used the Comply ones mostly inflight.
Details of construction:

Frame - To make the wire frame, I used some wire from a leftover Van's piano hinge. I made a prototype wire with a coat hanger, shaped for a bit until it felt comfortable - don't forget to move your head in all directions to ensure the set and mic stay in place. I then bent the hinge wire to the shape of the coat hanger template - these two steps alone took an hour. The trick with the latter is to try and 'roll' bends and not get kinks.
After wire hookups, heatshrink was applied for a more finished look. On my next set, I will try and keep the mic wires running along one side of the frame wire with epoxy before heatshrinking to provide a more polished look.
In the pic, the mic was just sitting here. I did not trim down the original AvComm mic, but others have. Weight was irrelevant, so I will do same next time. Plus, muff fit better on bigger mic body, and there was no time spent floxing a new body.

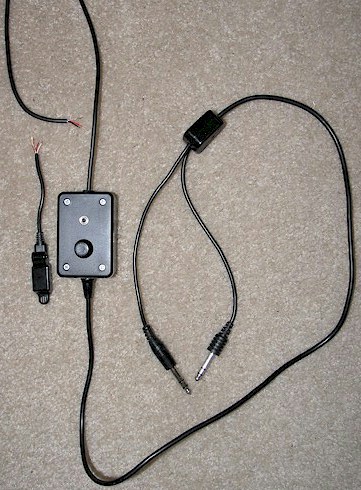
Here is the box - original headset wires from plugs come in, re-attached mic circuit chip (used to be in head cup) to appropriate wires, ran earphone wires to 1/8" stereo jack. On the latter, the planes I fly are mono intercoms, so I put a jumper between the right and left channel jack terminals - I will change this later when the RV is done, as I intend on a stereo set up. For the mic wires from the box to the mic, I used a piece of 2 conductor RCA patch cord from the scrap bin. Cord entries to the box were protected with strain relievers from the original headset. A little epoxy ensured no slippage.
That's about it. Works well, was cheap, and only was about 5 hours of work.
Thanks to Pete Howell and the others who blazed this fun project ahead of me,
Carl
I roughly followed the links below, but as with Pete Howell, I just used the Shure volume controller and did not use any transformers, pots. Made things real easy.
http://www.canardzone.com/members/nickugolini/CuplessHeadet/cupless_headset.htm
Here's Pete Howell's VAF write-up: http://www.vansairforce.com/community/showpost.php?p=146229&postcount=12
http://www.cozy1200.com/geeklog/article.php?story=20070427102533266
This is the completed set. I tried two earbuds - the Shure E2C @$65 (better sound quality for music) and the Comply set @ $50 (very comfortable tips, a little better sound blocking). Also note the Shure inline volume controller lower left - that plugs into box, then headset into that. Of note, I wanted a separate jack so I can take the headset away and use it for the mp3 player, etc.
Here is the in vivo pic - I'm using the Shure ear buds, but used the Comply ones mostly inflight.
Details of construction:
Frame - To make the wire frame, I used some wire from a leftover Van's piano hinge. I made a prototype wire with a coat hanger, shaped for a bit until it felt comfortable - don't forget to move your head in all directions to ensure the set and mic stay in place. I then bent the hinge wire to the shape of the coat hanger template - these two steps alone took an hour. The trick with the latter is to try and 'roll' bends and not get kinks.
After wire hookups, heatshrink was applied for a more finished look. On my next set, I will try and keep the mic wires running along one side of the frame wire with epoxy before heatshrinking to provide a more polished look.
In the pic, the mic was just sitting here. I did not trim down the original AvComm mic, but others have. Weight was irrelevant, so I will do same next time. Plus, muff fit better on bigger mic body, and there was no time spent floxing a new body.
Here is the box - original headset wires from plugs come in, re-attached mic circuit chip (used to be in head cup) to appropriate wires, ran earphone wires to 1/8" stereo jack. On the latter, the planes I fly are mono intercoms, so I put a jumper between the right and left channel jack terminals - I will change this later when the RV is done, as I intend on a stereo set up. For the mic wires from the box to the mic, I used a piece of 2 conductor RCA patch cord from the scrap bin. Cord entries to the box were protected with strain relievers from the original headset. A little epoxy ensured no slippage.
That's about it. Works well, was cheap, and only was about 5 hours of work.
Thanks to Pete Howell and the others who blazed this fun project ahead of me,
Carl
Last edited: