What's new
Van's Air Force

Don't miss anything! Register now for full access to the definitive RV support community.

Big FUBAR with NACA vent

[email protected]

Well Known Member
Well, there is the saying measure twice, cut once. I think I need to amend it tonight and say OPEN YOUR EYES and THINK before measuring the first or second time.

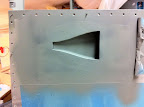
I layed out and cut my NACA vent backwards on my left side for rear vents. (After the skin was on the tail)
KenfgJOmTLjPf8jmAiWJE1gJywpgm2R2JhvUdIQsOuo

-- Followed the directions, but just getting a link for the photo sorry it did not embed.

Options as I see them:
1. Replace entire left skin...... NOT going to happen
2. Leave as is, use epoxy filler to fill in missing skin.
3. Add a large doubler under the entire NACA vent and recut the hole, still having to add some filler where the skin is missing.
4. Do #3, but also add small pieces in front of the doubler to bring flush to the skin.
5. ?????


Questions, Do I need to add the doubler? What should I fill it with?


I can't believe I did this... ARRRGGG.
Bill
 
Last edited:
Actually, despite the advice I gave in the other thread, this time i would replace the skin. The strength of the design resides largely in the skin and making a patch and doubler to fill the opening would be much more extensive than in the other guy's situation. I know the thought of drilling off the whole skin is horrible but you are talking to the guy who drilled off and replaced his HS skins because of some cosmetic dents.
 
BTW, those aren't true NACA ducts; they are quasi-NACA ducts since they have somewhat the same shape but definitely not the true dimensions. And unless you have run some definitive comparitive tests between these and a true curved-divergent-submeged duct, don't tell me how well they work. Dang near anything will work, but not well. A much more compact and better-flowing duct would be the NACA parallel-wall-submerged duct. It flows better than a true "NACA" duct at high flow rates, which is really what you want, and it's much easier to make.
 
Try not to beat yourself up too much. Some days we just shouldn't be in the shop.
I did one much like that and it can be repaired w/o replacing the skin.
I used a solution much like your option 3.
I made a doubler backing plate then made a pattern of the necessary shape
to fill in hole in the skin allowing for the vent opening.
Then I drilled a few holes for riveting and dimpled for countersunk rivets to
attach the doubler to the outer fill in piece.
Then drill the necessary holes to attach the doubler/fill in to the skin, countersink. Also drill the holes to fit the scoop.
Rivet everything in place and mix up some micro to fill in the seam around your fill in piece.
Sand when cured and when painted only you will know what happened....
And I'm sure you'll never tell.


Glenn Wilkinson
 
I agree, good job.

But I'll caveat that I am all for doing enhancement modifications while the area is easy to access. However, I think this one should wait until you have the fuselage since you can then use the NACA vent hole Van's makes in the forward fuselage as a template. Yours doesn't look quite the same...could just be me. I'm sure it'll work just fine.

Just one person's thoughts.

-Jim
 
Back
Top