What's new
Van's Air Force

Don't miss anything! Register now for full access to the definitive RV support community.

Help! Joining center and aft fuselage

wirejock

Well Known Member
I'm sure there's a trick. At least I hope so.
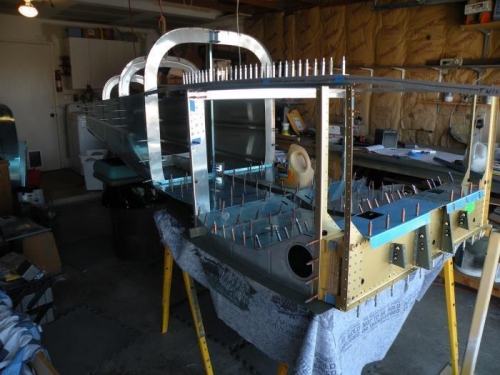
The center and aft fuse parts are joined at F706. No problem.
I clekoed the skin to the F704 assembly but the line of holes at F706 is off. The skin is a 1/4" below the aft fuse edge and all the holes are off by that much. I tried lifting the tail end but the whole fuse comes up.
Also, where does the longeron fit at F704H? It must be flush to the skin and ride on top of F704C/D but not sure.
Aggravated and time to ask instead of making more scrap.
 
It's been a while, but I seem to remember quite a lot of phenagling to get those to fit together well. I think I started clecoing on the bottom side (which is now up), and then wiggling the aft fuse to get the other holes to line up. I ended up using some carpenter's shims to get everything level on the sawhorses.

I'm not looking at a drawing, so I can't picture all the parts you reference, but maybe somebody with more recent experience will chime in.
 
Can ya post a pic of the problem area?

When I first joined the two sections I had an experienced "repeat offender" helping me. We joined the aft and center sections right side up... I didn't flip it upside down until well after the side skins were clecoed in place. Anyway, we had the center section sitting on a table and slid the aft section in, then adjusted everything until the holes lined up. Doing it upside down would be a challenge without some 2x4 extensions on the saw horses.

The longerons pass above the top ends of the F704 parts... there are four clips you make out of .063 alclad to tie the longerons to F704. Check location C3/C4 on DWG 23.

Edit: Dave's totally right, a package of wooden door frame shims from Lowe's came in really handy here!
 
Pics

Can ya post a pic of the problem area?

When I first joined the two sections I had an experienced "repeat offender" helping me. We joined the aft and center sections right side up... I didn't flip it upside down until well after the side skins were clecoed in place. Anyway, we had the center section sitting on a table and slid the aft section in, then adjusted everything until the holes lined up. Doing it upside down would be a challenge without some 2x4 extensions on the saw horses.

The longerons pass above the top ends of the F704 parts... there are four clips you make out of .063 alclad to tie the longerons to F704. Check location C3/C4 on DWG 23.

Edit: Dave's totally right, a package of wooden door frame shims from Lowe's came in really handy here!

I got frustrated and took the skin off. I will try again tomorrow and shoot a photo of the area. Thanks.
 
Some times you just have to hang it up and take a fresh look the next night. You'll get it.
 
Baggage area skins off

I do not know where I read it, but I took my baggage skins off the center section before joining the center and aft sections together.

I joined mine upside down and even with those skins off it took a lot of pushing, moving and swearing to get it together. In the end I found that by slowing raising the F-707 bulkhead everything lined up.

Here is where I tried to describe my process in my build log. May not be helpful but you are welcomed to look.

http://www.mykitlog.com/users/display_log.php?user=sdahrens&project=248&category=5097&log=104903&row=191

Good luck
 
Thanks

I do not know where I read it, but I took my baggage skins off the center section before joining the center and aft sections together.

I joined mine upside down and even with those skins off it took a lot of pushing, moving and swearing to get it together. In the end I found that by slowing raising the F-707 bulkhead everything lined up.

Here is where I tried to describe my process in my build log. May not be helpful but you are welcomed to look.

http://www.mykitlog.com/users/display_log.php?user=sdahrens&project=248&category=5097&log=104903&row=191

Good luck

Thanks Scott.
That's exactly what mine looks like. My longerons look short as well and the bends look to be in the wrong place. I checked all the measurements so it must be the same issue.
Your Kitlog helps a lot as well as this thread.
http://www.vansairforce.com/community/showthread.php?t=39880&highlight=F-770
Fingers crossed.
Tomorrow I will pull the baggage skins and try again.
 
Last edited:
Ok, I had this proble, there IS a piece on both sides that need to be trimmed, let me look and get back to you.
 
Here is a vid, off to work at the moment and don't have the plans but I think the aft vert arm rest bulk head needs trimmed, or the cross piece, sorry I don't have the part numbers in my brain at the moment but here is a vid

http://youtu.be/UQHa3OdgsoY
 
I did min alittle bit different. Because I was doing some forward cabin mock up work for a customer, I put everything on saw horses, clecoed them together. We then inverted the fuse and riveted the floor ribs to the floor. Aft side skins riveted, and the aft side of the forward skins to the F706 bulkhead area. Was alot more trouble, but everything lined back up where it originally was.
(I think if I were to do this again :eek:
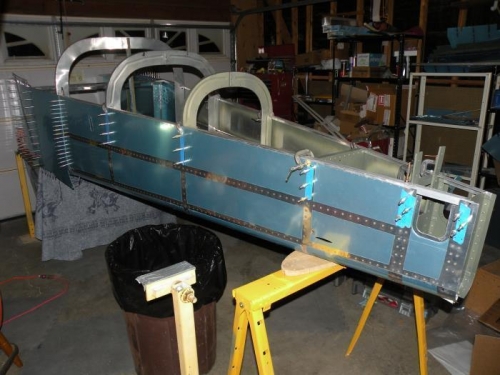
, I'd make a jig and leave off the side skins until all the systems were in. I'm short, so its tough to lean over the upper longeron to work.)
Tom
 
Larry,
Looking back through my log I didn't seem to have any issues with mating it. As I recall my issues came from getting saw horses and things to safely hold the pieces in place. I eventually put a piece of plywood down under the center section for support. Here is a link with some pictures that might help.
http://rvblog.thebrices.com/page/13/?chocaid=397

I dont remember trimming anything, either.
 
I did mine right side up. I first clecoed aft ends of the the baggage ribs to F-706 in the aft fuselage, then clecoed the forward side skins to the center fuselage. I then got my wife to raise and lower the aft fuselage at my direction until I could get a few clecos through the joint between the forward and aft side skins. At that point the bottom skins were lined up well enough to cleco.

FP22022014A0004B.jpg


FP22022014A0004D.jpg
 
Larry,
I just finished doing this join for the second time, after disassembling and doing the debur/dimple/prime routine. Both times, I had the difficulty you mentioned. Note that if you have the sections on sawhorses, the one under the rear fuselage supports only the rear fuse, then when the forward fuse is fitted over the bottom skin of the rear, it is unsupported at the joint, and its weight tends to make the rear fuse bottom skin (top of what you are working on, assuming the fuse is inverted) sag a bit. This causes the holes in the forward skin down the side along and behind the F-706 to be a little below the holes in the rear fuse skin. The best way I found to make it work was to install only a few clecoes in the F-704 center section near the cabin floor, just enough to support the weight of the skin. Then have a helper get under the canoe and lift up a little bit on the baggage area ribs just ahead of the joint. This helps to get the holes on the sides to line up, and then I clecoed both sides down this joint before clecoing the rest of the F-770 skins in place. Also, you might have to fiddle a little bit with shims under the F-704 uprights, or under the rear fuse just behind the joint, to get the angle just right. Between these two items, you can make it happen.
 
Got it!

Thanks everyone for the tips and big thanks to Doug for VAF. I would be futzing with empennage if not for VAF and all you gurus.
I will post my technique to the "gotchs" thread for others.

suveas.jpg
 
Hi Larry,

I did mine upside down like yours, but used 3 saw horses, one at the tail and two to hold a plywood table that supports both bulkheads on the center section. Some blocks and shims got everything into alignment.

I also cut up some scrap 2024 into strips to hold open the slots on the center section where the aft bottom skin slides into place under the ears of the baggage ribs. This allowed me to slowly wiggle it into place pull the alignment strips out once positive engagement was achieved.

Here's a photo of my setup:

http://www.mykitlog.com/users/displ...&project=2206&category=8689&log=204802&row=17
 
These are the notes from the day I put them together:

We jigged all the fuselage parts into proximity (leave the baggage floor skins off, for access to the joint) and they joined themselves together by magic while we watched. No, not really. It took a few minutes of adjusting the "sawhorse" heights and a few tugs to slide the bottom skins together at the 706 bulkhead. The next task was to cleco on the cabin side skins. I recommend installing a few 706 bulkhead clecos from the inside, to keep that bulkhead stable and allow room to attach a few cleco's through the same joint (including the cabin side skin) from the outside. This method worked really well at maintaining rigidity in the rear tailcone during assembly. The second side skin needed to be pulled a little bit to get the cleco's started but everything fell into place once a few were inserted.

Link to the page
 
Center fuse

Hey Bill.
I see you bucked the center section laying on a mechanic's creeper too!
My wife doesn't like ladders so we riveted on the floor. She prefers the gun so guess who gets to buck!
 
Hey Bill.
I see you bucked the center section laying on a mechanic's creeper too!
My wife doesn't like ladders so we riveted on the floor. She prefers the gun so guess who gets to buck!

Actually, it was just my back .. no creeper at all! Worked well, though!
 
Back
Top