-POSTING RULES

-Advertise in here!
-
Today's Posts
|
Insert Pics
Keep VAF
Going
Donate methods

Point your
camera app here
to donate fast.
|

04-21-2020, 09:50 AM
|
|
|
Join Date: Mar 2007
Location: Sonoma County
Posts: 4,450
|
|
Placed Timing Mark on back of prop.
I wanted to find a safe way to check the timing of my electronic ignition without being so close to the prop, and without the need for another person.
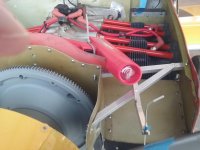
I made a bracket that would mount in the left inlet and allow an adjustable pointer to be mounted 3" from the back of the prop. I then set the timing that I wanted using the marks on the flywheel and a 32 oz yogurt container mounted to the nose cone with blue masking tape..... It had my cell phone mounted to it with blue masking tape also. With my Clinometer app, I had accuracy to within a 10th of a degree.
I then transferred the timing mark to the back of the prop and adjusted the pointer to alignment viewed from the pilots seat. I set the timing light in position close to the pointer secured to the top of the motor.
Waited till sunset, jumped in and fired it up..... perfect timing, with and without the vacuum line connected. So how accurate is it..... at that distance from the flywheel, 1/4 inch is one degree of movement.
__________________
VAF #897 Warren Moretti
2021 =VAF= Dues PAID
Last edited by gasman : 06-16-2022 at 12:50 PM.
|

04-21-2020, 12:07 PM
|
 |
|
|
Join Date: Oct 2005
Location: 08A
Posts: 10,835
|
|
Quote:
Originally Posted by gasman
I wanted to find a safe way to check the timing of my electronic ignition without being so close to the prop, and without the need for another person.
|
Very clever!
__________________
Dan Horton
RV-8 SS
Barrett IO-390
|

04-21-2020, 05:02 PM
|
 |
|
|
Join Date: Feb 2006
Location: Senoia, Georgia
Posts: 942
|
|
Quote:
Originally Posted by gasman
I wanted to find a safe way to check the timing of my electronic ignition without being so close to the prop, and without the need for another person.
I made a bracket that would mount in the left inlet and allow an adjustable pointer to be mounted 3" from the back of the prop. I then set the timing that I wanted using the marks on the flywheel and a 32 oz yogurt container mounted to the nose cone with blue masking tape..... It had my cell phone mounted to it with blue masking tape also. With my Clinometer app, I had accuracy to within a 10th of a degree.
I then transferred the timing mark to the back of the prop and adjusted the pointer to alignment viewed from the pilots seat. I set the timing light in position close to the pointer secured to the top of the motor.
Waited till sunset, jumped in and fired it up..... perfect timing, with and without the vacuum line connected. So how accurate is it..... at that distance from the flywheel, 1/4 inch is one degree of movement.
|
Warren,
Got any pics? I?ve never really enjoyed doing this task, especially alone. Scares the **** out me.
__________________
Jerry Esquenazi
RV-8 N84JE
|

04-21-2020, 05:33 PM
|
|
|
Join Date: Nov 2012
Location: Gilbert, AZ
Posts: 150
|
|
Timing
If you run without the cowl you can use the case split line and the timing marks on the back of the flywheel. Not sure what you are timing at but can adjust from the 25 degree mark on back of flywheel.
|

04-21-2020, 09:11 PM
|
|
|
Join Date: Mar 2007
Location: Sonoma County
Posts: 4,450
|
|
Quote:
Originally Posted by RV8Squaz
Warren,
Got any pics? I?ve never really enjoyed doing this task, especially alone. Scares the **** out me.
|
If you clocked your prop at 10 & 4 then bring #1 up to comp. and then set your timing marks as you normally do with the case split and your timing mark as a rough reference ( best to use a piston stop https://www.aircraftspruce.com/catal...iming_ind1.php) to find TDC and use your cell phone as I noted in the OP.
Your prop should now be between 10 and 11:00 as you sit in the airplane. I used blue masking tape with a 1/16" line cut from white electric tape. I placed the tape on the back of the prop perpendicular to the prop, about 6" from the spinner, mine is fixed pitch. Bend up a piece of wire as a pointer and find a way to temporarily set it on the inlet. Sit in the plane and adjust the pointer to line up with the white mark. Keep the pointer at least 3" away from the prop. Now just make braces so the pointer will stay still when you run the motor.
I do have pictures, just don't have a host..... Send me an E mail and I will send them to you.
__________________
VAF #897 Warren Moretti
2021 =VAF= Dues PAID
|

04-22-2020, 10:57 AM
|
|
|
Join Date: Mar 2007
Location: Sonoma County
Posts: 4,450
|
|
Quote:
Originally Posted by BobRv4
If you run without the cowl you can use the case split line and the timing marks on the back of the flywheel. Not sure what you are timing at but can adjust from the 25 degree mark on back of flywheel.
|
Electronic ignitions for the most part are set to TDC and the computer sets the timing. It needs to be confirmed with a timing light and the motor running at about 700 RPM. Usually this will take two people and one of them will be very close to a spinning prop standing on a box leaning over the motor with a timing light in one hand looking down the center of the case and trying to see a timing mark on the back of the flywheel.
The baffle behind the flywheel will also need to be removed to do this. And for any kind of accuracy, you will need to make a pointer that lines up with the case split and comes very close to the flywheel.
__________________
VAF #897 Warren Moretti
2021 =VAF= Dues PAID
|

04-23-2020, 08:54 AM
|
|
|
Join Date: Oct 2013
Location: Schaumburg, IL
Posts: 7,307
|
|
Quote:
Originally Posted by gasman
Electronic ignitions for the most part are set to TDC and the computer sets the timing. It needs to be confirmed with a timing light and the motor running at about 700 RPM. Usually this will take two people and one of them will be very close to a spinning prop standing on a box leaning over the motor with a timing light in one hand looking down the center of the case and trying to see a timing mark on the back of the flywheel.
The baffle behind the flywheel will also need to be removed to do this. And for any kind of accuracy, you will need to make a pointer that lines up with the case split and comes very close to the flywheel.
|
I made a pointer from -6 3003 tube (ends pinched in a vice and appropriately bent) and use a vice grip to hold it to the baffle attach support. You can get the pointer about 1/8" away from flywheel. Use the standard timing marks at the starter to set the engine at TDC then use a sharpie to draw a long, fat line on the flywheel at that pointer. I also like to put arrows left and right of the line in case the timing is off I will still see something to know how far off. You then don't need to get very close in order to see things while the engine is spinning or worry about trying to get your head over the case split line.
To keep the engine smoother, I set the EI for a fixed 25* timing and use the 25 degree mark instead of tdc for setting up the pointer and sharpie mark.
Larry
__________________
N64LR - RV-6A / IO-320, Flying as of 8/2015
N11LR - RV-10, Flying as of 12/2019
Last edited by lr172 : 04-23-2020 at 08:59 AM.
|

06-16-2022, 11:24 AM
|
|
|
Join Date: Mar 2007
Location: Sonoma County
Posts: 4,450
|
|
PICTURES.....
I updated the pictures into the thread and removed the old picture links.
This is the bracket mounted with wing nuts...

You can see the adjustable pointer with white tape on it. The timing light is secured in place close to the marks.
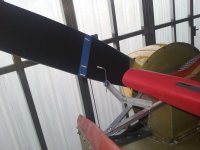
This next image you can see the tape on the prop with the timing marks I wanted to confirm .....
This last image was taken from the pilots seat with the canopy closed. The red glow is the timing light.
You can see the blue tape and the black prop with the strobe light reflection at 700 RPM.
 
__________________
VAF #897 Warren Moretti
2021 =VAF= Dues PAID
|

06-16-2022, 12:29 PM
|
|
|
Join Date: Feb 2008
Location: Calgary, Alberta
Posts: 1,840
|
|
What works for me.
Tape a 12" drill bit along the top crank case split, extended thru a hole in the forward baffle so it was within 1/8" of flywheel. Made timing mark very prominent by using white & black vinyl tape on the appropriate spot on the flywheel. Used a STABLE platform to stand on over the engine. Use a 'dumb' timing light (plain version without dwell adjustment). Cautiously time engine...
https://www.youtube.com/watch?v=5U8f8lAQe6I
__________________
Ralph
built a few RVs, rebuilt a few more, hot rodded more, & maintained/updated a big bunch more
Last edited by Ralph Inkster : 06-16-2022 at 01:45 PM.
|

06-16-2022, 05:47 PM
|
|
|
Join Date: Jun 2007
Location: new iberia la
Posts: 913
|
|
Timing marks
Way back when I was a helo mechanic we used reflective tape when tracking blades. Was highly visible even in bright daylight. This may work in this application.
Don Broussard
RV9 Rebuild in Progress
57 Pacer
|
Thread Tools |
Search this Thread |
|
|
Display Modes |
Linear Mode
|
Posting Rules
|
You may not post new threads
You may not post replies
You may not post attachments
You may not edit your posts
HTML code is Off
|
|
|
All times are GMT -6. The time now is 04:41 PM.
|