I see three areas that could be fixed if you want to eliminate these cracks from re-appearing after you have fixed them - two of which you mentioned.
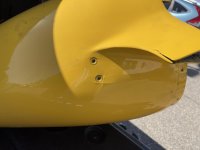
Putting carbon fiber in an area that is already cracked without addressing the reason for the crack will only move the stress failure to another place, possibly, because carbon fiber is stronger than fiberglass. The largest crack, at the trailing edge of both lower aft intersection fairings is because the initial installation was so tight it didn’t allow for any for/aft movement of the landing gear and the attached leg fairing. There should be enough wiggle room at the aft edge of the leg fairing to allow some flex without putting a load on the closed, immovable intersection fairing. Your intersection fairings look a little longer than most I have seen or built, which gives the leg fairing more ‘purchase’ on the lower intersection fairing and therefore more leverage to impart a force to cause a crack. To fix this you’ll need to sand out the uneven trailing edge areas of the cracks both inside and outside to clean it up and make ready for a fiberglass layup that will correct all this. You could also shorten the length of the intersection fairing if you want to and your leg fairing is long enough, but keep in mind, you may also need to repaint that leg fairing also if this is done. Of course, you will need to repaint the wheel pants when you are done with all of this, and the other two fixes. How do you do this? Make yourself an in place mold that will give you an increased gap at the aft edge of the intersection fairing after you have sanded the cracked areas aggressively and opened up he area to be re-glassed. Next put layers of epoxy wetted fiberglass over the gear leg fairing/mold, and epoxy it to the inside of the cracked intersection fairing. Here’s how I would do it: cut a couple pieces of thin aluminum to go over the gear leg fairing at the bottom, simulating where the intersection should lie in formation with it. This thin aluminum should be covered with heavy duty 3M packing tape - taped to the leg fairing, and then coated with carnoba car wax to prevent the epoxy soaked cloth from adhering to it. The wax is overkill, but ensures an easily removable mold. Make the aluminum mold wide enough at the aft edge to allow gear leg fairing aft edge fore and aft movement without impinging a load on the fixed lower intersection fairing. This little gap that you’ve created can (and should) be very thin, because the aft edge of the leg fairing is thin, and it will be barley noticeable, even to the trained eye. Then lay 3 or 4 layers of epoxy soaked fiberglass cloth over the waxed aluminum mold and attach the sanded, cleaned and now opened up wheel pant/intersection fairing on top of this wetted fiberglass leg leg firing. The wetted fiberglass will stick to the intersection fairing and not the gear leg fairing. You could also lay a layer or two to the outside of this intersection to give it a little more ‘meat’ and to close up any gap that may be visible from the original crack. If it ends up too thick, just get out your sander/grinder/sandpaper, and sand down on the outside to make it look like what you want. Writing all this down took me longer than it it would take to actually do this, and if you don’t like what you see, grind it back down and try again. Fiberglass, that none of us like to work with, is the most versatile and forgiving material that we work with on our riveted metal airplanes.
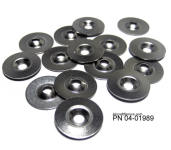
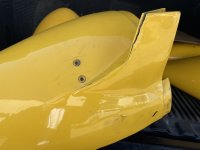
As far as the other two issues I mentioned before - the stress craters around the attach hole screws, and if you are working on this anyway, the stress cracks that appear to be coming from, possibly, your brake caliper impinging on the wheel pant surfaces because of zero clearance on the inside. You were right about adding a reinforcement layer or two to the inside of this screw attach area. Doesn’t need to be carbon fiber to work, but use what you want. The only thing you need to do to the outside of these areas is sand them down on the outside and fill the cracks with an epoxy based filler before doing the aforementioned painting of the wheel pant. Why only reinforce the area on the inside? Because you are trying to take out any preload on the area around the fastener. Get a bright light and place it so that the light from it hits the area around the wheel pant fasteners at a sharp angle. Then tighten down the fastener. If the reflected light shows any kind of deflection around the screw/fastener hole while tightening, you are putting a pre-load on that piece right at that point and will eventually crack, or show stress cracks, whether fiberglass, epoxy filler, polyester fillers (for sure), or plexiglass. Build up these areas from th back side to prevent this pre-load, and you eliminate future cracks.
As far as the stress like craters in your pictures on the lower part of the wheel pant - again, the wheel pant is hugging the landing gear assembly a little to tight, and possibly the brake caliper is causing that stress crack area - looks like it is.
Cut out the area in a small circle in the cracked area that coincides with the corner of your brake caliper. Make a rounded bubble out of that easily sandible green foam you get at a flower shop. Tape in place on the offending wheel pant-hole area, and lay 2 layers of 9oz clothe over this bubble. After cure - dig out the foam from the inside, clean it up with sand paper, etc, and lay another layer or two on the inside.
That’s what I would do anyway if it was mine. Doesn’t take that long, or cost much either, and the fixes should be permanent.


")