Although it's more expensive, I'm planning to use the Proseal (polysulfide) products that come in tubes and mix the contents before exiting the nozzle. There are a number of sizes and dispensers, from various vendors. Does anyone have some input on which ones seemed to work best for the wing tanks (RV-7)? I don't know how many oz. it takes to seal one tank. And there are some parts that get sealed before doing the main tank, so there would be a number of different volumes required in several sessions. So the availability of multiple sizes would seem best.

Van's Air Force
You are using an out of date browser. It may not display this or other websites correctly.
You should upgrade or use an alternative browser.
You should upgrade or use an alternative browser.
Proseal in Tubes
- Thread starter SonexGuy
- Start date

wirejock
Well Known Member
Flamemaster
No idea on the tubes but I used a can and a half of the Vans FlameMaster stuff on my 7A tanks. Maybe you can calculate.
i didn't find it messy or a problem at all. Mixed in batches and either spread it or filled a syringe and squeezed it. Easy. I did have a shattered leg at the time so maybe proseal was a welcome diversion.
Despite the warnings, I've used the remaining many times for non-aviation repairs and it still works just fine. Great stuff for fixing a leaky Thermorest Mattress!
Although it's more expensive, I'm planning to use the Proseal (polysulfide) products that come in tubes and mix the contents before exiting the nozzle. There are a number of sizes and dispensers, from various vendors. Does anyone have some input on which ones seemed to work best for the wing tanks (RV-7)? I don't know how many oz. it takes to seal one tank. And there are some parts that get sealed before doing the main tank, so there would be a number of different volumes required in several sessions. So the availability of multiple sizes would seem best.
No idea on the tubes but I used a can and a half of the Vans FlameMaster stuff on my 7A tanks. Maybe you can calculate.
i didn't find it messy or a problem at all. Mixed in batches and either spread it or filled a syringe and squeezed it. Easy. I did have a shattered leg at the time so maybe proseal was a welcome diversion.
Despite the warnings, I've used the remaining many times for non-aviation repairs and it still works just fine. Great stuff for fixing a leaky Thermorest Mattress!
PaulvS
Well Known Member
Youtube video
There is a Vans video by Scott McDaniels on Youtube that is recommended viewing. The process doesn't really lend itself to using cartridges, other than for the rear baffle.
I sealed my 6A tanks by mixing small batches around 30 g each and weighed out with a jewellers scale accurate to 0.1 g. Working time is 2 hours but after 30 minutes it becomes stickier and harder to spread.
Total quantity to seal both tanks was less than a quart can. If you use cartridges I think there will be a lot of wasteage and expense.
Paul Thomas
Well Known Member
Proseal is not something to be afraid of. I think it's a bigger deal online that the reality of working with it. It makes riveting slower and a bit more difficult because you can't really see the shop head. The big trick to it is to take your time and to clean up as you go.
How much you'll need depends on which method you use. With fay sealing vs. traditional method are going to have different requirements. Please look at Scott McDaniels video. I've built multiple tanks and still find it helpful.
If you are going to order in tubes like that, order a few and figure out what you need as you go. Shipping is not that big a deal in the grand scheme of things.
I bought a semco pneumatic gun and a handful of empty tubes, plungers and tips. I’d weigh out the material and mix it on a bondo board then load a tube. 60-80 grams was about right. The application of the proseal was very easy and smooth. I figured out that I could leave the tips messy when unscrewed and then the cured proseal pulled out easy. I would use a stick to get the plunger out of the tube and let the tube and plunger cure. All the proseal would peel off easy and then I reused the tubes and all over and over. It’s was a little extra work but the proseal always went where I wanted. For me it was a lot easier than bags or popsicle sticks.
The cheapest throwaway mixing board was $1 cookie sheets from the dollar store. I’d cut it in half. I also used the plastic cutting boards from there but liked throwing the cookie sheets away better than cleaning the plastic boards.
Anyway, it’s pretty cheap to waste some proseal from the quart cans learning some process. My tanks don’t leak either.
fixnflyguy
Well Known Member
"The tubes" are my favorite
I have experience with both cans and tubes of all sizes at my day job, (currently maintaining KC10 refueling tankers) , which leak a lot. I built my -4 also and from a simplicity point, almost failure proof mixing, prefer the tubes. For the KC-10's, we only use tubes as partial cans are too hard to control. As others have mentioned, the can may be cheaper in the long run since you can mix small amounts. When I built my RV-4 tanks a zillion years ago, I used tubes, probably about 4-6 of the 6 oz. size in , but I also like to topcoat my seams and fasteners with 1422-A, which is a thinner brushable sealant. The tubes come in various sizes, 2.5oz. and 6 oz. being the most common. I don't usually worry much about the throw away at the end, I'd rather mix a little too much than not enough once I start the sealing...if you are using the 2 hr, and have to take a break, throw it in the freezer and it will slow curing and usable after thaw.
I have experience with both cans and tubes of all sizes at my day job, (currently maintaining KC10 refueling tankers) , which leak a lot. I built my -4 also and from a simplicity point, almost failure proof mixing, prefer the tubes. For the KC-10's, we only use tubes as partial cans are too hard to control. As others have mentioned, the can may be cheaper in the long run since you can mix small amounts. When I built my RV-4 tanks a zillion years ago, I used tubes, probably about 4-6 of the 6 oz. size in , but I also like to topcoat my seams and fasteners with 1422-A, which is a thinner brushable sealant. The tubes come in various sizes, 2.5oz. and 6 oz. being the most common. I don't usually worry much about the throw away at the end, I'd rather mix a little too much than not enough once I start the sealing...if you are using the 2 hr, and have to take a break, throw it in the freezer and it will slow curing and usable after thaw.
Draker
Well Known Member
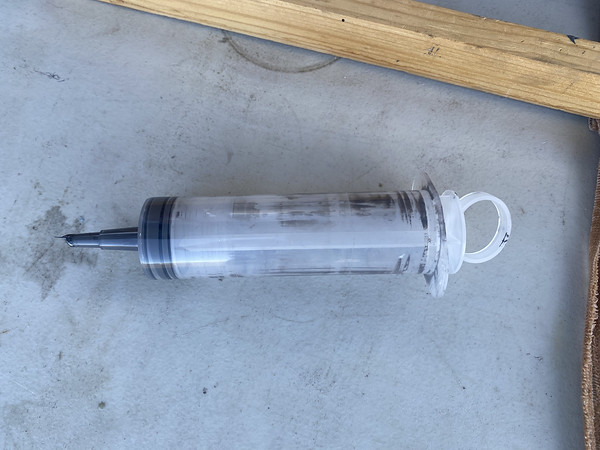
I had pretty good success with syringes like these: https://www.amazon.com/Pack-60ml-Syringe-Disposable-Hydroponics/dp/B07H3MH52R
Mix up about an ounce or so using a small scale, goop it into the syringes with a popsicle stick, and then spread the joy all over whatever you're working on. If you thoroughly clean the syringes afterwards, you can reuse them 5-6 times.
Mix up about an ounce or so using a small scale, goop it into the syringes with a popsicle stick, and then spread the joy all over whatever you're working on. If you thoroughly clean the syringes afterwards, you can reuse them 5-6 times.
wirejock
Well Known Member
Syringes
What ^ he said!
Yep. If you need extra mojo, drop the syringe into a caulking gun.
They are really useful for measuring paints. Pull the product right out of the can. Zero mess.
I buy the Rubberless 60ml catheter tip from Grainger. No silicone contamination and no rubber plunger popping off.
I had pretty good success with syringes like these: https://www.amazon.com/Pack-60ml-Syringe-Disposable-Hydroponics/dp/B07H3MH52R
Mix up about an ounce or so using a small scale, goop it into the syringes with a popsicle stick, and then spread the joy all over whatever you're working on. If you thoroughly clean the syringes afterwards, you can reuse them 5-6 times.
What ^ he said!
Yep. If you need extra mojo, drop the syringe into a caulking gun.
They are really useful for measuring paints. Pull the product right out of the can. Zero mess.
I buy the Rubberless 60ml catheter tip from Grainger. No silicone contamination and no rubber plunger popping off.
David Paule
Well Known Member
You can push the sealant, unmixed, into separate containers and weigh out what you need from there. That way you don't need to mix it all at once.
Dave
Dave
I can't say how many tubes to use for the -7, but I used 9 - 3.5 oz tubes for my -14 tanks. I think if you were a little more efficient, you could probably get away with using 7 tubes. This was my first build.
The tubes worked well as there is no question about weighing out the proper amount each time. Just mix them up and start squirting. Very neat. But do yourself a favour and buy the drill attachment mixing tool. Store unused tubes in the freezer and take them out about an hour before you're ready to use them.
The tubes worked well as there is no question about weighing out the proper amount each time. Just mix them up and start squirting. Very neat. But do yourself a favour and buy the drill attachment mixing tool. Store unused tubes in the freezer and take them out about an hour before you're ready to use them.
Lots of good info, so far, but be aware that when using the tubes, the sealant doesn’t mix as it comes out of the tube like it does for some adhesives.
You have to mix up the entire tube and then either use it all before the end of your work session or it is wasted.
The tubes are good if you can deal with this issue, and the challenge of getting it mixed correctly, which is not as easy to do as just mixing it on a pallet plate out in the open. That is likely the reason someone recommended the drill attachment which I agree with.
bruceh
Well Known Member
Skip the tubes. Buy some 100ml irrigation syringes from Amazon for about $2 each. Mix up about 50-60 grams of sealant from your quart can, then use a plastic knife or craft stick to fill the syringe. You can adjust the size of the bead by trimming the nozzle of the syringe. I just used these on a set of RV-10 tanks and it worked perfectly. After you are done, set the syringe aside and let the leftover sealant cure. You can pop out the cured sealant and reuse these syringes many times.
I had pretty good success with syringes like these: https://www.amazon.com/Pack-60ml-Syringe-Disposable-Hydroponics/dp/B07H3MH52R
I also had good results with 60ml syringes from Amazon.
Richard Connell
Well Known Member
I also had a lot of success with repurposing miniature caulking guns from the hardware store. I bought a $2 tube of water based construction adhesive. Squeeze it all out and wash tube in the dishwasher then fill it with proseal.
Holds about 7-8oz which is plenty for a 3/16 bead all around the rear baffle of a 10ER
Otherwise I find popsicle sticks and the short bit of tubing as described in Ken’s video the least messy way for the rest of it.
I have tried syringes on previous tank builds, but they require 2 hands. The mini gun is a one handed operation.
I built my RV-6 wing tanks using polysulfide cartridges and a pneumatic calking gun made for the cartridges. I prefer the 1/16" angle tips and use a drill operated mixer.
When using the B2 cure polysulfide cartridges, I prefer the 2 Oz size. I use to use the larger 3.5 oz size but as I get older and work slower, I waste too much as it starts to cure (gets thick) before I have use it.
When I built my RV-6, I calculated that it cost me twice the price in material compared to using the quart can and other techniques that were suggested by others. Building the RV-8, I used the same technique that I used on the RV-6.
Before I retired, I worked as an engineer. At one point in time, I was at Hughes Aircraft Company and was around polysulfide being used to keep water out of radars that we built. I have seen and learned a lot about how to use polysulfide and make leak proof seals. Polysulfide will not stick to a smooth surface and it will not stick to a dirty surface. Scuff everything that you want it to stick to and make sure it is very clean before application.
My RV-6 first flew in September 1997 and has accumulated over 3,550 hobbs hour of flight. The only fuel tank leaks so far have been leaking o-rings on the tank sumps.
I will not do fuel tank work with the quart cans. I will only use the premeasured cartridges.
cvairwerks
Well Known Member
One neatness trick you can do, is lay down a layer of 3/4” or wider tape just outside where you want the edge of the sealant. Apply the sealant, rivet or bolt as required and after a few minutes, peel the tape back and away from the wet sealant. It will leave a nice clean edge.

