What's new
Van's Air Force

Don't miss anything! Register now for full access to the definitive RV support community.

Instrument panel painting and printing-etching ?

BruceW

Well Known Member
Have a very nice -14 panel cut by Up North Aviation.
Bill does only the cutting.
Looking for recommendations for panel painting and printing-etching?
(my feeble VAF search found not much)

Checked and Steinair only works on their own panel builds due to current work load. Would prefer screenprint or etching rather than dry-rub transfers.
And of course, kit builder affordability.

Thanks.
 
Vinyl

If you have a CAD drawing for the panel cut, you're 90% done.
Import into Illustrator. Add the labels. Have it printed. Apply the vinyl.
It's A Wrap
 
Have a very nice -14 panel cut by Up North Aviation.
Bill does only the cutting.
Looking for recommendations for panel painting and printing-etching?
(my feeble VAF search found not much)

Checked and Steinair only works on their own panel builds due to current work load. Would prefer screenprint or etching rather than dry-rub transfers.
And of course, kit builder affordability.

Thanks.

You might check Aircraft Specialties or Aerosport Products. Aerosport recently painted and laser cut my panel. I don’t know if either companies will paint a panel that isn’t theirs, but it’s probably worth asking.
 
Panel label DIY?

Im bringing this post back because I still can’t find a great solution for switch lables and such.

I have a hand cut panel, so no CAD file.
I can paint it myself but need a good option for lables that look good. I assume no silk screen printer or lazer etch company can work on my 1 off panel. Heard from some about transfer ( rub on ) lables that you can print at home with some special equipment. Anyone know if this works?

Also heard of a company that will make the rub on labels for you but I don’t know how to design the proof to send them.

May find an artist to just paint the letters and I’ll clear coat over the whole thing. Seems too labor intensive in this modern age.

Any inputs? Thought I would save a bunch by cutting my own custom panel. And It came out great but if I have to put lable maker stickers on it- it’s not worth it.
 
Try Booth Manufacturing in Fort Pierce Florida. 772-465-4441-X258. [email protected]. Talk to Eric.

Excellent work, quick turn and reasonable prices.
 

Attachments

  • Panel3.jpg
    Panel3.jpg
    167.6 KB · Views: 175
  • Panel4.jpg
    Panel4.jpg
    191 KB · Views: 183
Consider having the panel anodised in your choice of colour then have the text engraved and paint filled?
 
Heard from some about transfer ( rub on ) lables that you can print at home with some special equipment. Anyone know if this works?

Check out DecalProFX

You make your own dry transfer. Print it, laminate it, transfer it, and to make it extremely durable you can use a clear coat.

I had good results previously and will use again.
 
Screen Printing - Find Aviation "Friendly" Printer

I found a local printer whose owner was a pilot and wanted to be user "friendly" to the EAB community (now 20+ years ago).

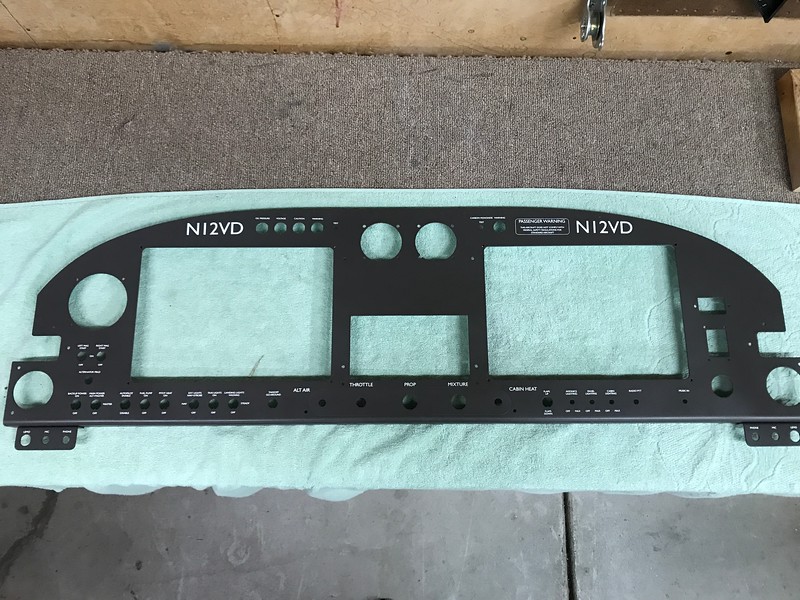
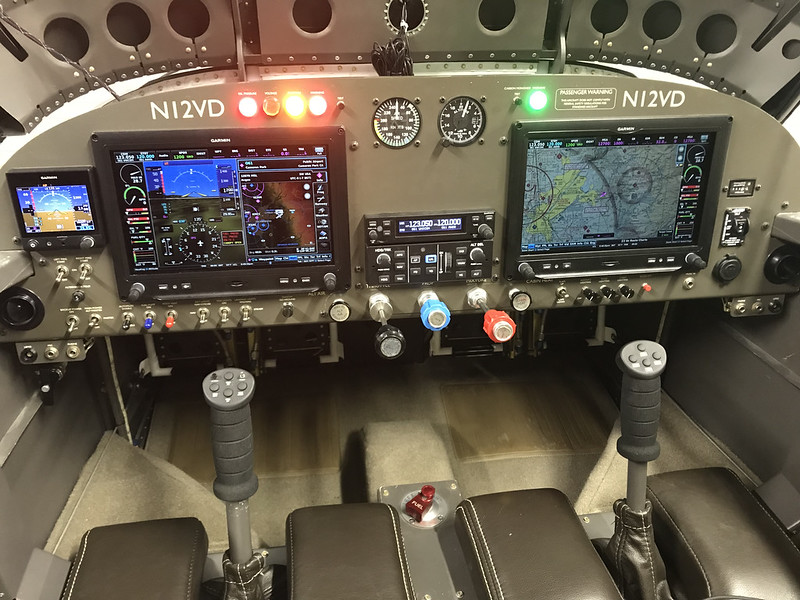
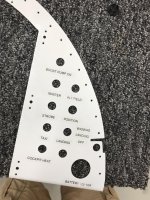
They were willing to work with me to print my call sign on the panel, and then all of the labels onto the lower sub panel - and did a beautiful job.

A couple of caveats: 1. You're paying for screen development for one item only - that can be pricey, depending on how badly you want that quality of finished product. 2. The screen print frame requires a completely flat surface (at least in the area to be printed), so any flanges, or protuberances can't get in the way of the screen.

In my case, the lower sub panel had a mounting flange that interfered with the print frame. So ... what I did was make a flat "overlay", matching the face dimensions of the panel, had that printed, and then installed as an "overlay" when finished. If done right, you can't tell there is an overlay there - I have had people look at the main panel & sub panel for 20 years now, and not one has ever ask about an overlay on the lower panel.

Sorry about the length ...

HFS

Also, because of the odd size of the print objects, and the nature of screen printing, you will need to make a holding "device" OK'ed by the printer to hold your work on their rotating table.

I used Pro-Screen Inc. in Fresno - but unless you are local, you'll need to find a printer near enough to you for a "walk-in". You need to be there in person for the "back & forth" required to get the job done.
 
I suggest you take into consideration how long your panel will last before you change something. Avionics upgrades are obvious but after your first flight you may find a great placement idea was not so great, and you want a change.

I’ve gone through a lot of new panels and build assuming that trend will continue. My first build is 20 years old and the on its fifth panel. The second build is 10 years old and one its third panel. My panels are hand cut using a scroll saw from standard panel blanks from Van’s. I use a dark gray PPG single stage urethane paint and the labels are white lettering on clear tape. If you get real close you can tell they are not silk screened, but most people don’t notice and only ask “who did your panel?”.

Always build with an eye toward maintenance.
Carl
 
Last edited:
I agree with Carl. Clear Rhino labels on polyurethane. Still perfect 3 years after application. I haven’t seen an RV panel more than two years old that didn’t get modified somehow.
 

Attachments

  • A5C3C081-459C-4AB9-B189-DB8CCA490533.jpg
    A5C3C081-459C-4AB9-B189-DB8CCA490533.jpg
    577.1 KB · Views: 137
I suggest you take into consideration how long your panel will last before you change something. Avionics upgrades are obvious but after your first flight you may find a great placement idea was not so great, and you want a change.

I’ve gone through a lot of new panels and build assuming that trend will continue. My first build is 20 years old and the on its fifth panel. The second build is 10 years old and one its third panel. My panels are hand cut using a scroll saw from standard panel blanks from Van’s. I use a dark gray PPG single stage urethane paint and the labels are white lettering on clear tape. If you get real close you can tell they are not silk screened, but most people don’t notice and only ask “who did your panel?”.

Alway build with an eye toward maintenance.
Carl

I have to agree with this. A lot of new builders want to build a factory-quality, award-winning panel right off the bat - and IGRF you are building a “standard configuration” then that might work. But in all the airplanes I have built, not one has the panel exactly as I conceived it during the design phase - switches get added or repurposed as technology changes and better ideas come along.

I cut my own panels and use a label-maker to apply switch text (neatly and nicely….) so that I can make changes/additions as required. And yea….I have won awards using this approach.

The message being, don’t let peer pressure make you go with a laser-cut, printed panel. Do it if you want to, but look at all the options and consequences of the choices.

Paul
 
Im bringing this post back because I still can’t find a great solution for switch lables and such.

I have a hand cut panel, so no CAD file.
I can paint it myself but need a good option for lables that look good. I assume no silk screen printer or lazer etch company can work on my 1 off panel. Heard from some about transfer ( rub on ) lables that you can print at home with some special equipment. Anyone know if this works?

Also heard of a company that will make the rub on labels for you but I don’t know how to design the proof to send them.

May find an artist to just paint the letters and I’ll clear coat over the whole thing. Seems too labor intensive in this modern age.

Any inputs? Thought I would save a bunch by cutting my own custom panel. And It came out great but if I have to put lable maker stickers on it- it’s not worth it.

I did everything in Word. Keeping modifying fonts and spacing until it works on paper. Then buy the water based slide off (the the old model decals) material that goes in a laser printer. You get a good amount of time to move around untill aligned. The shoot a couple coats of clear over the whole panel, followed by a cut and buff and the label edges disappear. It is easier to make long labels that cover many switches and sometimes even top and bottom. On my panels, you cannot tell it wasn't custom unless you get your eyes a couple of inches away. Should be under $15
 
Last edited:
I have to agree with this. A lot of new builders want to build a factory-quality, award-winning panel right off the bat - and IGRF you are building a “standard configuration” then that might work. But in all the airplanes I have built, not one has the panel exactly as I conceived it during the design phase - switches get added or repurposed as technology changes and better ideas come along.

I cut my own panels and use a label-maker to apply switch text (neatly and nicely….) so that I can make changes/additions as required. And yea….I have won awards using this approach.

The message being, don’t let peer pressure make you go with a laser-cut, printed panel. Do it if you want to, but look at all the options and consequences of the choices.

Paul

Ditto. I was thinking the same thing. No reason to over think it. Heck, I won an OSH award with a rattle can painted panel and labels printed on a laser printer at home. As far as I know, it is still flying just fine 16yrs later.
The next one isn't much different.
 
I painted mine with rattle can Rustoleum, wet sanded down to something like 2000 grit, then applied rub-on labels, then went over everything with clear coat.


For the labels I went with https://www.rubontransfers.net. Sent an Adobe Illustrator file and received the labels in the mail. I got three copies printed in case I screwed any of them up. For layout, I tried to do them in rows so that I could apply an entire strip to do multiple switches, guaranteeing they lined up properly on the panel and didn't end up crooked.

 
Some good ideas here that I won't repeat other than to support the idea of allowing for change.

My first (steam gauge) panel was silk screened and over time wound up with several stickers over original labels. On my second panel (when I went to glass) I used the DecalPro FX system so I could do it myself and be able to change it. And glad I did, since I've already did things like add and change some switches, and I was able to change the lettering so it looks like it's original.

DecalPro FX decals wind up looking just like silk screening and hold up well. At first glance you wouldn't think it's changeable but you can get the old off with rubbing alcohol, then make and apply the new lettering in its place.

The downside is, making and applying the decals it is a somewhat involved and fussy process and tricky to get right with the small / thin lettering on our panels, so I might look at one of the rub on transfer options if I were to do it again.
 
Check out DecalProFX

You make your own dry transfer. Print it, laminate it, transfer it, and to make it extremely durable you can use a clear coat.

I had good results previously and will use again.

They are out of business. Any other good quality home print transfer?

Max
 
I used superioraircraftcomponents.com Did a great job. Inexpensive. Quick turnaround. UV 4-color printing instead of screen printing.
 
Back
Top