

I removed both Pmags and installed an SDS CPI-2 ignition on my carburated Lycoming O235-L2C engine in my RV-9a. I know that the vast majority of PMags perform without problems, unfortunately mine didn't. Long term ignition reliability was my main concern and here are my reasons for this conversion:
1. I reached my limit checking bearing integrity at every oil change and sending both Pmags back to the factory five times or about every 100 hours to replace worn bearings and occasionally requiring the replacement of the circuit boards and internal PMag alternator. I see that Emagair now recommends that the Pmags be removed every 100 hours to check bearing integrity. I lost confidence in the robustness and airworthiness of the PMag design. Both PMags have the newer version V.4 firmware.
2. I wanted an ignition that would not lose its reference to TDC, which happened to me on many occasions and 3 times requiring emergency landings on one mag. Once the bearing or magnet integrity is lost then timing becomes erratic and in my case severely advancing the timing curve. I was too slow to do a mag check and didn't turn off the problem mag in time. This catastrophic pre-ignition quickly destroyed my engine. I decided to purchase a brand new Lycoming engine rather than rebuild the old destroyed engine. The new engine came with slick mags and I had no ignition problems with them for about 300 hours. I decided to give the Pmags another shot and re-installed them, and the bearing problems started all over again.
3. Brad could only speculate that my engine might have had an accessory case gear train resonance that was destroying the bearings. It's a brand new factory built Lycoming engine and I had the same PMag problems with my last engine. My plane has a light weight Catto composite prop which possibly may have caused my new and old engine to not smoothly spin this low rotational inertia prop and created a gear train resonance. Brad actively listened but had no answer to the premature bearing failure and was unable to solve these ongoing serious PMag problems.
4. I did not feel comfortable with the long term reliability of having the ignition timing electronics and CPU bolted directly onto a heat soaked engine and having to endure repeated temperature excursions and engine vibration. Emagair recommends keeping the PMags and engine temperatures below 200 deg. Occasionally on hot days my engine oil temperature gets up to 240 deg F and the required PMag blast tubes are useless when the engine is turned off. I feel way more comfortable having the control module and timing electronics mounted in a cooler and lower stress environment inside the cabin.
5. I felt that the canned PMag timing curve of 35-40 degrees BTDC was way too advanced for an engine that was specified at 25 degrees BTDC. I wanted the ability to easily "set and forget" my own designed advance curve while; remaining in my engines power curve, maximizing fuel efficiency, preventing detonation, and lowering CHT's.
6. I was fed up with having to cancel flying engagements with friends while I had to stay at home or in the hanger while my mags were back at the factory.
7. I wanted a more robust ignition with no moving parts that could wear out.
8. I wanted the ability to quickly and easily increase the advance curve during LOP cross country flights.
9. I wanted the ability to view the current firing angle on the controller mounted in the panel to be sure at a glance that both ignitions were firing as programmed.
10. I need to feel comfortable that I am using the most reliable products and getting the best long term performance from every vital component.
11. Excellent customer service is an "absolute must" for me. I read all the reviews on VAF and corresponded with a few SDS customers, and they all confirmed that customer service at SDS was outstanding. Fortunately, I have not called SDS since the installation 4 years ago and 600 hours of flight time.
I am a diligent builder and mechanic. It took me a total of 55 hours to completely remove the PMag setup and retrofit the CPI-2 ignition. This included drilling holes and mounting magnets in the flywheel, installing Hall-Effect sensors, coils, controller, CPU, all new wiring, strobe light engine timing, and controller programming. The firing angle for my engine is specified at 25 deg BTDC. I started out using the CPI-2 conservative RPM-MAP advance curve which at idle fires at 23 deg BTDC and smoothly advances to 26 deg BTDC as a function of MP and RPM. Additionally, by pressing the LOP button the user defined curve advances when cruising at higher altitudes. I made one minor modification to the timing table, and I am delighted that there have been absolutely no ignition problems.
Previously, I had to set the PMag canned timing "A Curve" with jumper wire installed to 10 deg ATDC rather than TDC to decrease high CHTs. My #4 cylinder was always about 30-40 deg F hotter than the rest and baffle changes only had a small effect on reducing temperature. I was always having to compensate for high CHTs by slowly climbing to cruising altitude. My first CPI-2 hour long flight at cruising speed was uneventful. On my second flight I climbed at 1100 FPM from sea level to 5000 feet and the highest #4 CHT observed was 389 deg verses the previous 415-425 deg that I was used to dealing with at slow VS climbs. I was delighted that the CHTs and the temperature range was lower.
I installed a complete Dynon HDX system last year, and I anticipated installing an electronic ignition which also requires a 12 v. BACKUP battery. So, I installed an EarthX, 6.2ah, 2.2 lb, LiFePO4 BACKUP battery which should provide a minimum of 45 minutes of reserve power for the CPI-2 ignition and essential avionics in case of an alternator, main battery, or main buss fault that requires switching OFF the MASTER or ALT. The BACKUP battery is charged and isolated from the master buss and starter circuit by 2 large 10A Schottke diodes. The BACKUP battery is normally switched ON before start to supply backup power to the avionics and remains ON during flight up to keep it fully charged and ready to supply reserve power instantly in case the master voltage is interrupted. The BACKUP battery is switched OFF at shut down to keep it in a charged state and to prevent it from back feeding current into the avionics buss.
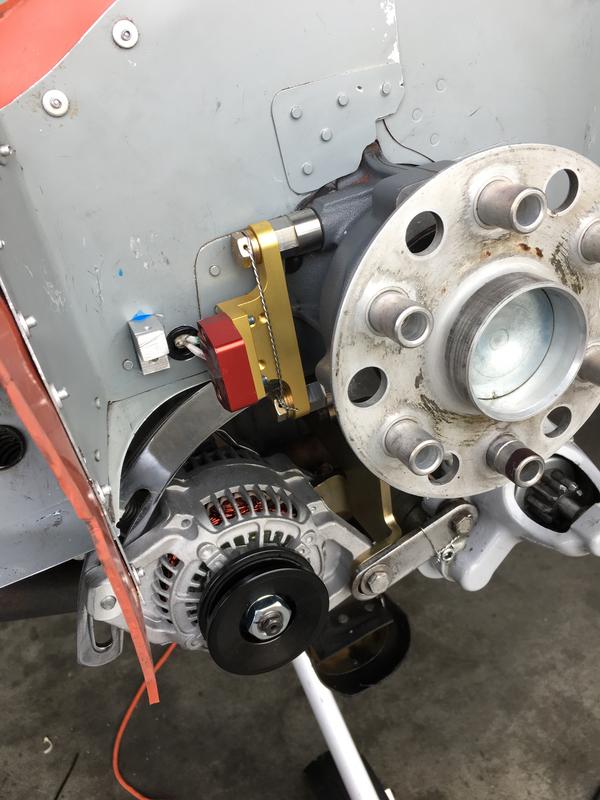
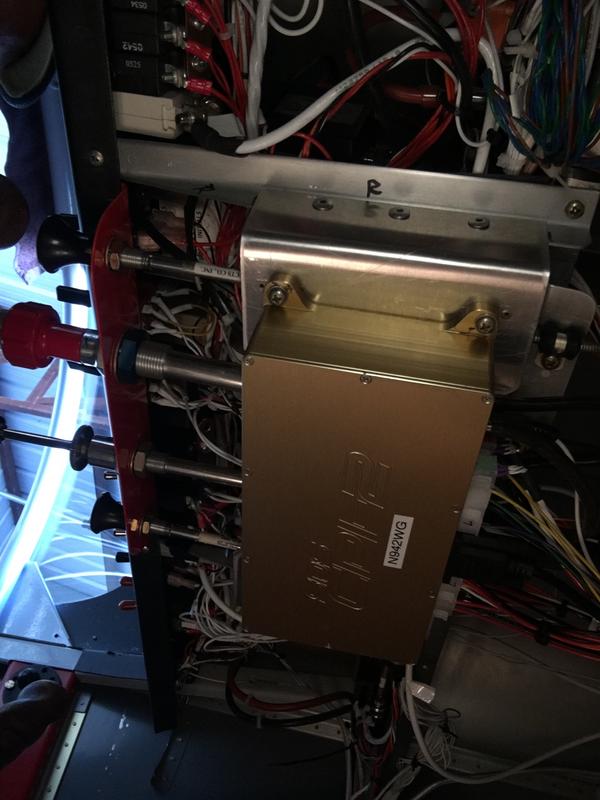
I planned this conversion for about a year waiting for the CPI-2 to get released into production and to accumulate some flight time. I called SDS on numerous occasions to ask questions and always received a knowledgeable response. I worked in the electronics industry for many years and felt that this design would be a big improvement over the numerous problems that I had with PMags. I decided to purchase the SDS system and all my previous ongoing electronic ignition issues ended after this conversion. Ross and Barry were very supportive after the purchase answering questions and mailing me parts usually with overnight delivery. I followed the backup battery wiring diagram outlined in the Installation Manual, and I called Barry a few times with questions. Now, after 4 years and 600 hours of use the SDS ignition has been maintenance free, and I have not had to remove or service the CPU or modify the program. Here are a few photos of the installation showing the dual Hall Effect sensor triggered by magnets mounted in the flywheel. The dual ECU is mounted under the throttle quadrant where it remains at cabin temperature and is out of the way and easy to service. I bolted an aluminum block near the sensor wires as added protection from fan belt issues.
1. I reached my limit checking bearing integrity at every oil change and sending both Pmags back to the factory five times or about every 100 hours to replace worn bearings and occasionally requiring the replacement of the circuit boards and internal PMag alternator. I see that Emagair now recommends that the Pmags be removed every 100 hours to check bearing integrity. I lost confidence in the robustness and airworthiness of the PMag design. Both PMags have the newer version V.4 firmware.
2. I wanted an ignition that would not lose its reference to TDC, which happened to me on many occasions and 3 times requiring emergency landings on one mag. Once the bearing or magnet integrity is lost then timing becomes erratic and in my case severely advancing the timing curve. I was too slow to do a mag check and didn't turn off the problem mag in time. This catastrophic pre-ignition quickly destroyed my engine. I decided to purchase a brand new Lycoming engine rather than rebuild the old destroyed engine. The new engine came with slick mags and I had no ignition problems with them for about 300 hours. I decided to give the Pmags another shot and re-installed them, and the bearing problems started all over again.
3. Brad could only speculate that my engine might have had an accessory case gear train resonance that was destroying the bearings. It's a brand new factory built Lycoming engine and I had the same PMag problems with my last engine. My plane has a light weight Catto composite prop which possibly may have caused my new and old engine to not smoothly spin this low rotational inertia prop and created a gear train resonance. Brad actively listened but had no answer to the premature bearing failure and was unable to solve these ongoing serious PMag problems.
4. I did not feel comfortable with the long term reliability of having the ignition timing electronics and CPU bolted directly onto a heat soaked engine and having to endure repeated temperature excursions and engine vibration. Emagair recommends keeping the PMags and engine temperatures below 200 deg. Occasionally on hot days my engine oil temperature gets up to 240 deg F and the required PMag blast tubes are useless when the engine is turned off. I feel way more comfortable having the control module and timing electronics mounted in a cooler and lower stress environment inside the cabin.
5. I felt that the canned PMag timing curve of 35-40 degrees BTDC was way too advanced for an engine that was specified at 25 degrees BTDC. I wanted the ability to easily "set and forget" my own designed advance curve while; remaining in my engines power curve, maximizing fuel efficiency, preventing detonation, and lowering CHT's.
6. I was fed up with having to cancel flying engagements with friends while I had to stay at home or in the hanger while my mags were back at the factory.
7. I wanted a more robust ignition with no moving parts that could wear out.
8. I wanted the ability to quickly and easily increase the advance curve during LOP cross country flights.
9. I wanted the ability to view the current firing angle on the controller mounted in the panel to be sure at a glance that both ignitions were firing as programmed.
10. I need to feel comfortable that I am using the most reliable products and getting the best long term performance from every vital component.
11. Excellent customer service is an "absolute must" for me. I read all the reviews on VAF and corresponded with a few SDS customers, and they all confirmed that customer service at SDS was outstanding. Fortunately, I have not called SDS since the installation 4 years ago and 600 hours of flight time.
I am a diligent builder and mechanic. It took me a total of 55 hours to completely remove the PMag setup and retrofit the CPI-2 ignition. This included drilling holes and mounting magnets in the flywheel, installing Hall-Effect sensors, coils, controller, CPU, all new wiring, strobe light engine timing, and controller programming. The firing angle for my engine is specified at 25 deg BTDC. I started out using the CPI-2 conservative RPM-MAP advance curve which at idle fires at 23 deg BTDC and smoothly advances to 26 deg BTDC as a function of MP and RPM. Additionally, by pressing the LOP button the user defined curve advances when cruising at higher altitudes. I made one minor modification to the timing table, and I am delighted that there have been absolutely no ignition problems.
Previously, I had to set the PMag canned timing "A Curve" with jumper wire installed to 10 deg ATDC rather than TDC to decrease high CHTs. My #4 cylinder was always about 30-40 deg F hotter than the rest and baffle changes only had a small effect on reducing temperature. I was always having to compensate for high CHTs by slowly climbing to cruising altitude. My first CPI-2 hour long flight at cruising speed was uneventful. On my second flight I climbed at 1100 FPM from sea level to 5000 feet and the highest #4 CHT observed was 389 deg verses the previous 415-425 deg that I was used to dealing with at slow VS climbs. I was delighted that the CHTs and the temperature range was lower.
I installed a complete Dynon HDX system last year, and I anticipated installing an electronic ignition which also requires a 12 v. BACKUP battery. So, I installed an EarthX, 6.2ah, 2.2 lb, LiFePO4 BACKUP battery which should provide a minimum of 45 minutes of reserve power for the CPI-2 ignition and essential avionics in case of an alternator, main battery, or main buss fault that requires switching OFF the MASTER or ALT. The BACKUP battery is charged and isolated from the master buss and starter circuit by 2 large 10A Schottke diodes. The BACKUP battery is normally switched ON before start to supply backup power to the avionics and remains ON during flight up to keep it fully charged and ready to supply reserve power instantly in case the master voltage is interrupted. The BACKUP battery is switched OFF at shut down to keep it in a charged state and to prevent it from back feeding current into the avionics buss.
I planned this conversion for about a year waiting for the CPI-2 to get released into production and to accumulate some flight time. I called SDS on numerous occasions to ask questions and always received a knowledgeable response. I worked in the electronics industry for many years and felt that this design would be a big improvement over the numerous problems that I had with PMags. I decided to purchase the SDS system and all my previous ongoing electronic ignition issues ended after this conversion. Ross and Barry were very supportive after the purchase answering questions and mailing me parts usually with overnight delivery. I followed the backup battery wiring diagram outlined in the Installation Manual, and I called Barry a few times with questions. Now, after 4 years and 600 hours of use the SDS ignition has been maintenance free, and I have not had to remove or service the CPU or modify the program. Here are a few photos of the installation showing the dual Hall Effect sensor triggered by magnets mounted in the flywheel. The dual ECU is mounted under the throttle quadrant where it remains at cabin temperature and is out of the way and easy to service. I bolted an aluminum block near the sensor wires as added protection from fan belt issues.
Last edited:


